How to create a local IoT broker with Greengrass and connect it to the AWS cloud
Introduction
Greengrass is a software developed by Amazon Web Services (AWS) for the deployment of local compute, messaging, and data caching capabilities for Internet of Things (IoT) devices. This allows IoT devices to operate even when disconnected from the cloud and enables real-time local processing and the ability to respond quickly to events. One common deployment scenario for Greengrass is using a small, low-power IoT device as the core device. These devices, such as the Raspberry Pi, can be configured to run Greengrass and connected to sensors and actuators. This allows for data to be collected and processed locally on the IoT device, and then securely sent to the cloud for further analysis and storage. This approach can be particularly useful in situations where a reliable internet connection may not be available or where low latency is crucial. In situations where more CPU power is needed, a more powerful device can be used as the IoT core. For example, a larger single-board computer like the NUC or Intel's IoT gateway could be used, providing more processing power and storage capacity for more demanding workloads. Additionally, the ability to run AWS Lambda functions on the IoT device with Greengrass enables the execution of specific business logic on the device itself, reducing the need to constantly send data to the cloud.
Prerequisites
Disclaimer: This tutorial is for people that know the basics of AWS and can read code.
What you need to follow this tutorial:
Hardware
- Raspberry Pi (Recommended is a Pi 3 or 4. For setting up a Zero, check out this video)
- SD Card
- Electricity (Duh!)
Software
- AWS IoT Greengrass Core software: This is the software that runs on the Raspberry Pi and provides local compute and communication capabilities for connected devices. It can be downloaded from the AWS IoT Greengrass website.
- Operating System: Greengrass v2 supports Linux or Windows. In this tutorial, I'm going to use Raspberry Pi OS.
- Python: Greengrass uses python as its primary programming language. It requires python 3.7 or higher.
- pip
- virtualenv
Also, grab a cup of coffee, you'll need it. Go ahaid, I'll wait for you.

Local Setup
There are plenty of tutorials on how to set up a Raspberry Pi, so I won’t go through this topic. If you need a tutorial, please read the official documentation, most tutorials are outdated on how to set up a pi: https://www.RaspberryPi.com/documentation/computers/getting-started.html
Just make sure, it has SSH and access to the internet.
SSH onto your Raspberry and install the following software.
But first, let’s update our raspberry:
sudo apt update && sudo apt upgrade -y
Install Java:
sudo apt install default-jdk
check if Java is installed with:
java --version
you should get a version from this command, like this:
openjdk 11.0.16 2022-07-19
OpenJDK Runtime Environment (build 11.0.16+8-post-Raspbian-1deb11u1)
OpenJDK Server VM (build 11.0.16+8-post-Raspbian-1deb11u1, mixed mode)
Cloud Setup
Go to the AWS Management Console and head over to IAM. We need a User. Give that User programmatic access and make sure to save the Access and Private Key. You’ll need the user just to pull the correct data during the Greengrass installation. When that is done, you can delete that user.
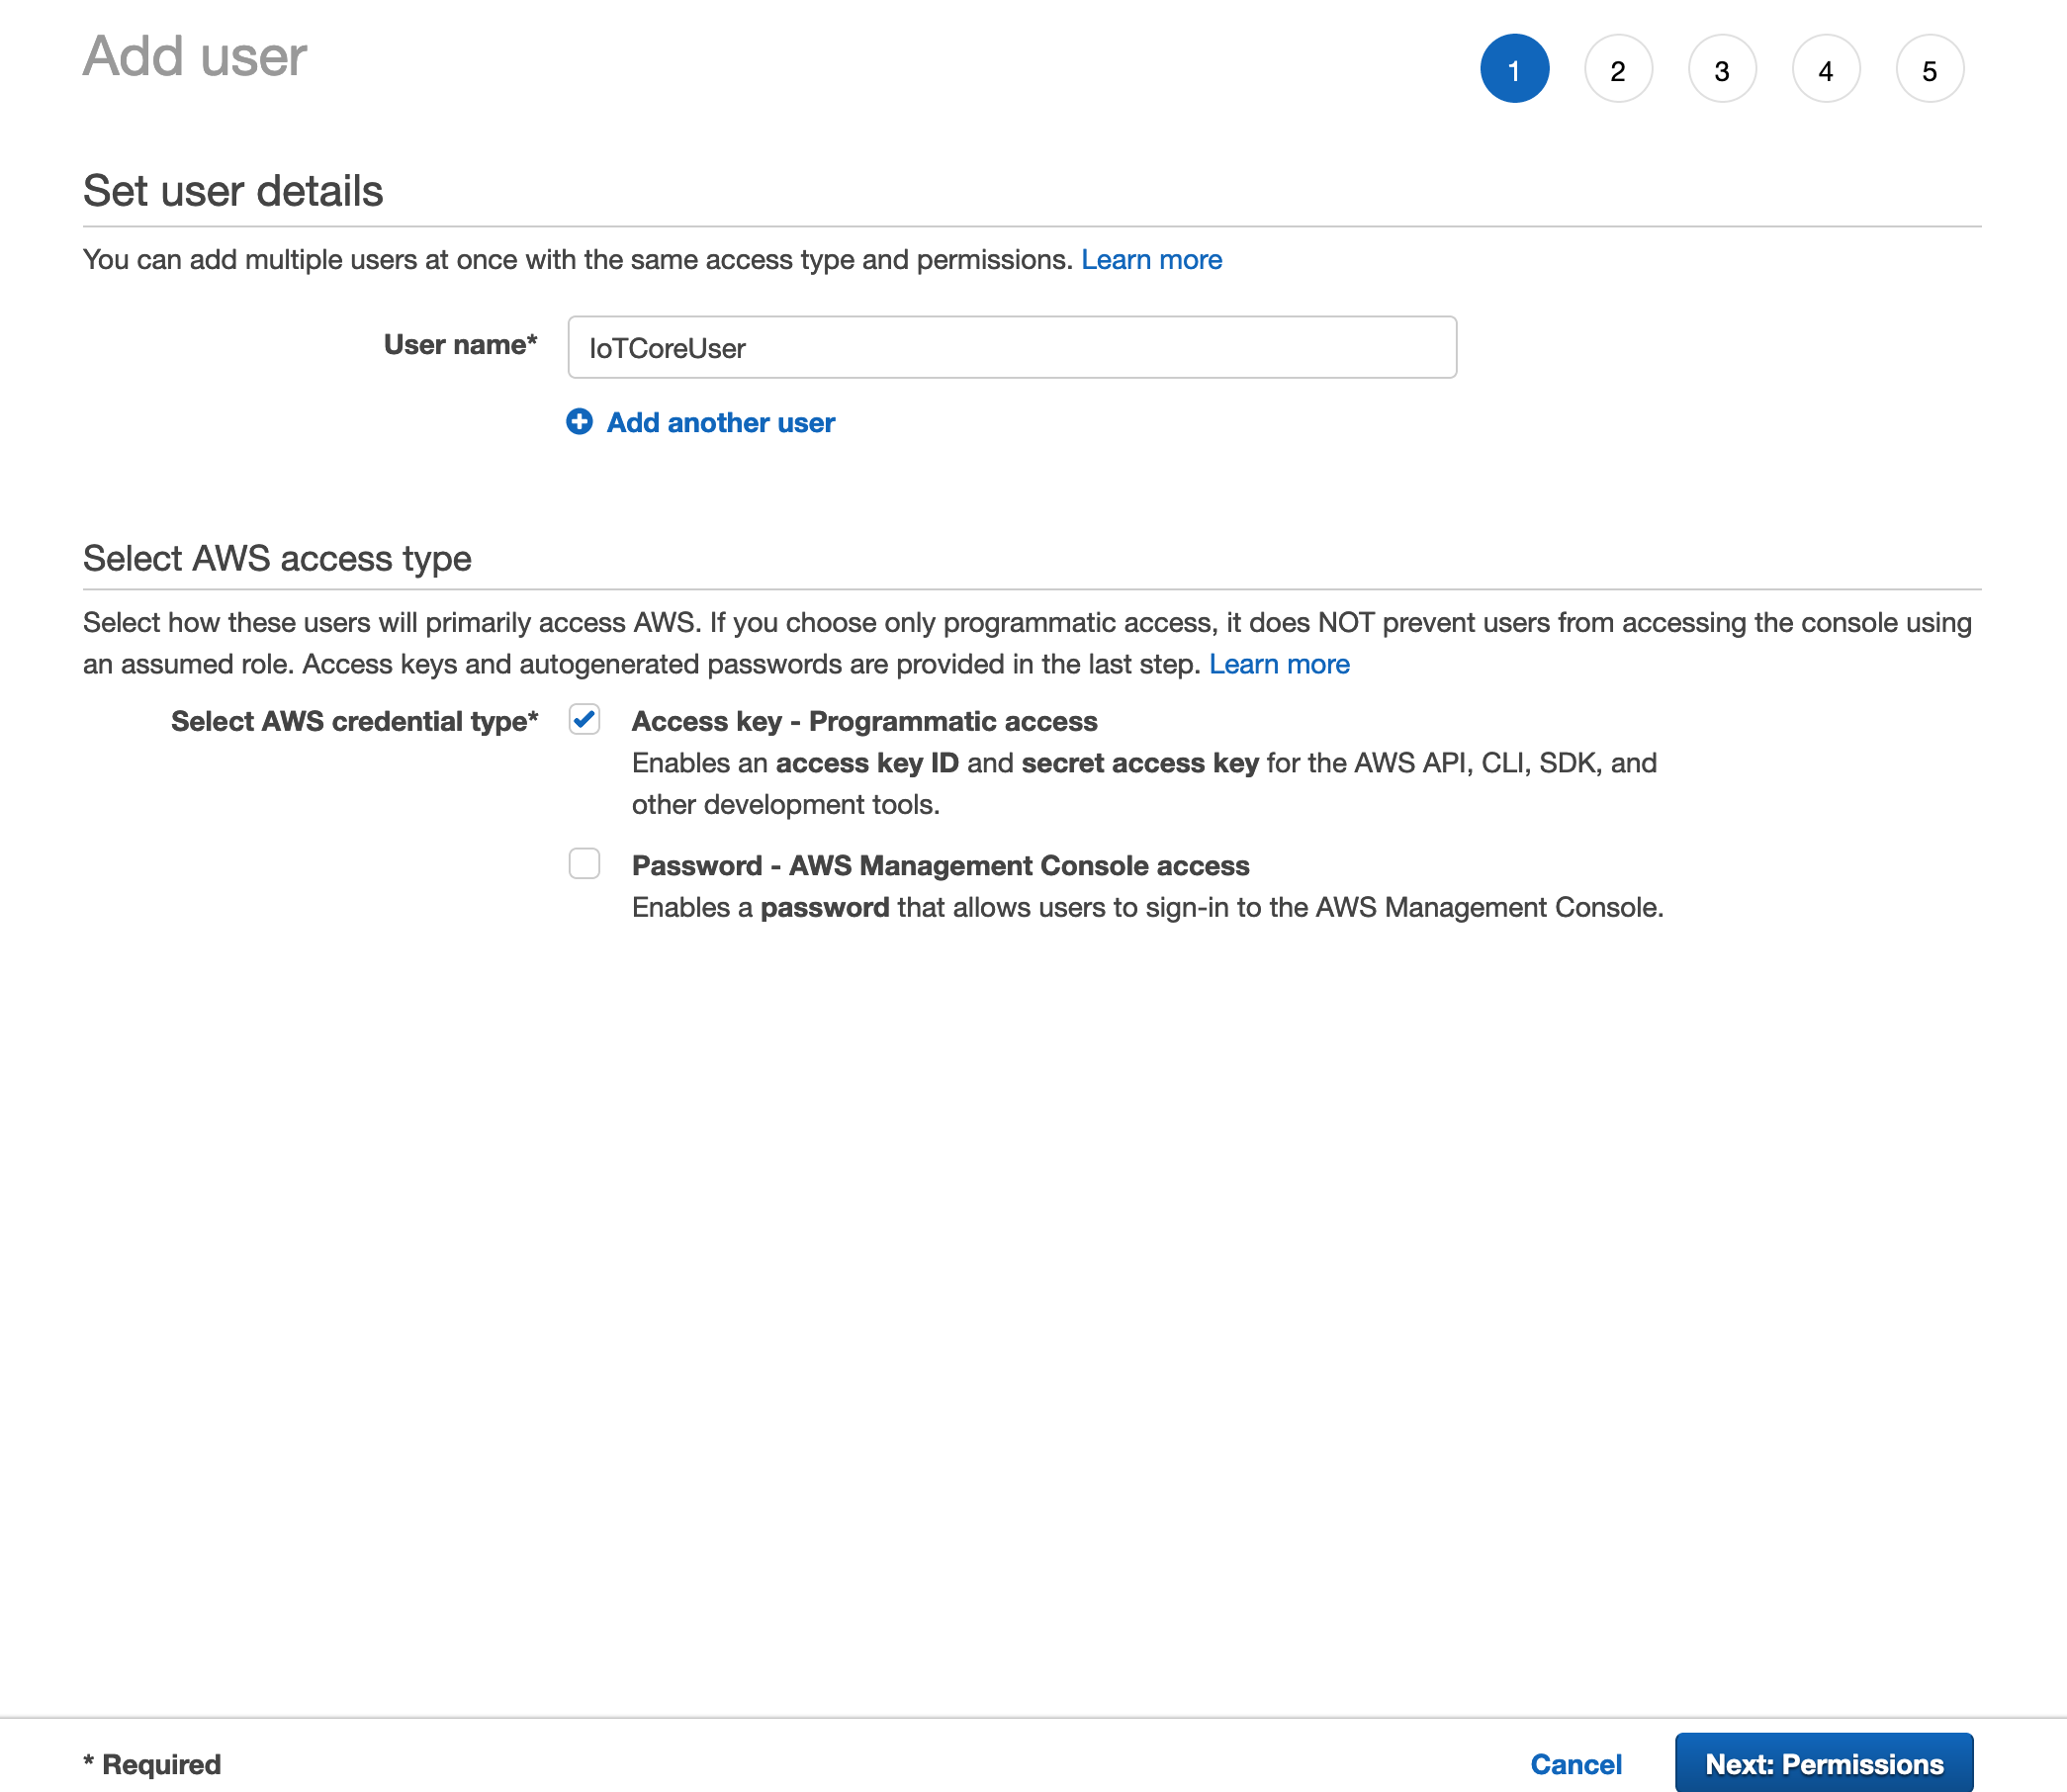
Again: it is important to grab the access and secret key, after creating the user.
Now that user needs the right permissions. Create a Policy with the following permissions:
{
    "Version": "2012-10-17",
    "Statement": [
        {
            "Sid": "VisualEditor0",
            "Effect": "Allow",
            "Action": [
                "greengrass:*",
                "iot:DescribeEndpoint",
                "iam:*",
                "iot:*"
            ],
            "Resource": "*"
        }
    ]
}
This policy is overpermissive, but because we are only using this during the one-time installation, it is fine. Give that Permission to your freshly created user.
Awesome! The first steps are done. Take a sip of your coffee!
Installing and configuring Greengrass
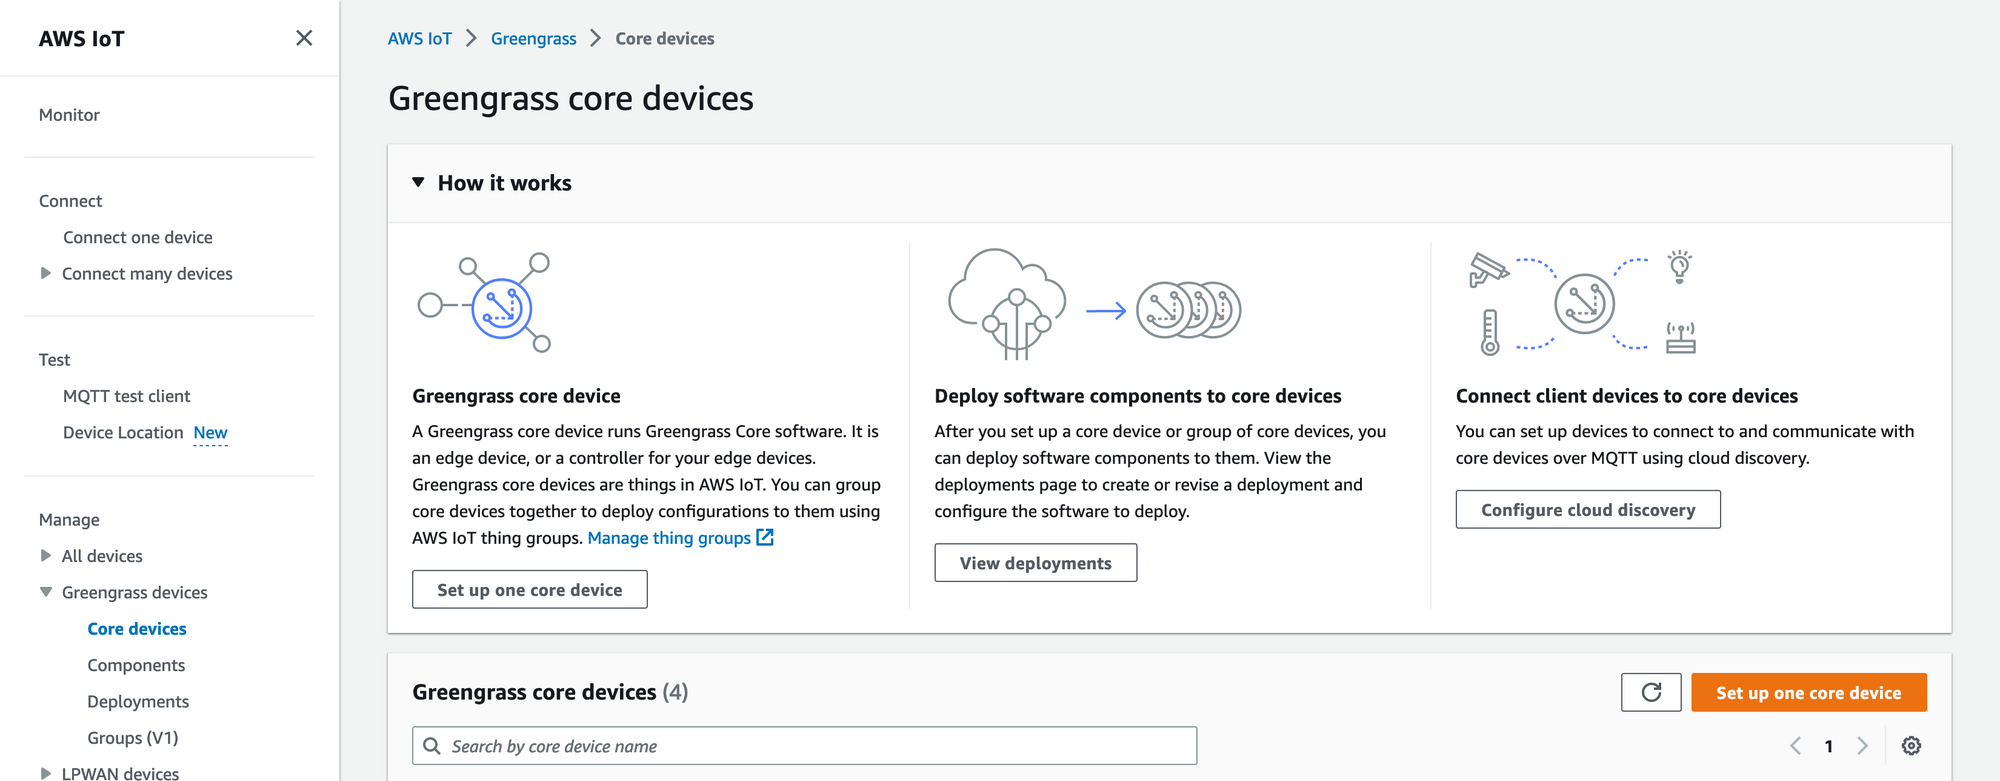
Time to create the core Device. This will be the representation of the Raspberry Pi. Navigate to IoT Core, under Manage, and go to Greengrass Devices -> Core Device. Click the bright orange button (Setup one core device).
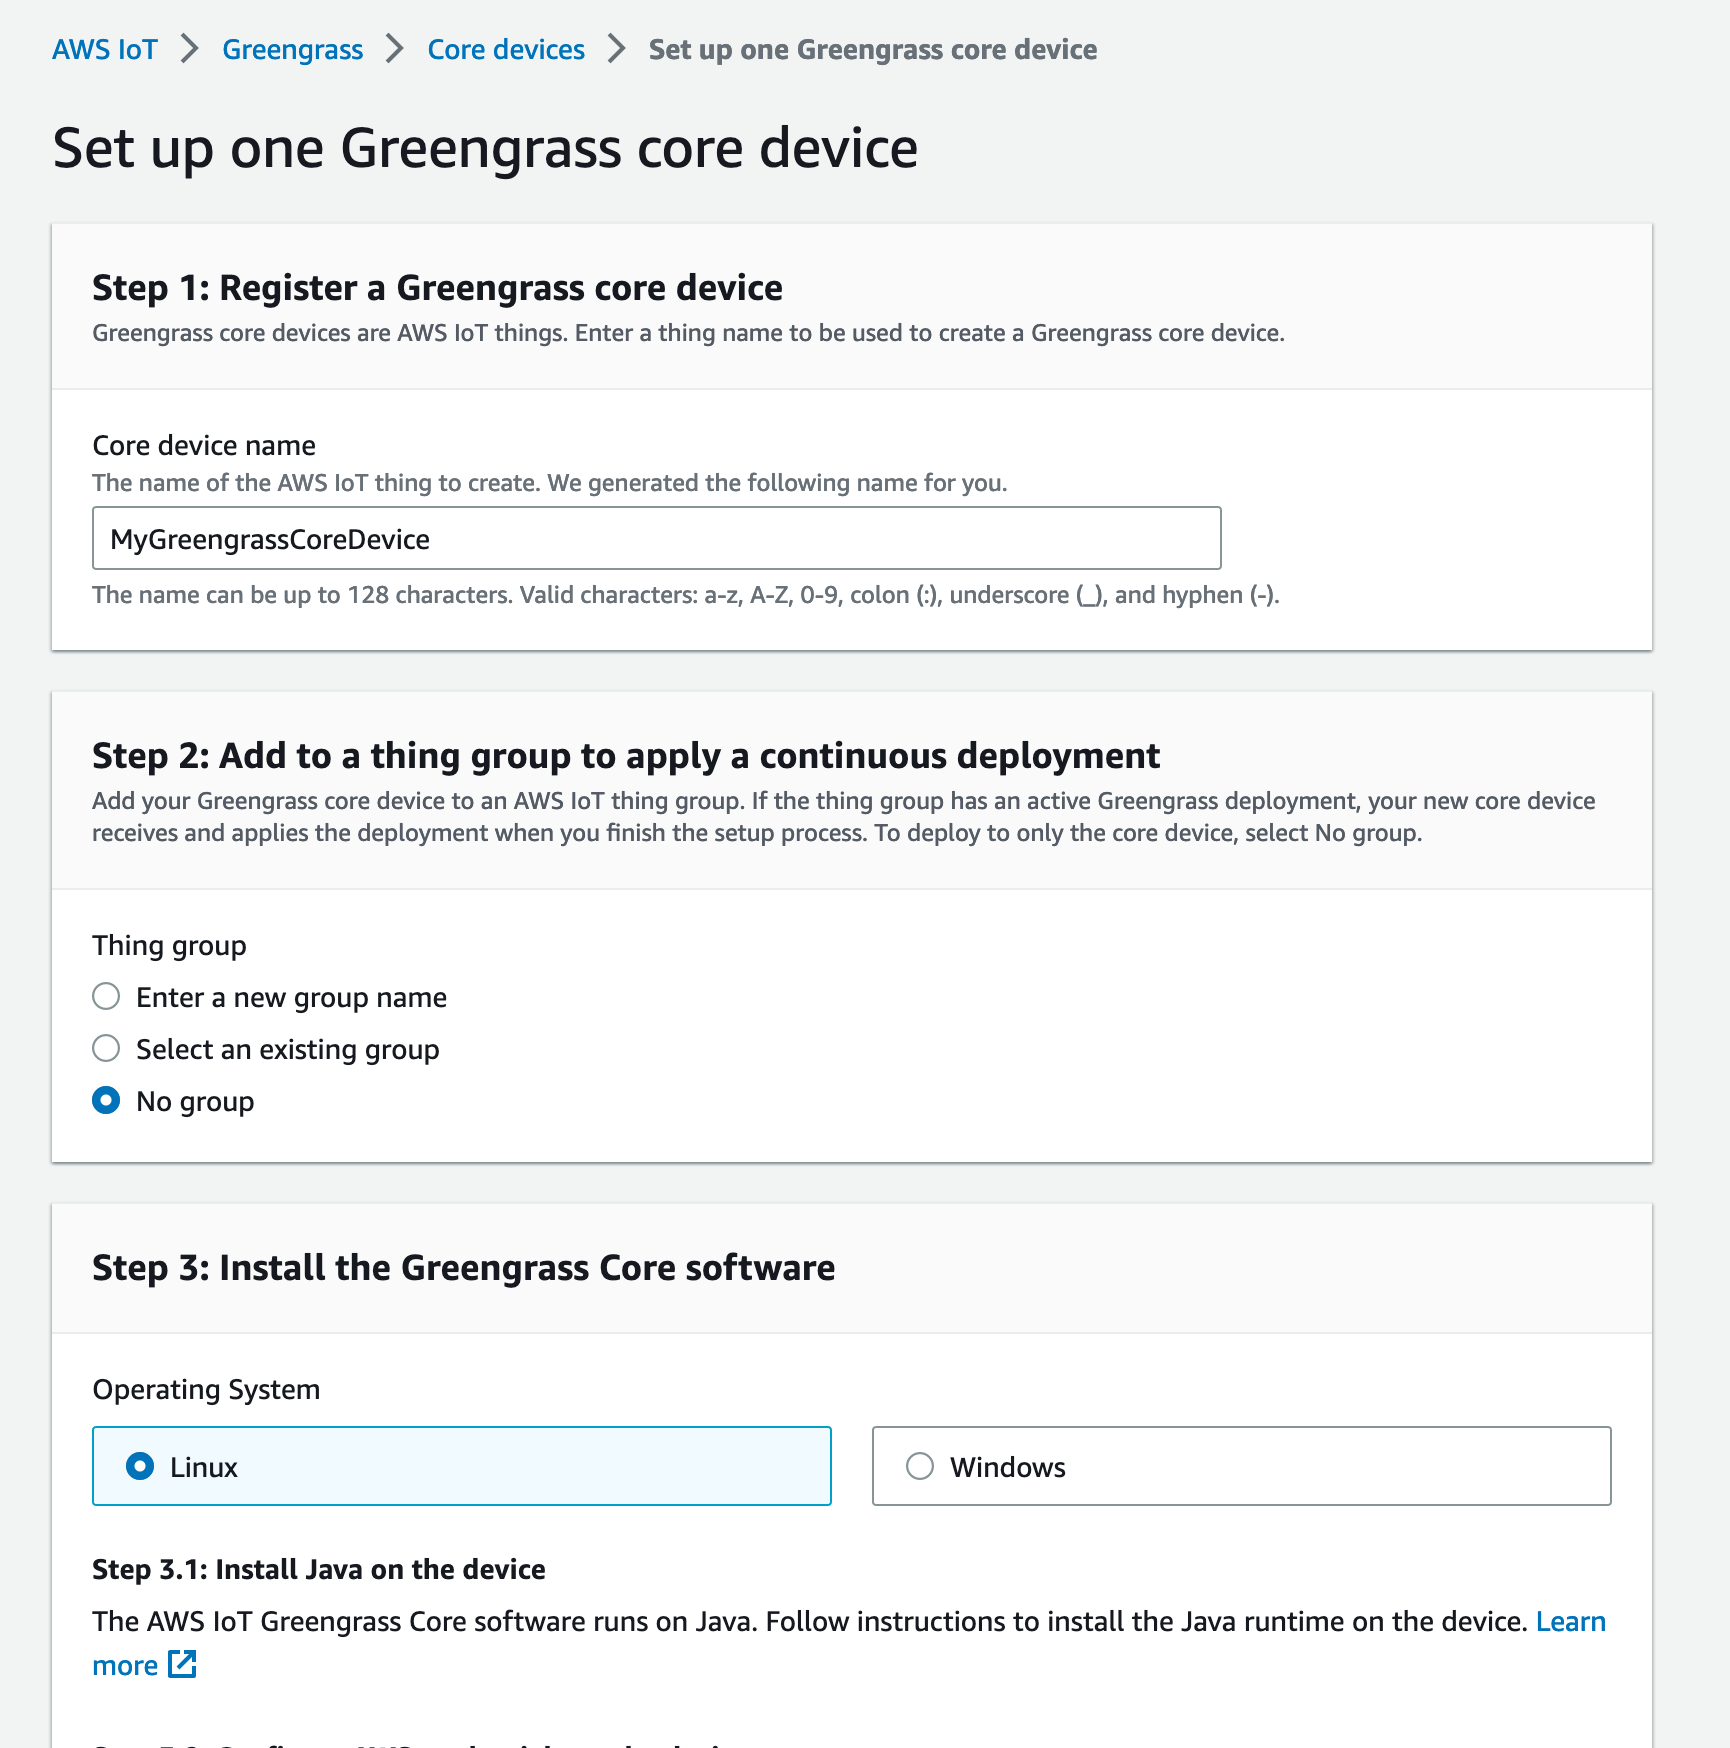
Now give your Core device a name and select no group. Note: Since I'm just showing how to set up one device, I don't need groups. If you are planning on having multiple core devices and want to group them, e.g. to deploy and configure components, go ahead and create a group.
The next steps are all on the Raspberry Pi, so let's switch over. AWS is recommending using temporary security credentials (which makes sense), but since you're just going to use that user during the one time installation, we will kindly ignore that here.
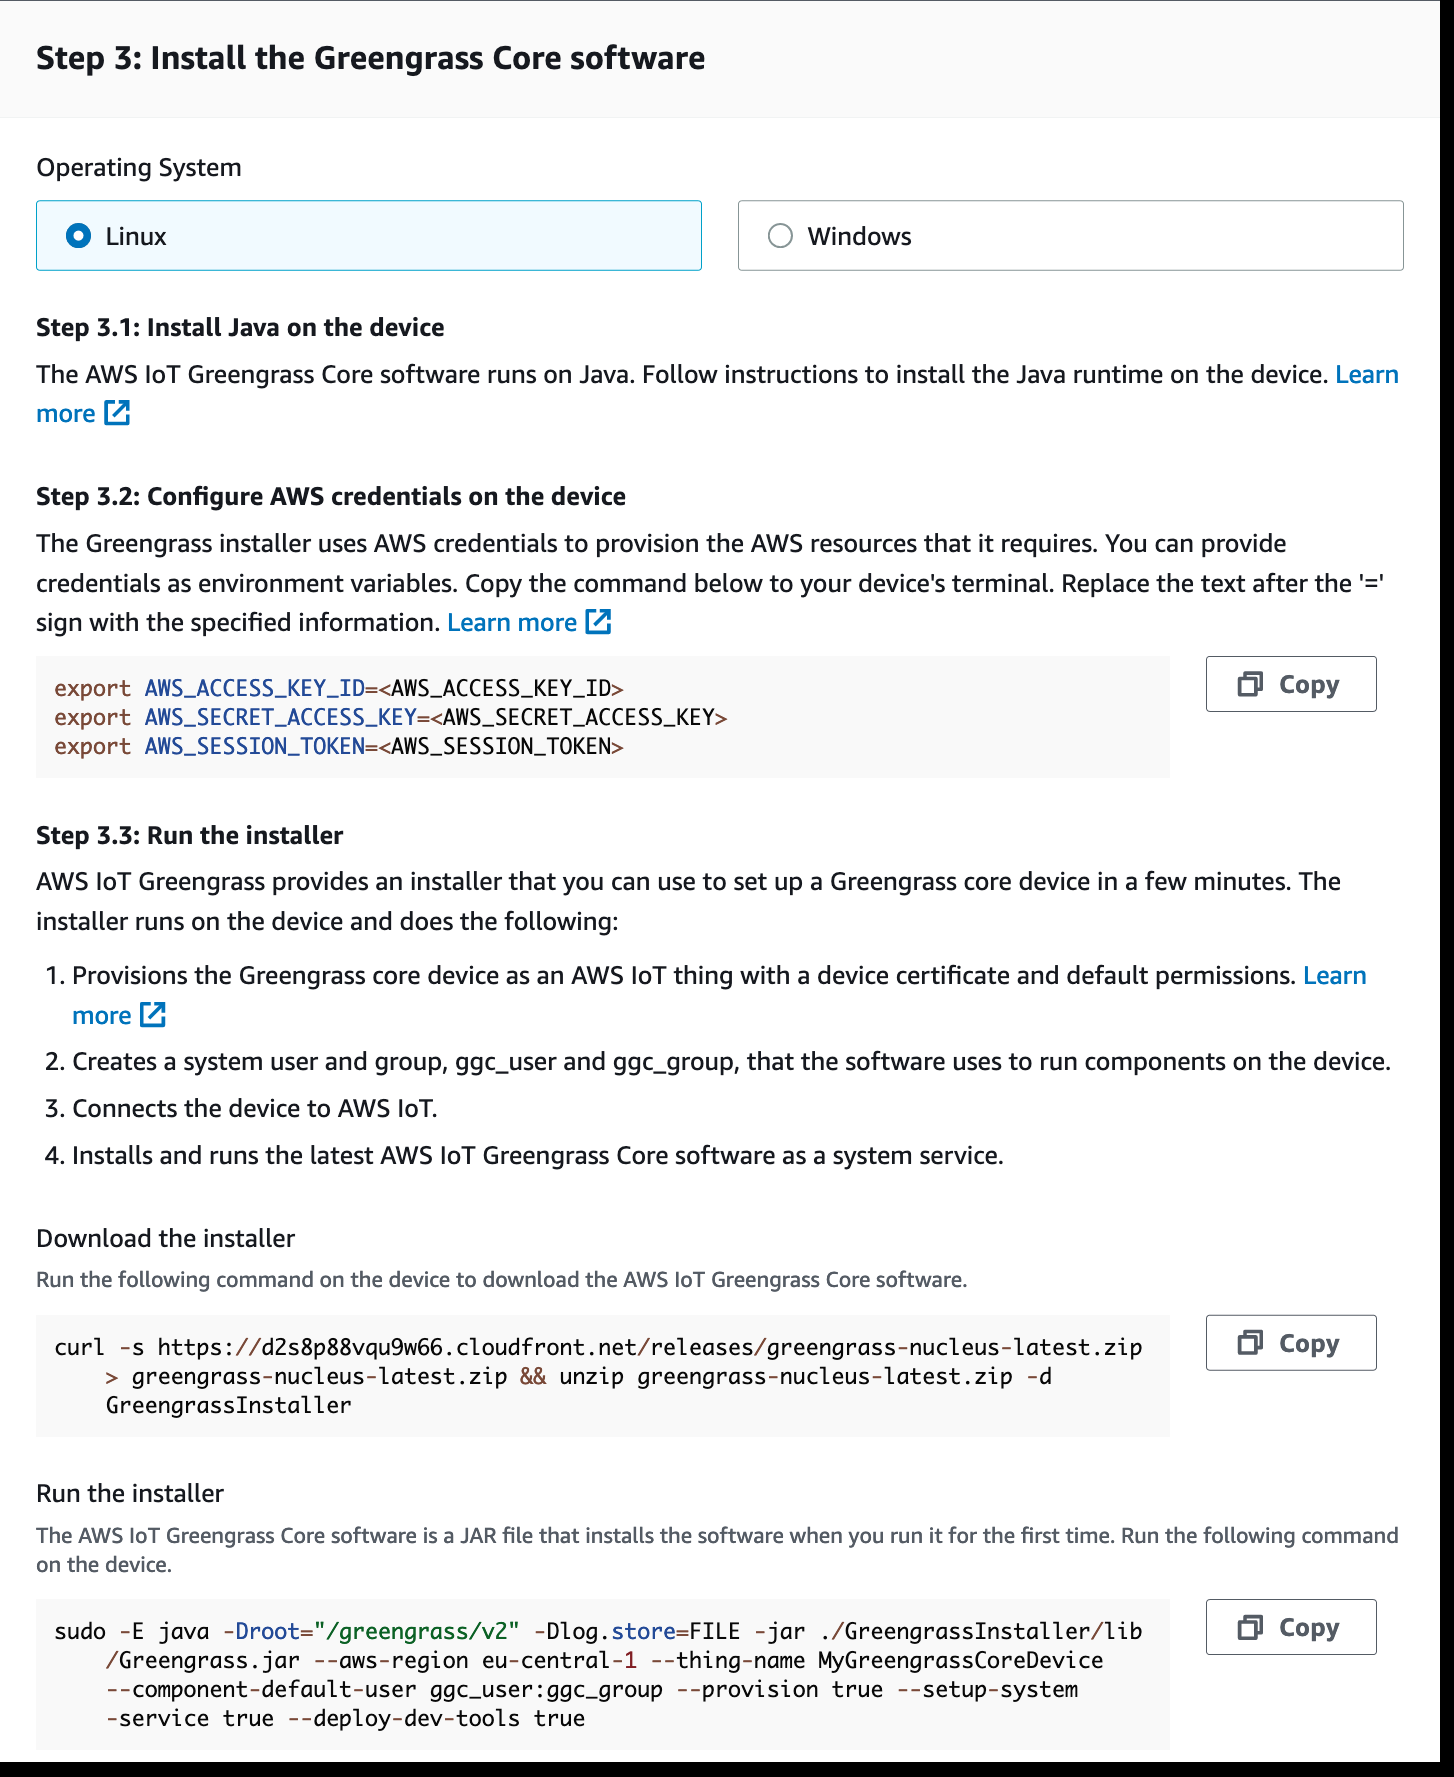
SSH into your Raspberry Pi and type in the commands from the setup page: (Replace <AWS_ACCESS_KEY_ID> and <AWS_SECRET_ACCESS_KEY> with the keys from the previously created user)
export AWS_ACCESS_KEY_ID=<AWS_ACCESS_KEY_ID>
export AWS_SECRET_ACCESS_KEY=<AWS_SECRET_ACCESS_KEY>
Copy the command to download the Greengrass installer. Similar to this one:
curl -s https://d2s8p88vqu9w66.cloudfront.net/releases/greengrass-nucleus-latest.zip > greengrass-nucleus-latest.zip && unzip greengrass-nucleus-latest.zip -d GreengrassInstaller
After the download is finished, run the command to install Greengrass. Use the command AWS is providing you in step 3.2. It is similar to this:
sudo -E java -Droot="/greengrass/v2" -Dlog.store=FILE -jar ./GreengrassInstaller/lib/Greengrass.jar --aws-region eu-central-1 --thing-name MyGreengrassCoreDevice --component-default-user ggc_user:ggc_group --provision true --setup-system-service true --deploy-dev-tools true
Best time to take another sip!

The installation should be done fairly quickly and you get some info. Check if the service is running:
sudo systemctl status greengrass.service
If it's green and running, congratulations! If it's dead, check out the troubleshooting part of the docs.
You can read more about the installation process and parameters here.
Go back to the management console, and click on "View core devices". You should see your core device sooner or later pop up in the table.
Perfect! You've done the hardest part of the tutorial! Take another sip of your coffee and enjoy the victory! This is also the perfect time to delete the user you've created before.
Deployment
Next, we want the Raspberry Pi to receive and forward messages to IoT Core.
For this to properly work, we will need a couple of Greengrass components on the Raspberry Pi:
- Auth
- Bridge
- Broker (Moquette)
On the management console, under IoT Core, go over to Deployment. Search for Deployment for (Replace with your core device name).
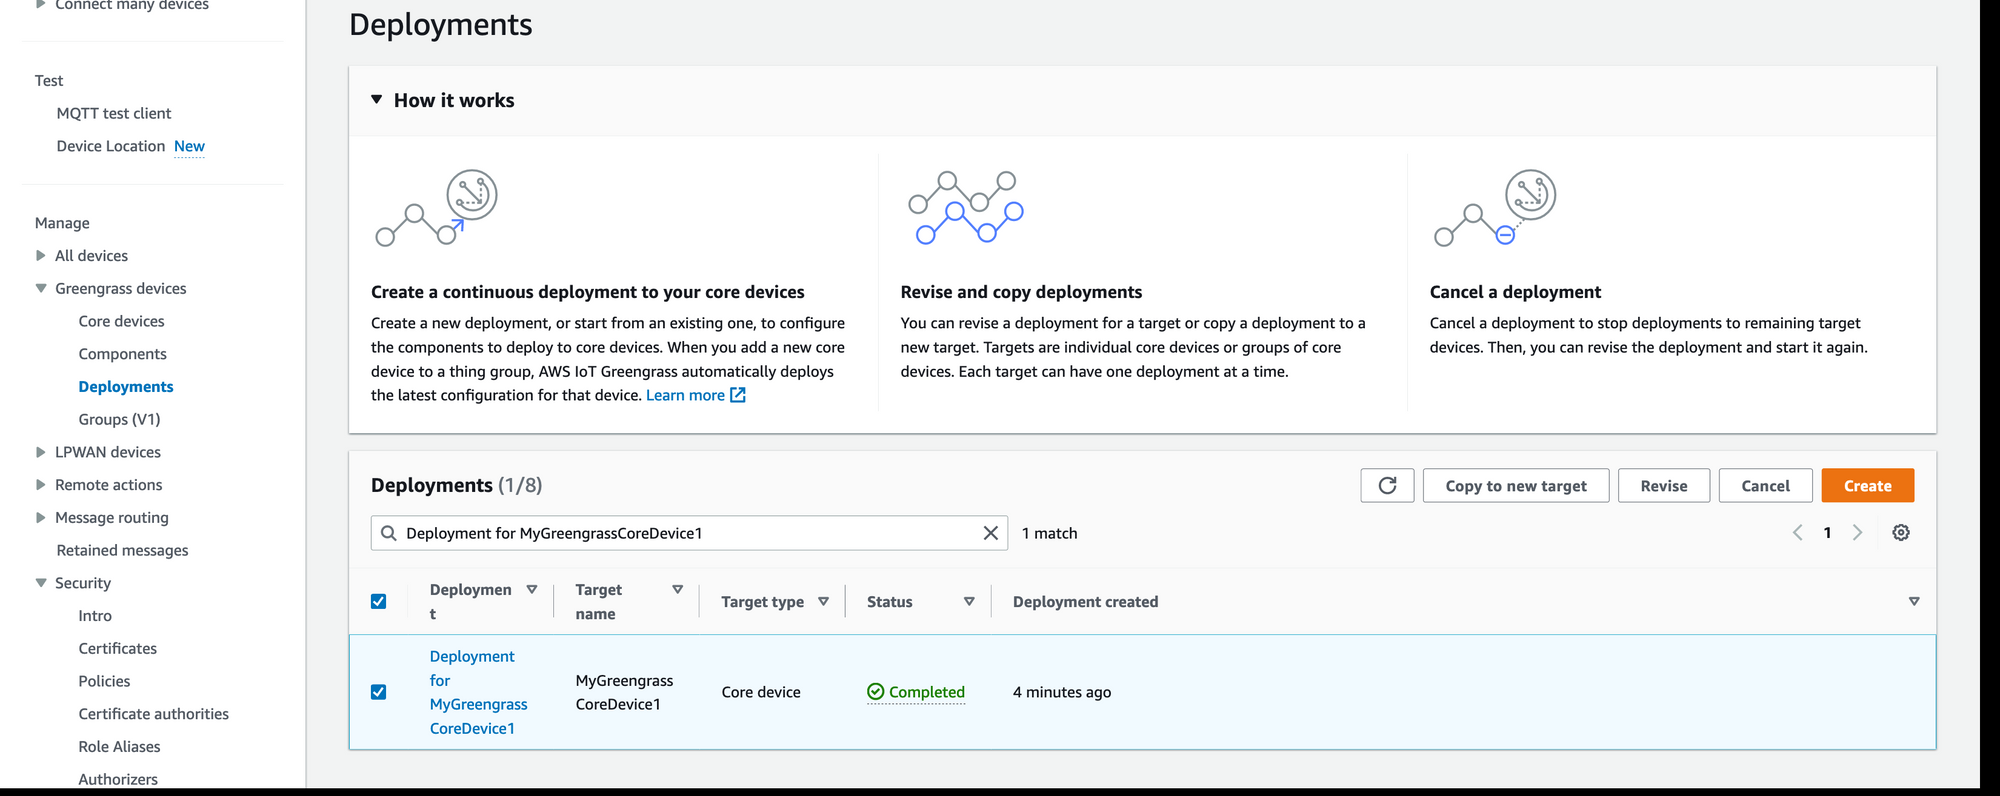
Select the deployment and click on Revise on the top right corner.
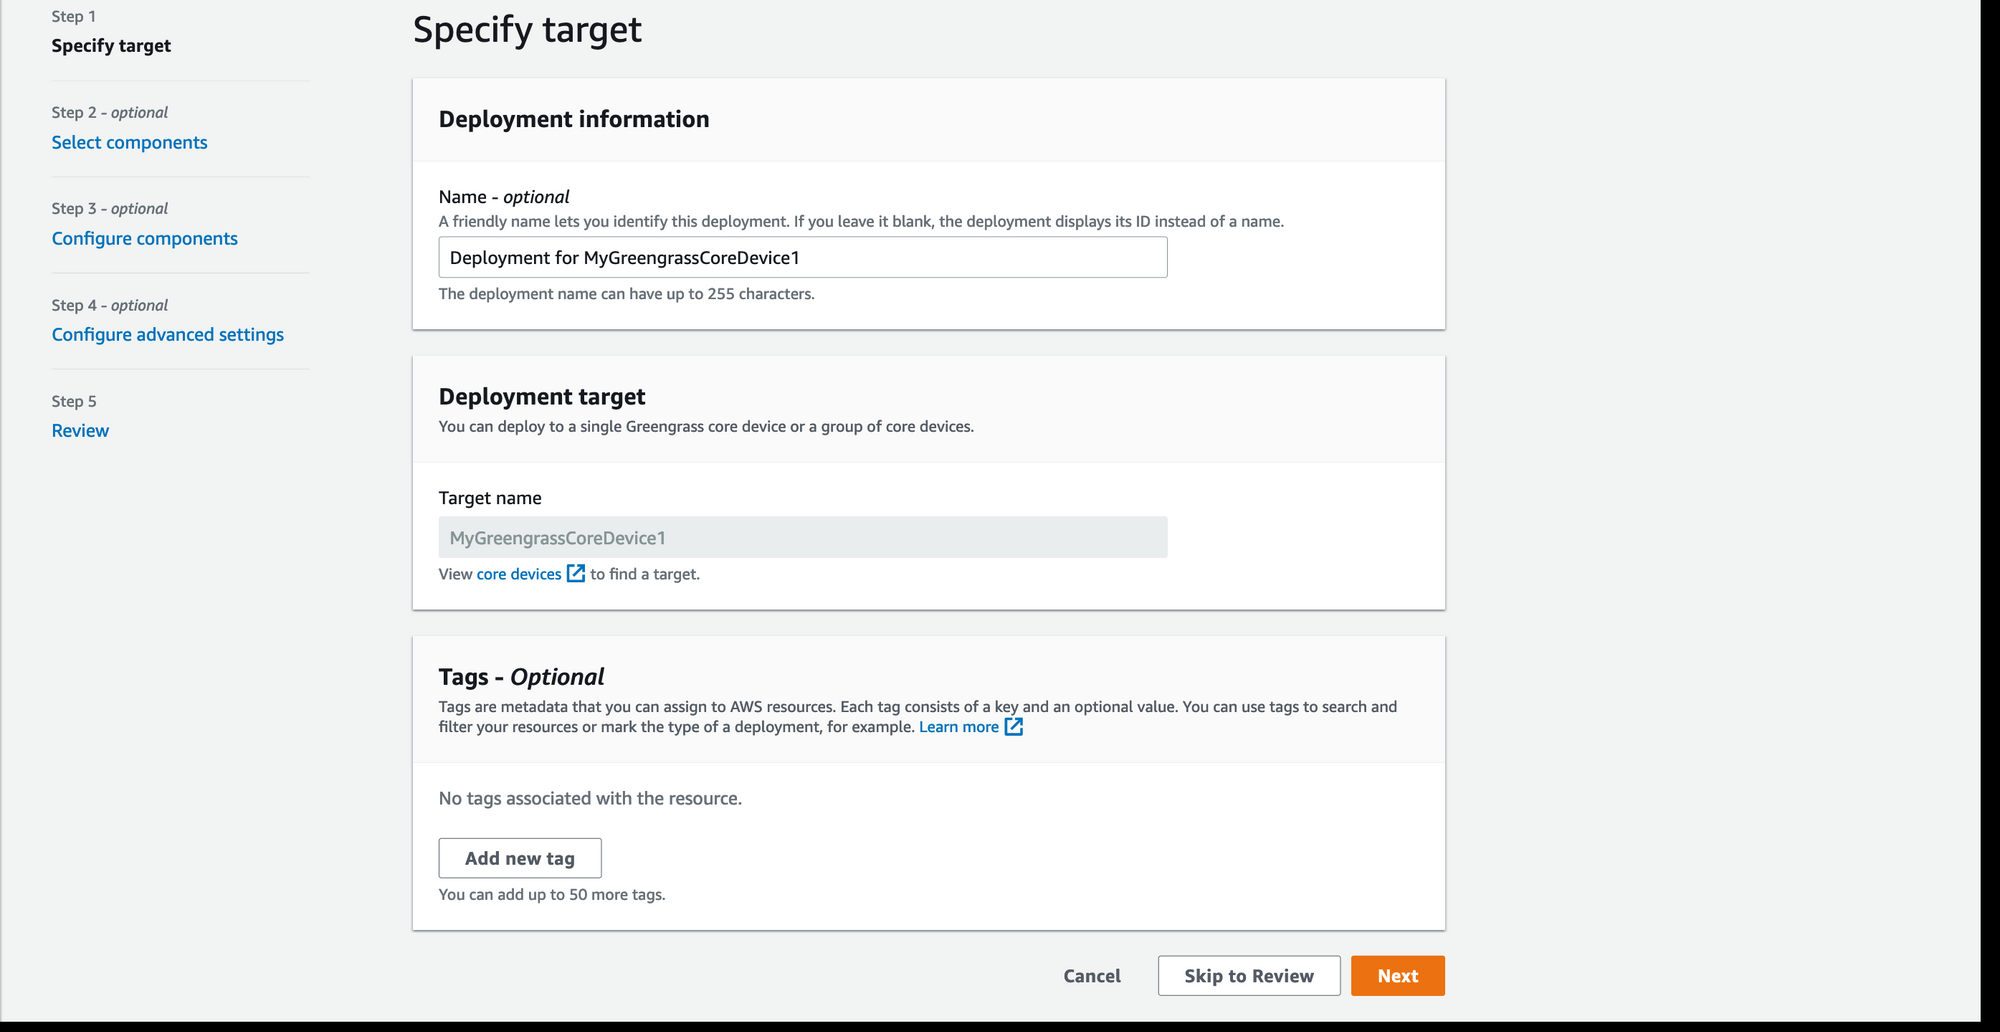
You can take a look at the info and click next.
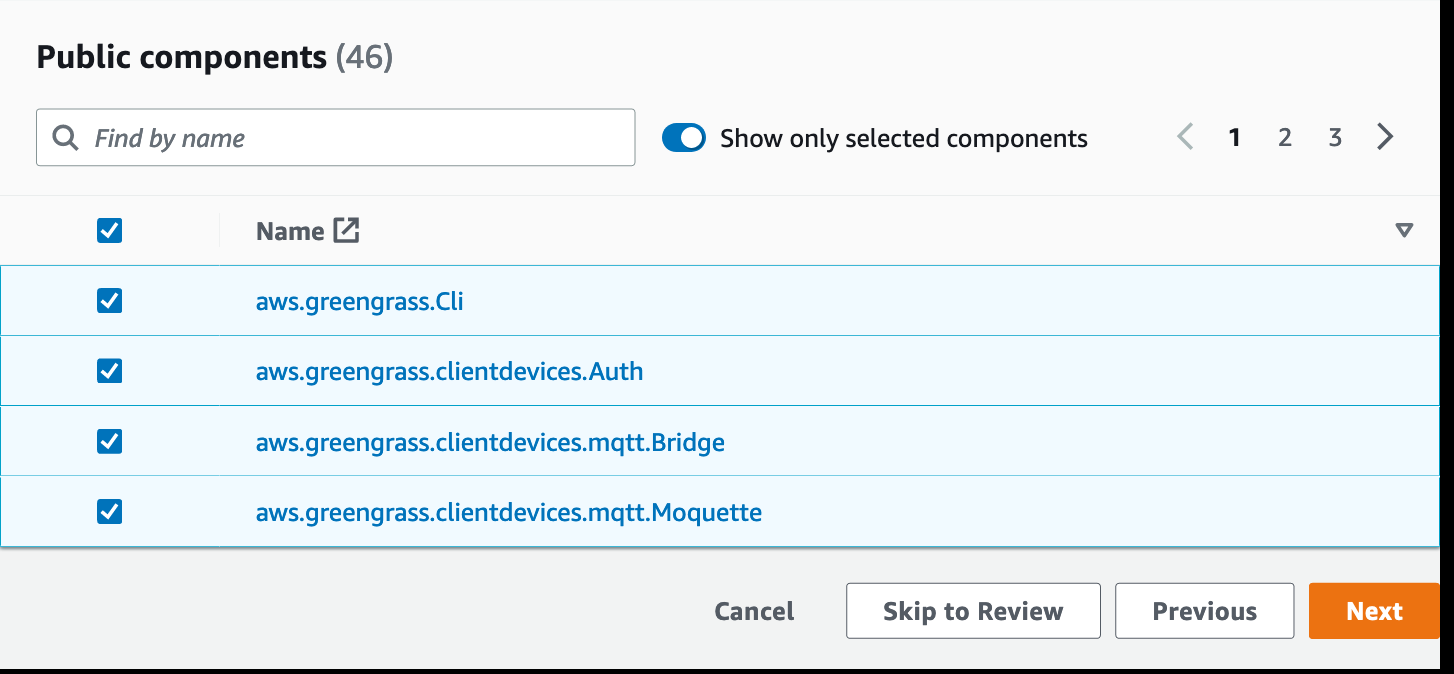
Under Public components make sure the toggle for Show only selected components is disabled. Search for Auth and select the component. Repeat the same for Moquette and Bridge. Your selection should be as the following:
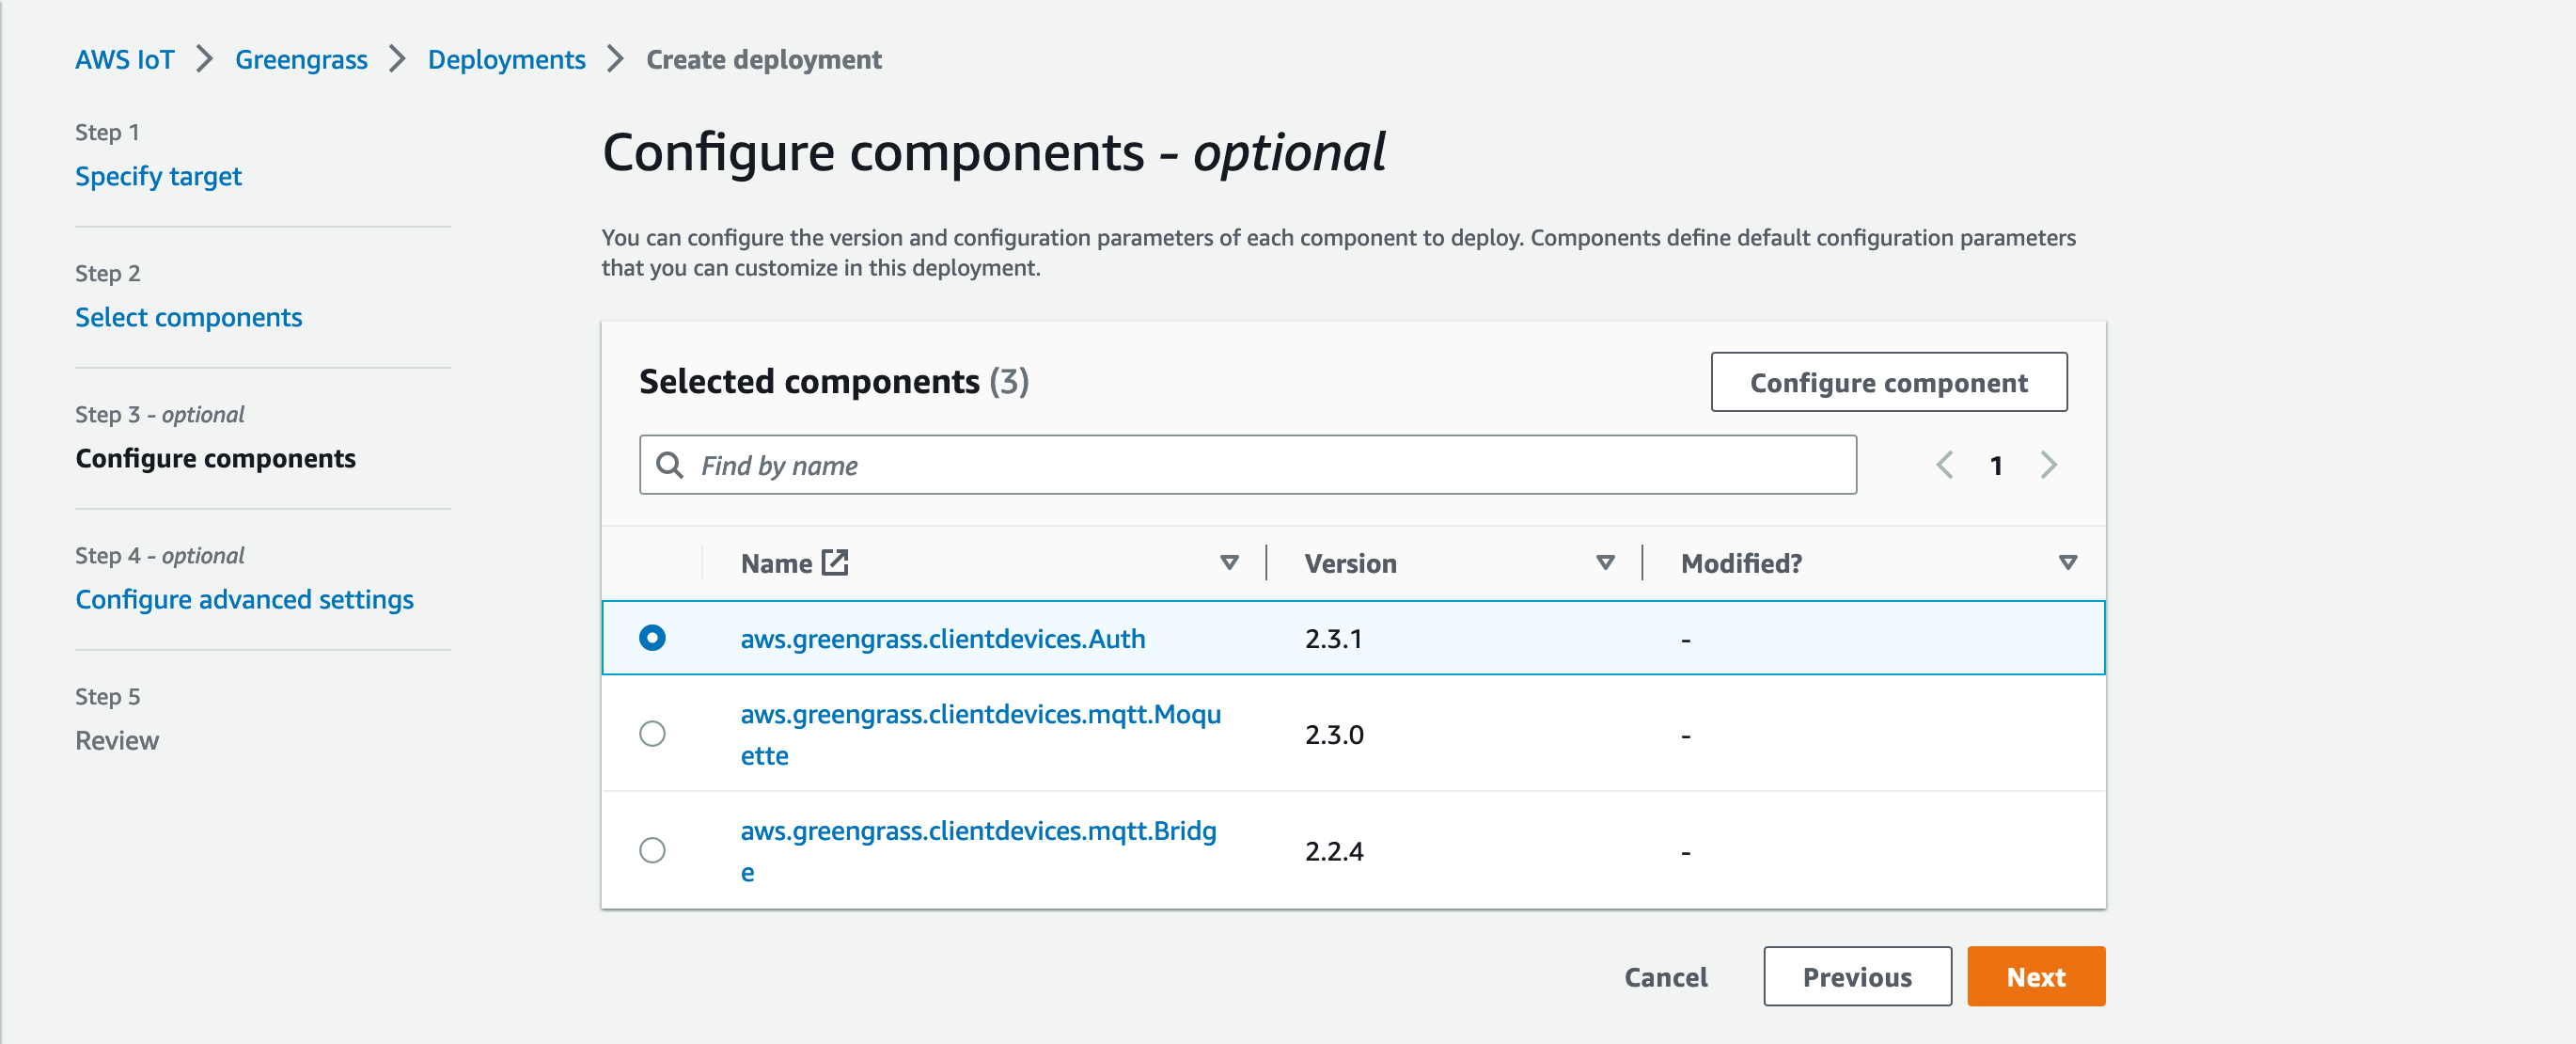
Click next, to configure the components. In this step, I'm going to show you how you can control what topics are allowed and what IoTs can publish messages to topics.
Select the Auth component and click Configure component on the top right corner.
This should bring up a modal form, where you place the following JSON under Configuration to merge:
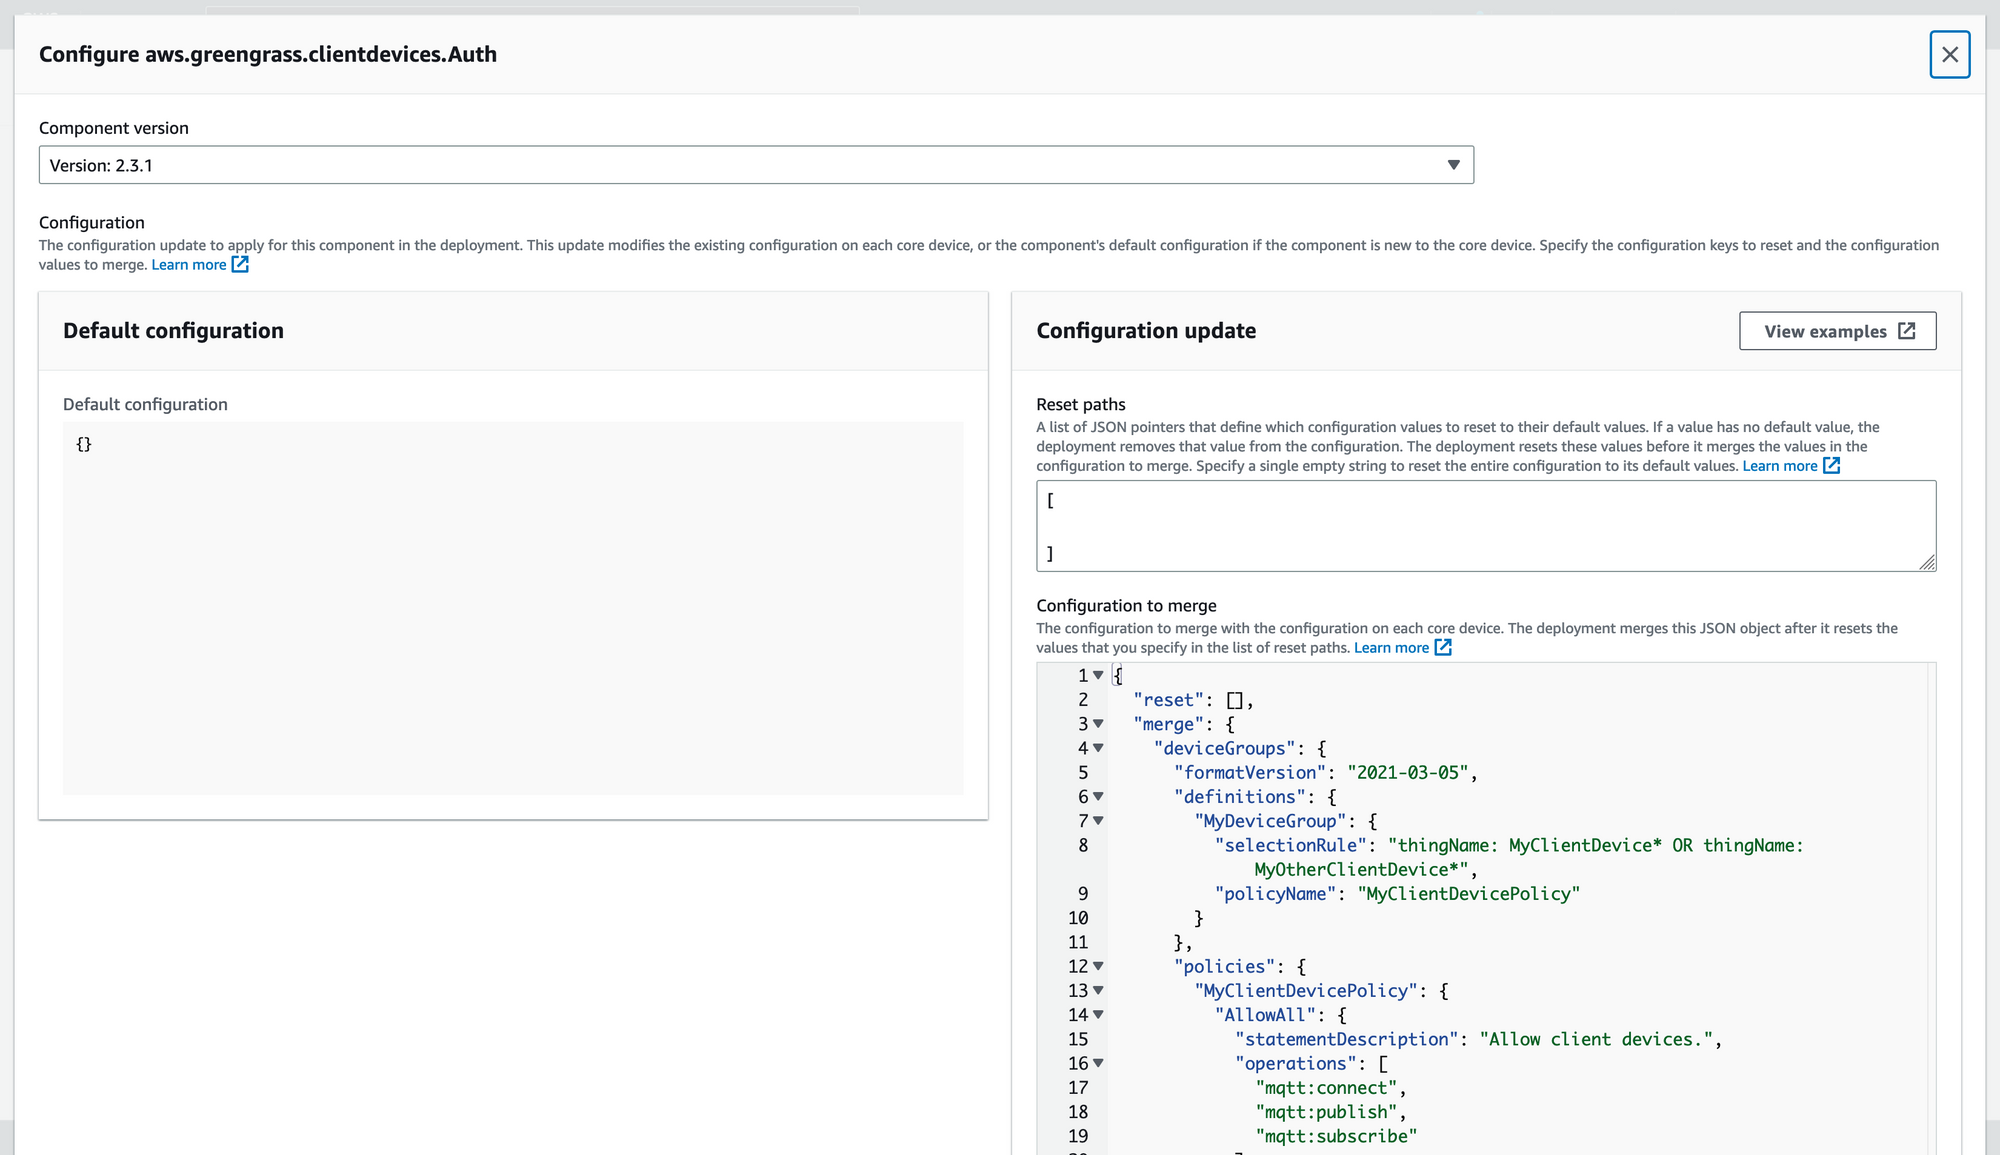
{
  "deviceGroups": {
    "formatVersion": "2021-03-05",
    "definitions": {
      "MyDeviceGroup": {
        "selectionRule": "thingName: MyClientDevice* OR thingName: MyOtherClientDevice*",
        "policyName": "MyClientDevicePolicy"
      }
    },
    "policies": {
      "MyClientDevicePolicy": {
        "AllowAll": {
          "statementDescription": "Allow client devices.",
          "operations": [
            "mqtt:connect",
            "mqtt:publish",
            "mqtt:subscribe"
          ],
          "resources": [
            "*"
          ]
        }
      }
    }
  }
}
This Configuration allows only Things with a certain name (e.g. MyClientDevice1, MyOtherClientDevice3) to connect, publish and subscribe to topics on this broker.
Click confirm at the bottom.
Next, select the Bridge component and again on Configure component. Again under Configuration to merge, place the following configuration:
{
  "mqttTopicMapping": {
    "HelloWorldIotCoreMapping": {
      "topic": "clients/+/hello/world",
      "source": "LocalMqtt",
      "target": "IotCore"
    }
  }
}
This configuration will only forward messages to IoT Core on the topic clients/+/hello/world. The + is a wildcard here.
Click confirm at the bottom. That's it.
Click Next, Next again, and finally Deploy.
This will kick off the deployment and the Greengrass will install all components on the Raspberry Pi.
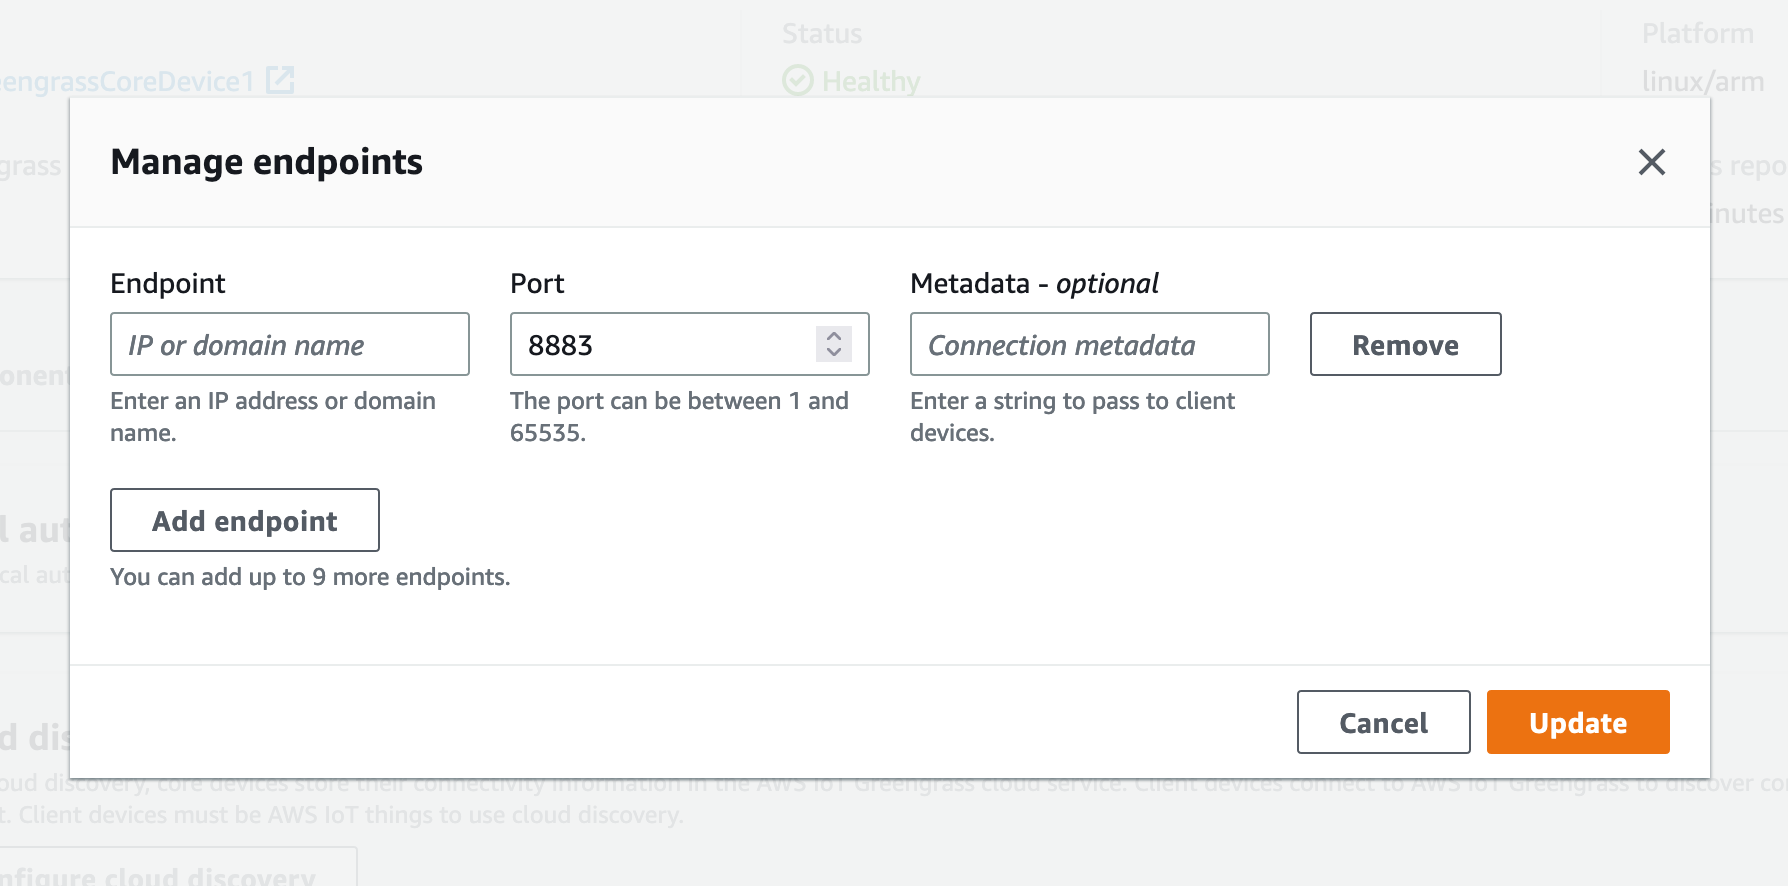
Now go to your core device again and over to the tab Client Devices and click on Manage endpoints.
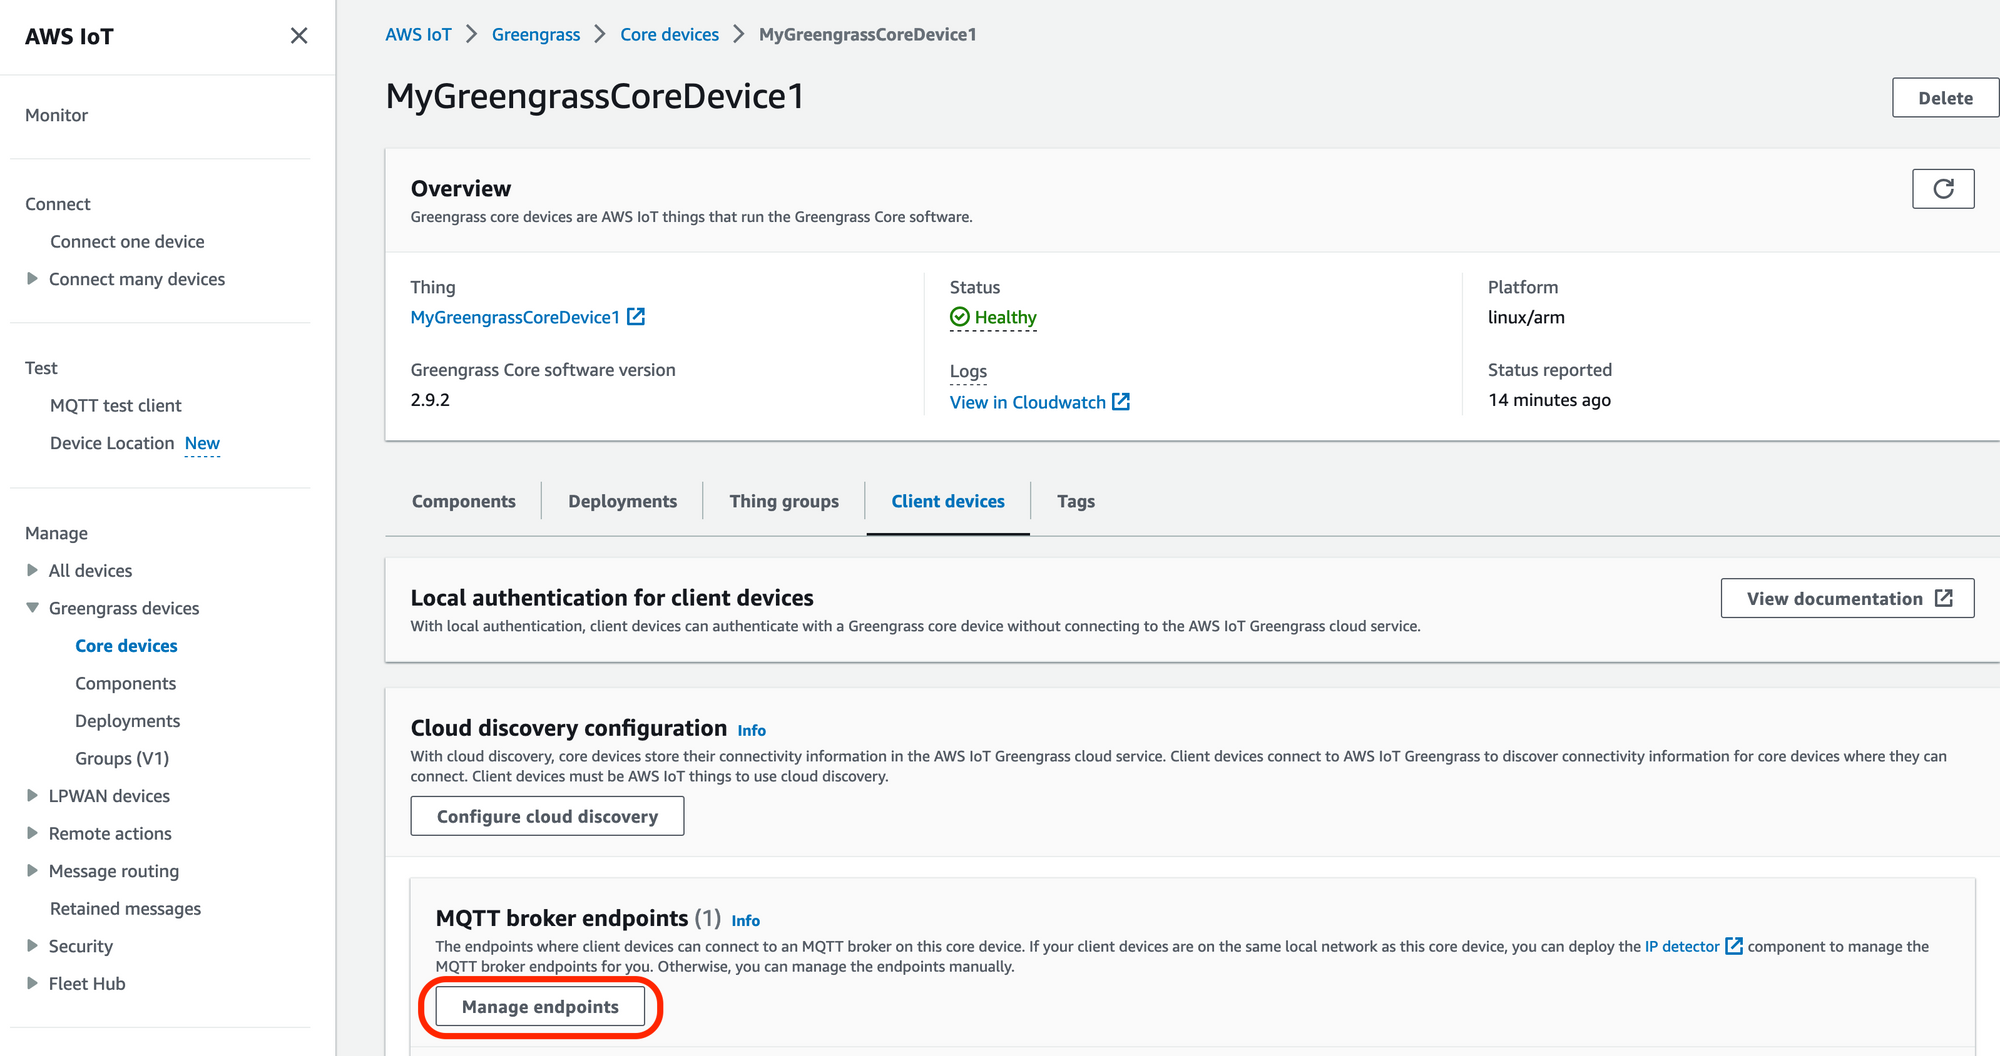
Here simply add the IP of your Raspberry Pi and the Port 8883. This will allow connection on that IP and the provided CA certificate by the Auth component.
Coffee? Coffee!

That is the perfect time to check the status of your deployment. You can do this in the Management Console under Deployments or check the Greengrass logs on your Raspberry Pi with:
sudo tail -f /greengrass/v2/logs/greengrass.log
To list all installed components you can use sudo /greengrass/v2/bin/greengrass-cli component list
In that output, you should see the Auth, Bridge, and Broker components.
If you need detailed information on how to set this up, you guessed it -> docs
Everything is set up. You can now send some messages. Finally! But for this, you first need to set up a thing.
Side note
If an MQTT Broker already exists in your environment, it can be reused instead of the MQTT Broker provided by Greengrass. The IoT Core device can then act as a bridge between the existing MQTT Broker and AWS by installing and configuring the necessary software. This allows for seamless communication and data exchange between the existing MQTT Broker and the cloud-based services provided by AWS. This approach allows for the continued use of the existing MQTT Broker while also utilizing the capabilities of AWS IoT.
Setup a Thing
Luckily, this is done quickly and all we need to have in the end are the certificates. These certifactes will have a policy attached to them and will be used to authenticate the thing.
Create Policy
Let's start with the required policy. Go to Security -> Policies -> Create Policy.
For the Name I choose MyClientDevicePolicy and add all IoT Policies to that device:
- iot:Connect
- iot:Publish
- iot:Receive
- iot:Subscribe
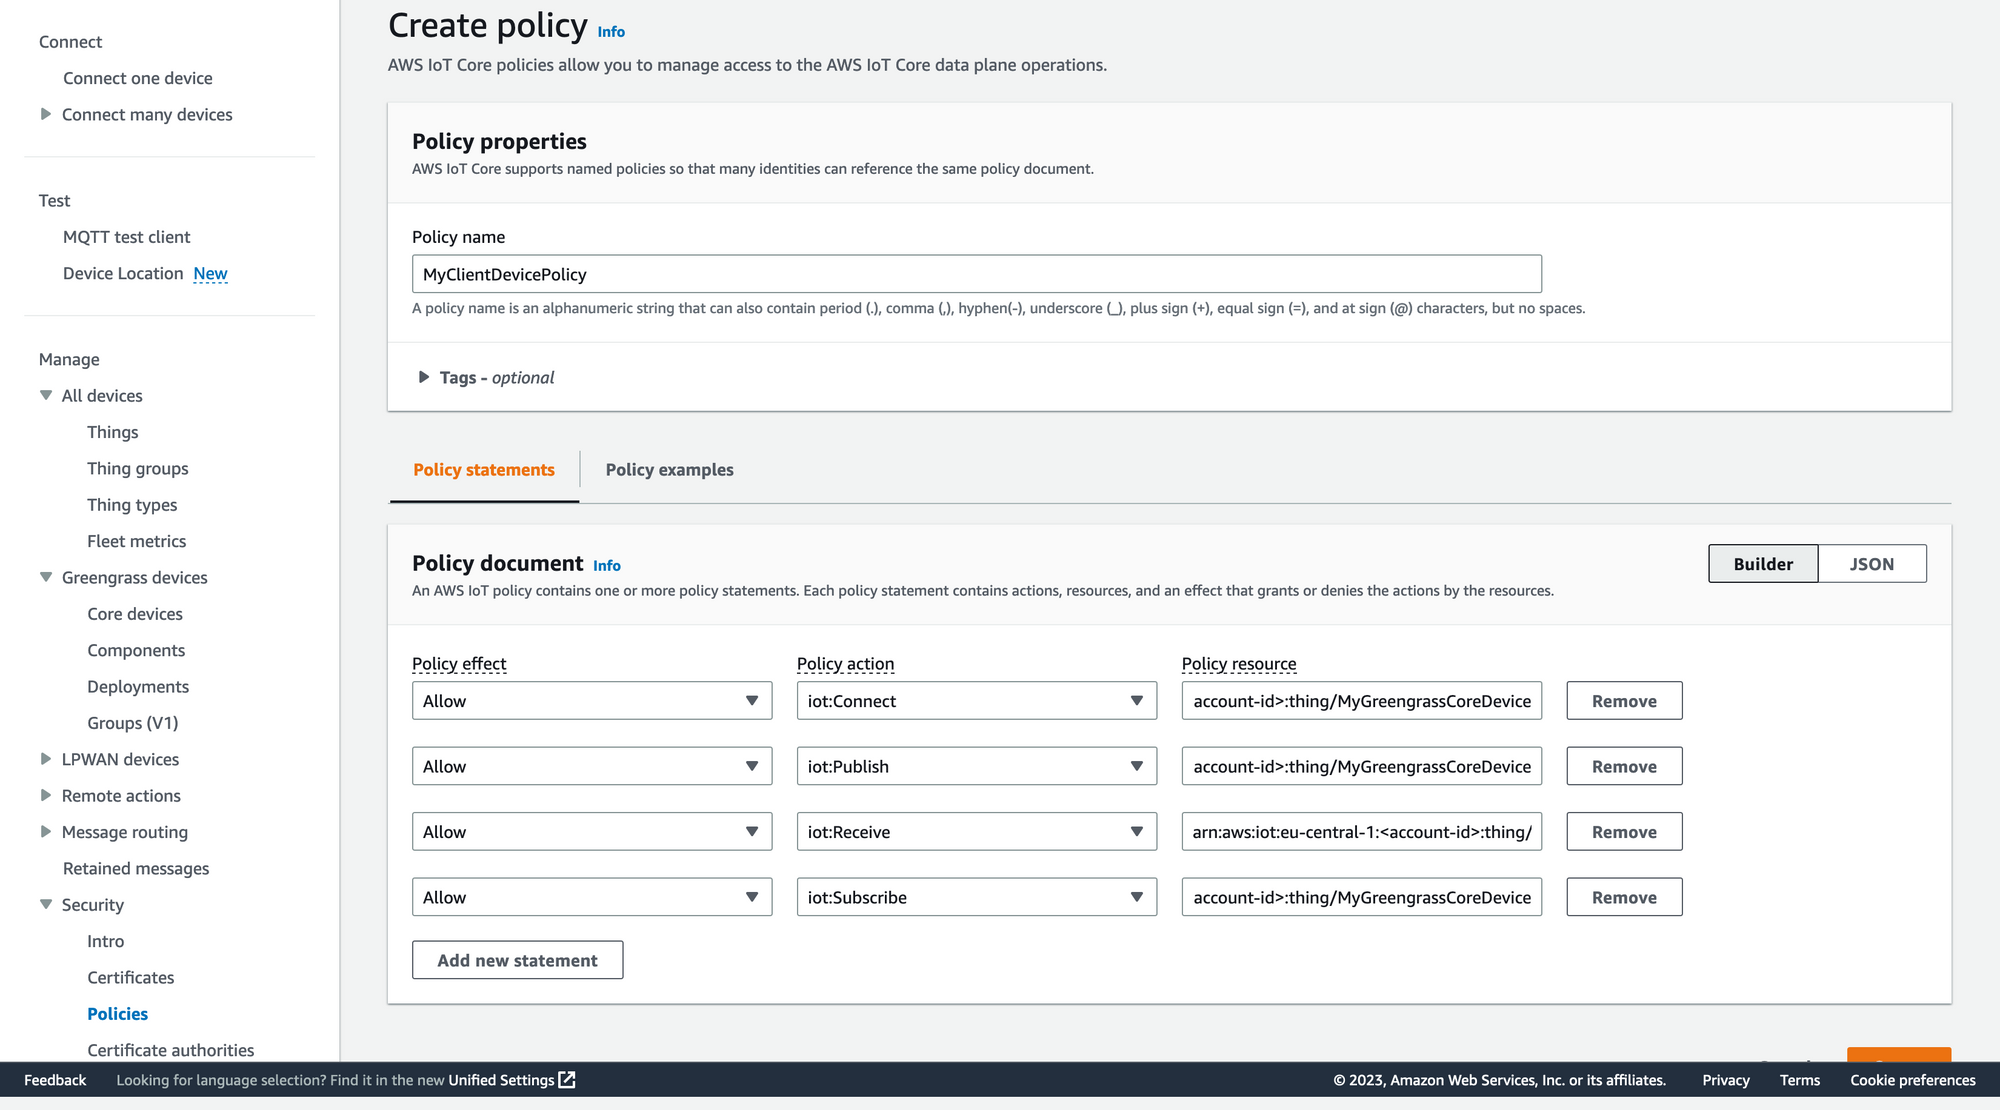
replace <core-device-thing-arn> with your own ARN, which looks like this: arn:aws:iot:<region>:<account-id>:thing/<NameOfTheCoreDevice>.
{
  "Version": "2012-10-17",
  "Statement": [
    {
      "Effect": "Allow",
      "Action": "iot:Connect",
      "Resource": "<core-device-thing-arn>"
    },
    {
      "Effect": "Allow",
      "Action": "iot:Publish",
      "Resource": "<core-device-thing-arn>"
    },
    {
      "Effect": "Allow",
      "Action": "iot:Receive",
      "Resource": "<core-device-thing-arn>"
    },
    {
      "Effect": "Allow",
      "Action": "iot:Subscribe",
      "Resource": "<core-device-thing-arn>"
    }
  ]
}
Create Thing
Go to Manage -> All devices -> Things and click on Create Thing. Choose Create single thing.
Click next.
For the name, remember the configs you set earlier. The name has to start with MyClientDevice. For the sake simplicity, i pick MyClientDevice1.
Click next.
Choose Auto-generate a new certificate.
Click next.
Attach the policy you've created in the previous step. This policy is attached to the certificate.
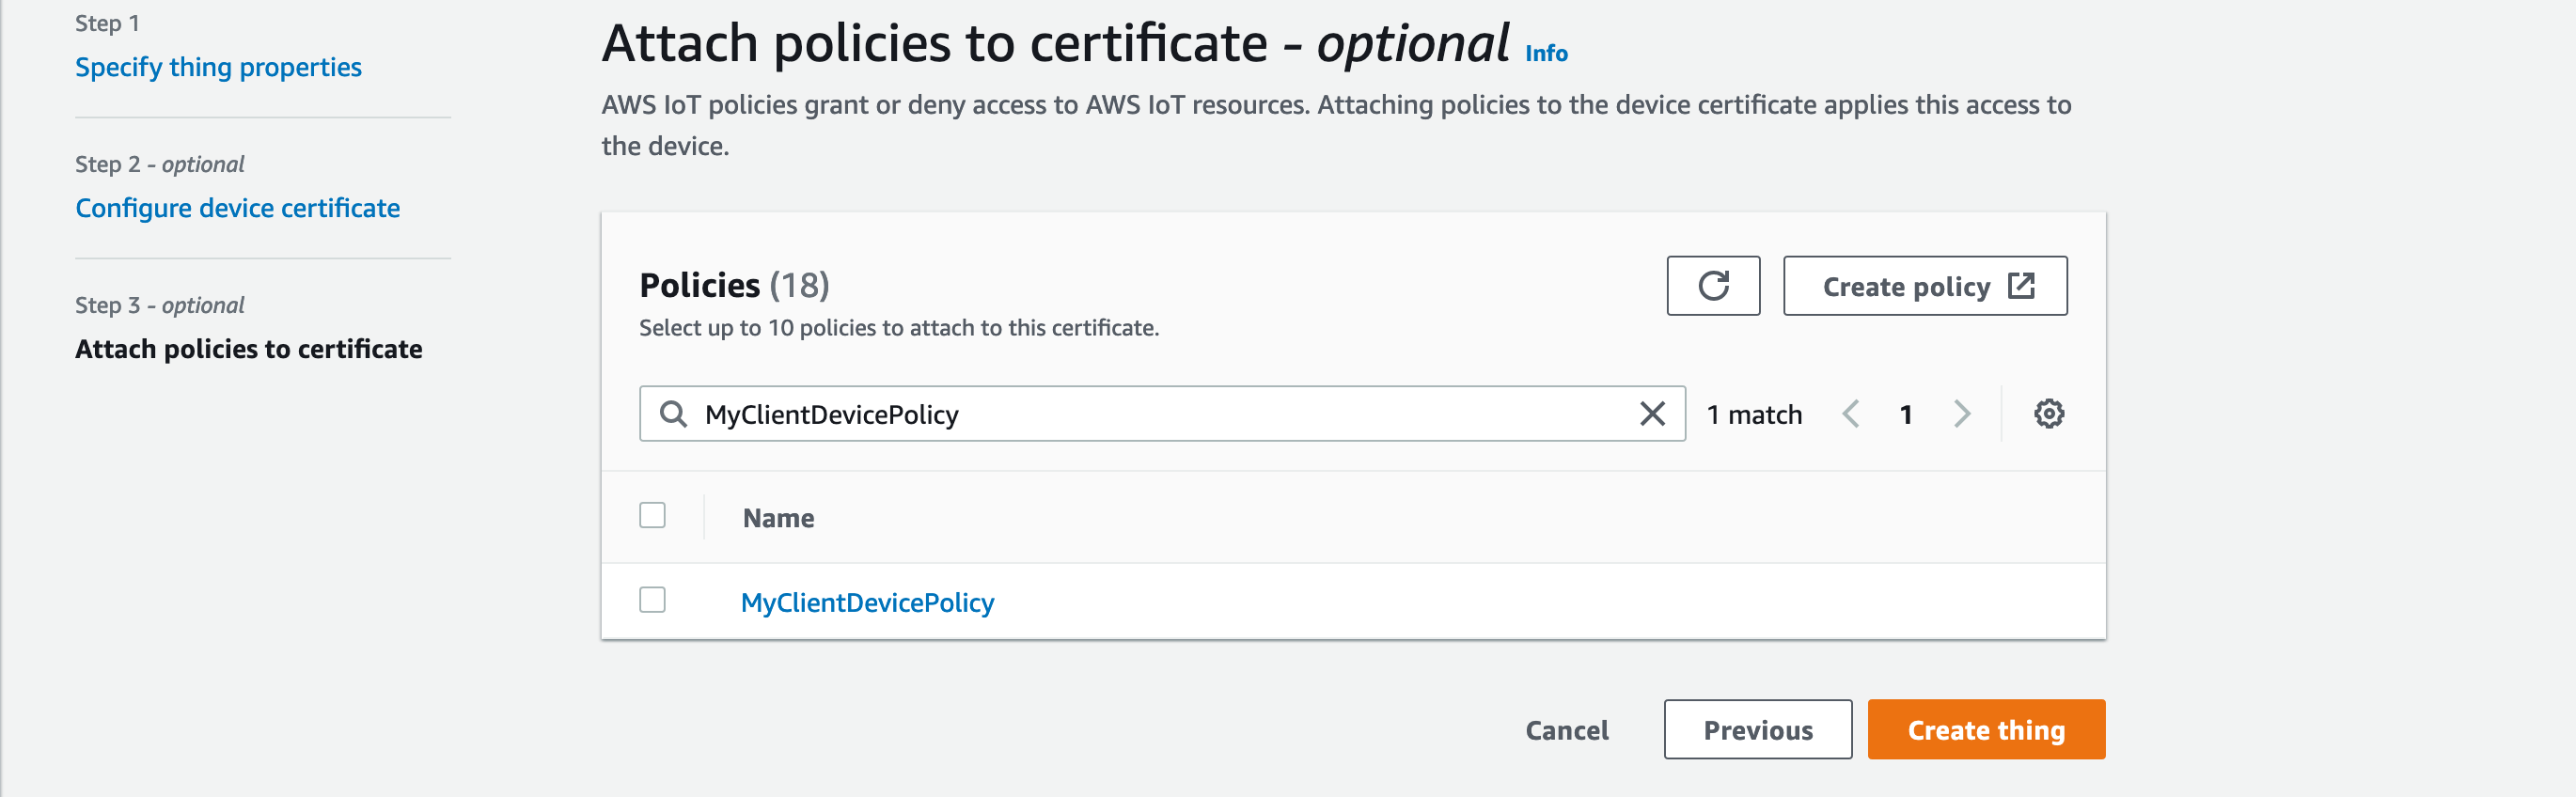
Create thing.
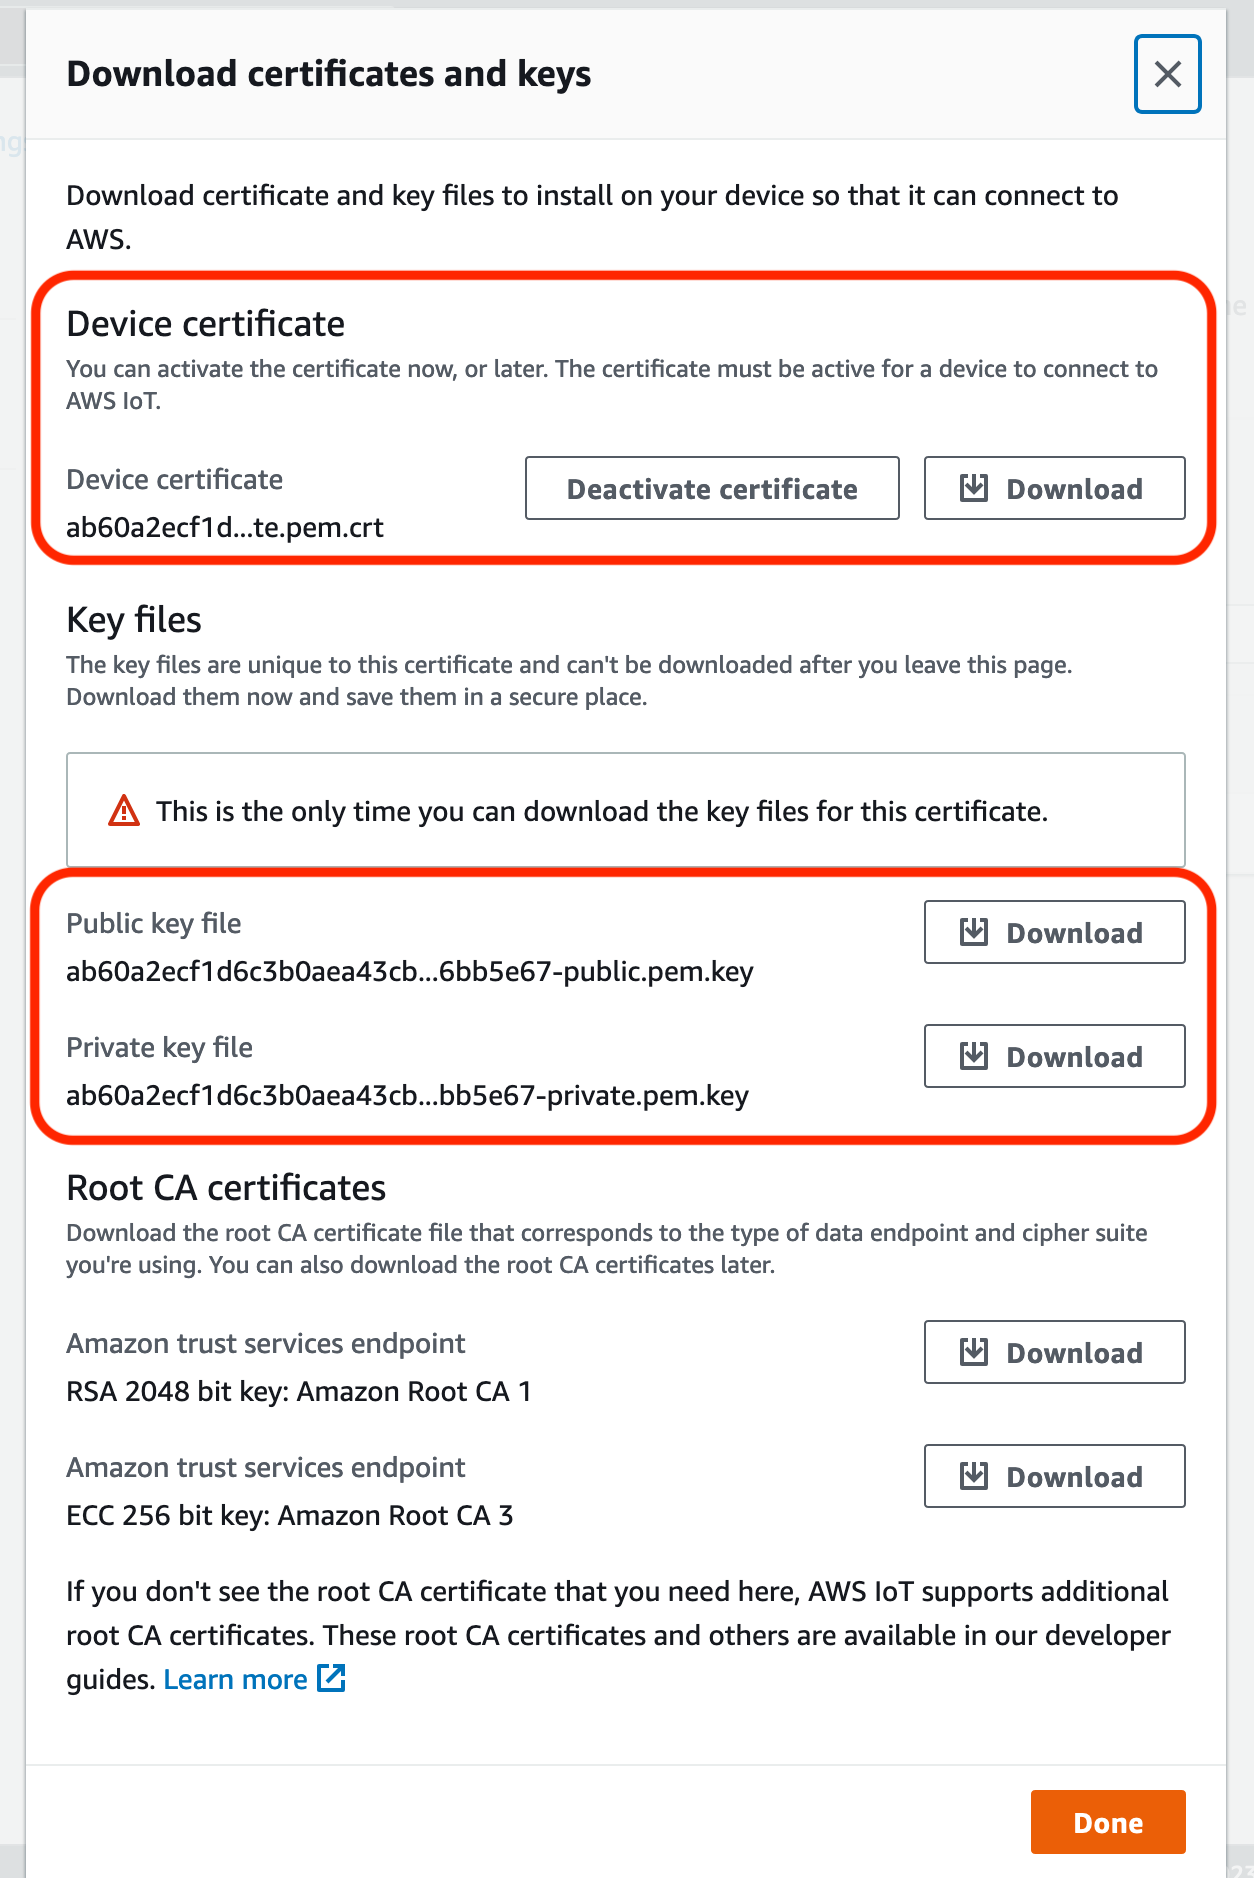
Make sure to download the private and device certificate and since you are forced to grab the public one as well, do it.
Send Messages
Finally! We have all components in place and set up to send messages to the broker, over the bridge to IoT Core (That is now the Raspberry Pi).
Coffee Time!

Create a folder on your laptop, call it iot.
Inside that iot folder create another folder called certs.
Place your device certificate and private certificate inside certs. To make your life easier, remove the random string from the name of the certificate.
Now you need the CA certificate from the core device. You can find that on your Raspberry Pi under: /greengrass/v2/work/aws.greengrass.clientdevices.Auth/ca.pem
The simplest way to get this certificate: Use the following command: sudo cat /greengrass/v2/work/aws.greengrass.clientdevices.Auth/ca.pem
copy the output into a new file in your certs folder and call it ca.pem. Make sure it starts with -----BEGIN CERTIFICATE---- and ends with -----END CERTIFICATE-----.
-----BEGIN CERTIFICATE-----
Random looking stuff, definitely not coffee
-----END CERTIFICATE-----
Now create a file called message.py inside the iot.
paste in the following code inside it. Replace the placeholder in line 6 with your RaspberryPis local IP address and if you picked another name for your thing name, change that on line 33 - paho.Client(client_id="MyClientDevice1").
import paho.mqtt.client as paho
from time import sleep
from random import uniform
import datetime

broker="<RaspberryPi-Local-IP>"
port=8883


cert_folder = "certs"
ca = f"{cert_folder}/ca.pem"
cert = f"{cert_folder}/certificate.pem.crt"
private = f"{cert_folder}/private.pem.key"


connflag = False

def on_connect(client, userdata, flags, rc):
    global connflag
    if rc==0:
        connflag = True
        print("connected OK Returned code=",rc)
    else:
        print("Bad connection Returned code=",rc)


def on_publish(client,userdata,result):

    return print("data published \n")


mqttc= paho.Client(client_id="MyClientDevice1")
mqttc.on_connect = on_connect
mqttc.on_publish = on_publish


mqttc.tls_set(
    ca_certs=ca,
    certfile=cert,
    keyfile=private
)

mqttc.connect(broker,port)

mqttc.loop_start()

while 1==1:
    sleep(0.5)
    if connflag == True:
        now = datetime.datetime.now().timestamp()
        mqttc.publish("clients/test/hello/world", str({"time": now}), qos=1)
        print(f"msg sent: {now}")
    else:
        print("waiting for connection...")
This python script connects to the local MQTT Broker running on your Pi and is sending messages with the payload of the current time on the topic clients/test/hello/world.
You should have a folder structure like this:
├── certs
│   ├── ca.pem
│   ├── certificate.pem.crt
│   └── private.pem.key
└── message.py
Create the virtual environment with virtualenv and install paho, this is a MQTT Python client:
pip install paho-mqtt
Finally you can run the script with:
python message.py
Head over to the management console and navigate to the MQTT test client. Under Subscribe, type in the topic clients/test/hello/world click Subscribe and now you should see all the messages coming in.
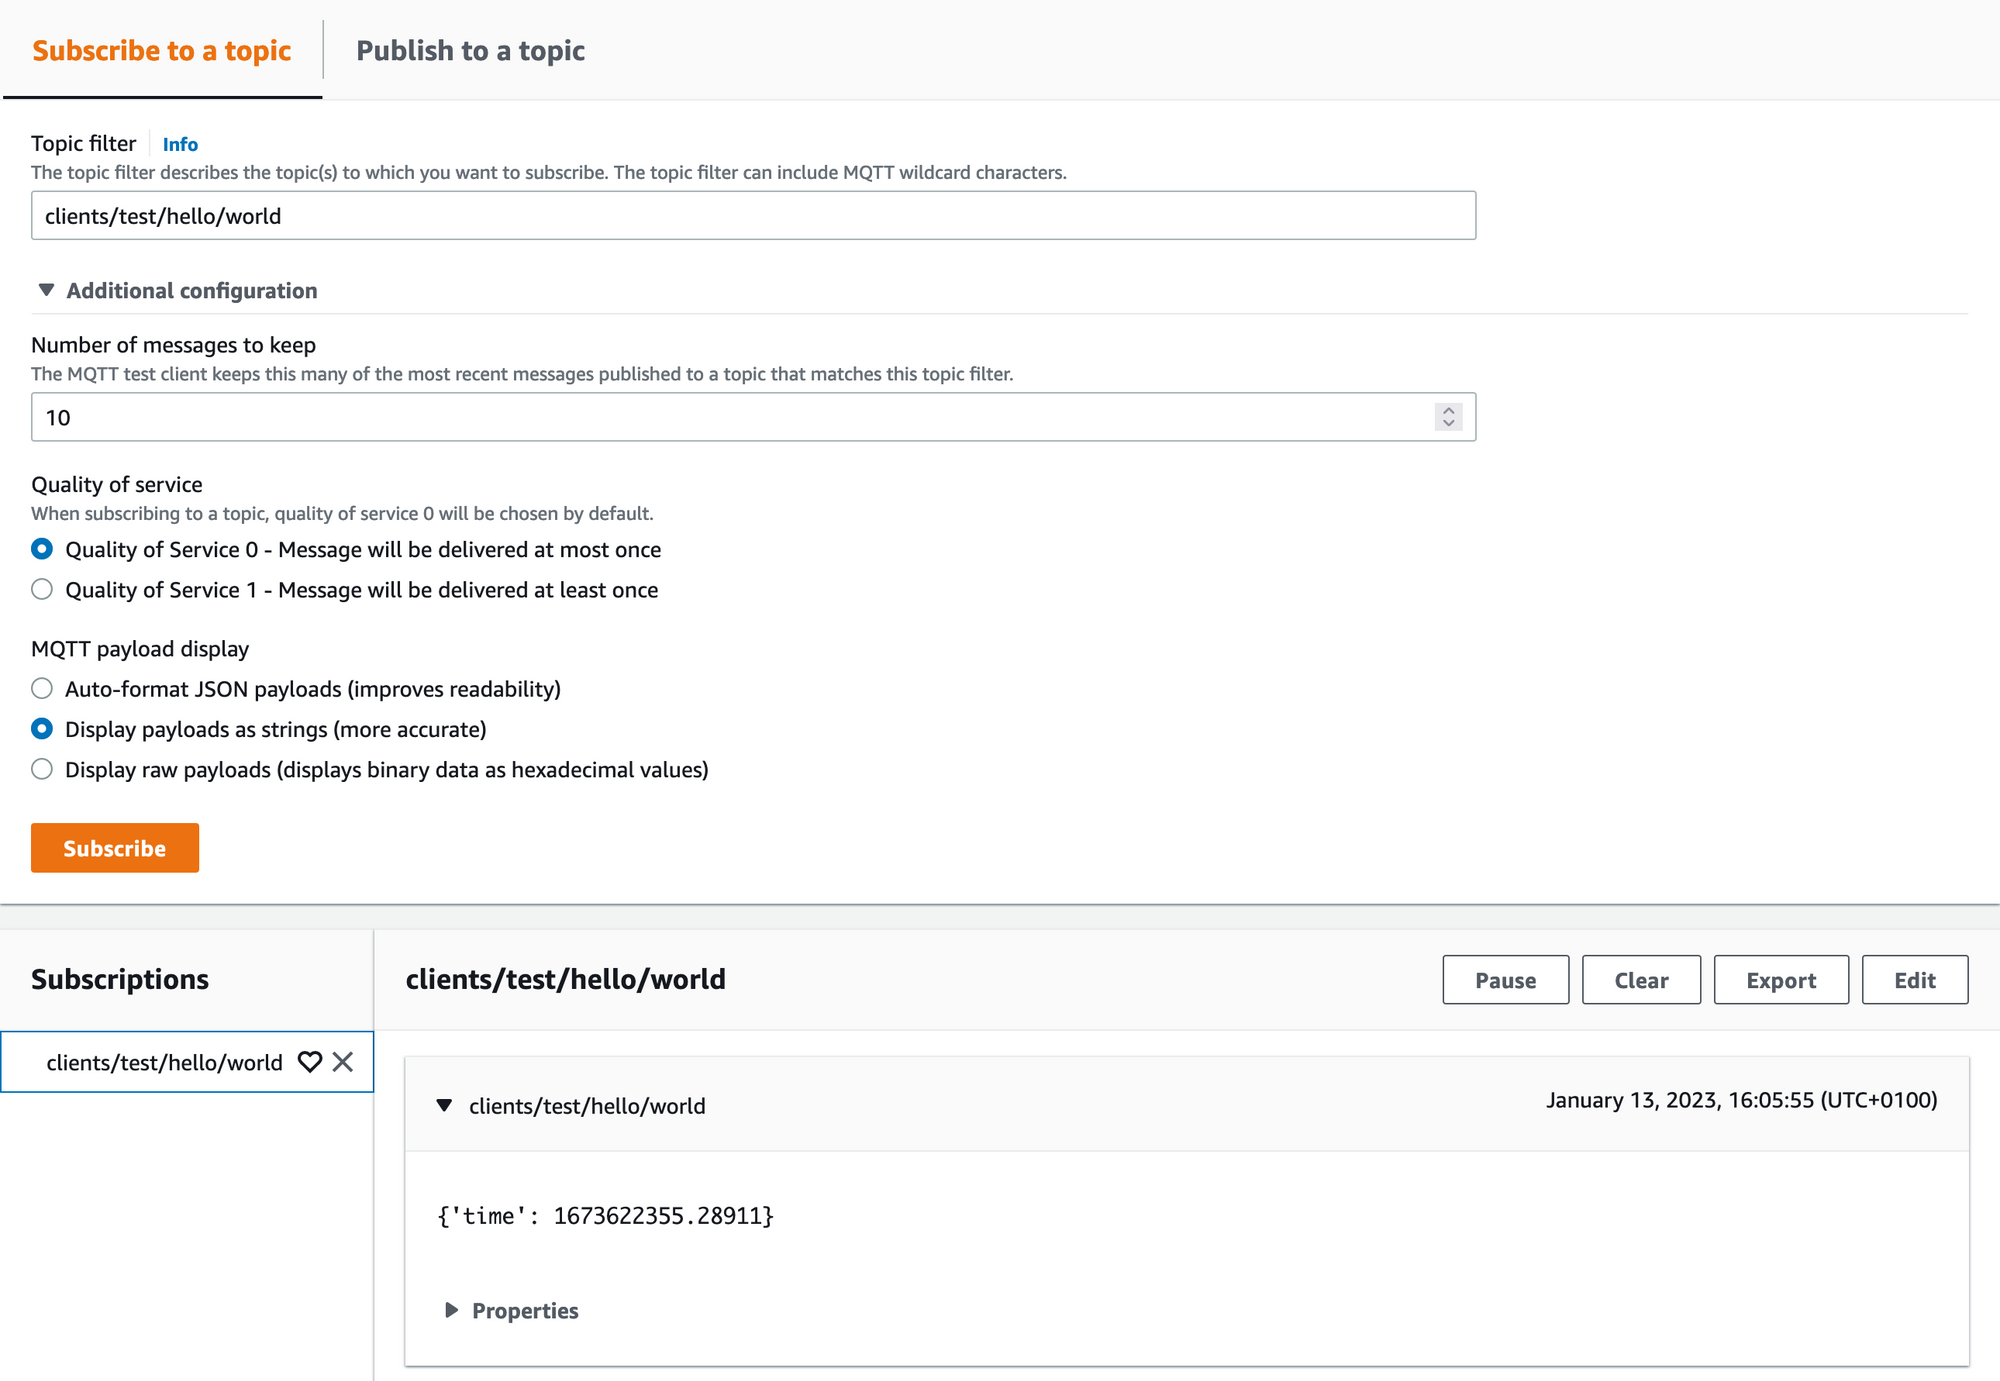
If you still have coffee left, drink it up, like the champ you are!

Conclusion
As you have seen Greengrass allows for local device-to-device communication and processing of data without the need for a cloud connection. This can be useful in a variety of different use cases, as it allows for faster and more efficient data processing, as well as the ability to continue functioning in the event of a network outage. One potential use case for a Greengrass-enabled IoT device is in industrial settings, such as factories or warehouses. These environments often have a large number of connected devices that need to communicate with each other and with a central control system. Greengrass allows for these devices to communicate with each other and make decisions locally, without having to send all data to the cloud for processing. This can lead to faster decision-making and more efficient use of resources. Another potential use case is in the field of smart homes, autonomous vehicles and Agriculture.
From this setup you can make the system even more efficient by deploying Lambda functions on the Greengrass Core Device. Exactly! Deploying Lambda functions on a Greengrass-enabled IoT device can greatly improve the cost and performance of the device. Local Lambda. Sounds great? That's because it is. Deployed Lambda functions can be run on the Greengrass core device, allowing for local processing of data without the need for a cloud connection. This can lead to significant cost savings, as data doesn't need to be sent to the cloud for processing, and can also result in faster and more efficient data processing. Additionally, by deploying Lambda functions on the Greengrass core device, it allows for more complex logic to be implemented locally, such as image or video analysis, machine learning, or data filtering. This can be especially useful in resource-constrained environments, such as on edge devices, as it reduces the amount of data that needs to be sent to the cloud for processing.
In terms of security, using a VPN or Direct Connect connection to the cloud can enhance the security of the Greengrass-enabled IoT device even further. A VPN (Virtual Private Network) allows for a secure connection to the cloud, and can help protect against unauthorized access to the device. In summary, Greengrass is a powerful IoT platform that can provide many benefits, including faster and more efficient data processing, the ability to function in the event of a network outage, and the ability to make decisions locally, without the need for a constant connection to the cloud. This makes it a valuable tool in a wide range of use cases, including industrial settings, smart homes, autonomous vehicles and Agriculture. Additionally, deploying Lambda functions and using a VPN or Direct Connect connection can improve cost, performance and security of the device.