Secure User Authentication with Next.js, NextAuth.js, and AWS Cognito
Introduction
For one of our projects we have decided to use Next.js 13. As a backend developer, you can imagine how excited I am to work on this frontend. After reading through the docs, I decided to get started with a tutorial on YouTube.
From the NextJS tutorials that I watched, I got two takeaways:
- All tutorials that don't cover NextJS 13 are outdated and cannot be used.
- All of the tutorials I watched were just video guidelines for the documentation.
Great. So here I am, with no tutorial on how to set up NextJS 13 with AWS Cognito. Which means:

Overview
Here is a diagram of what we're going to build:
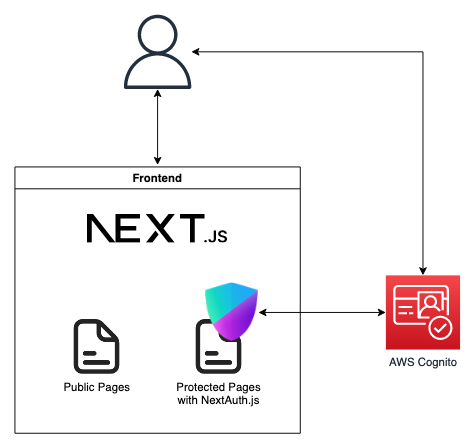
Note that the goal of this tutorial is not to give you a fully-fledged full-stack app, but rather a baseline to help you get started with an app that has secure authentication in place.
As you can see from the diagram, we're going to use the following tools:
- NextJS 13 (experimental app directory)
- Next Auth
- AWS Cognito
- AWS SES
Since you're here because you explicitly searched for this setup, I won't explain what those services are.
You can find the repository here.
So without further ado, let's get this setup started!
Disclaimer: Some frontend might got hurt during the process. I'm sorry.

Actually not.
Setting Up AWS
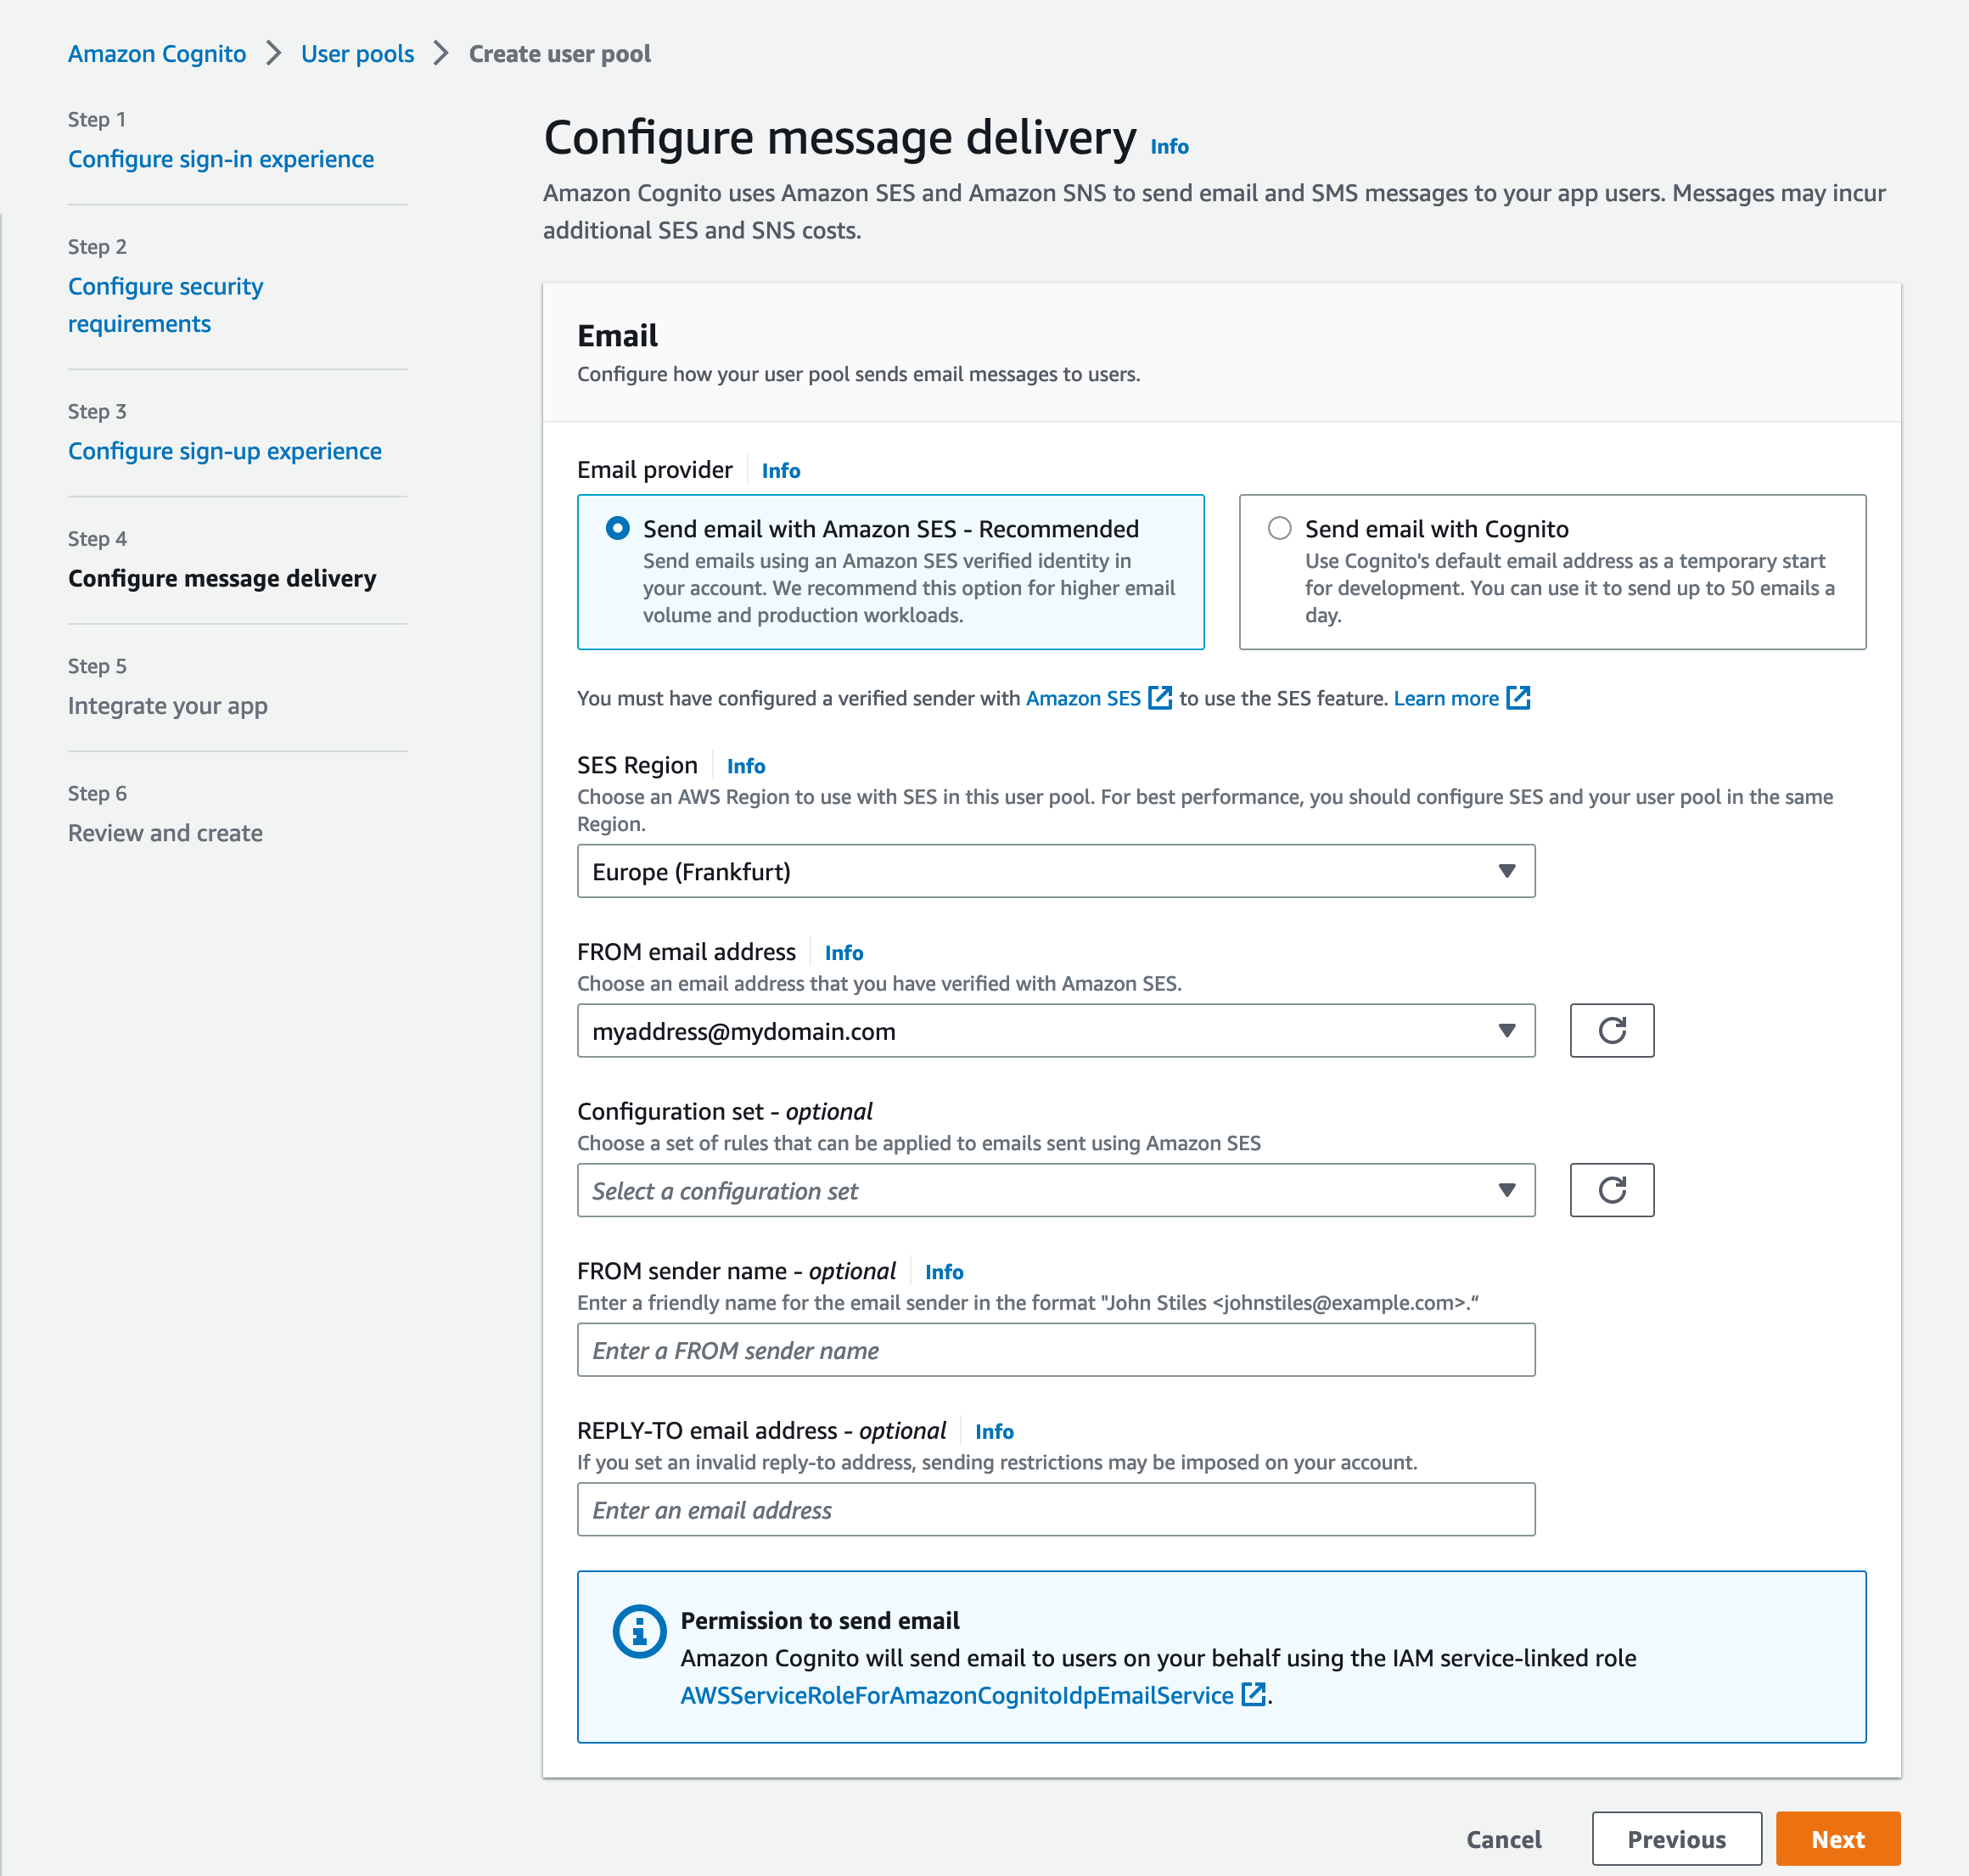
You probably want to send out confirmation e-mails to your users. For this you've got two options. Cognito itself or SES. The difference between these two options is the state of your application. If you're just testing or still developing. Skip the SES setup. Just pick Send email with Cognito in Step 4 of setting up Cognito and you are good to go. For a production environment use SES. It's not rocket science.
Setting up SES
Login into your AWS Account and head over to Amazon SES.
On the left side, go to Verified identities and create a new identity.
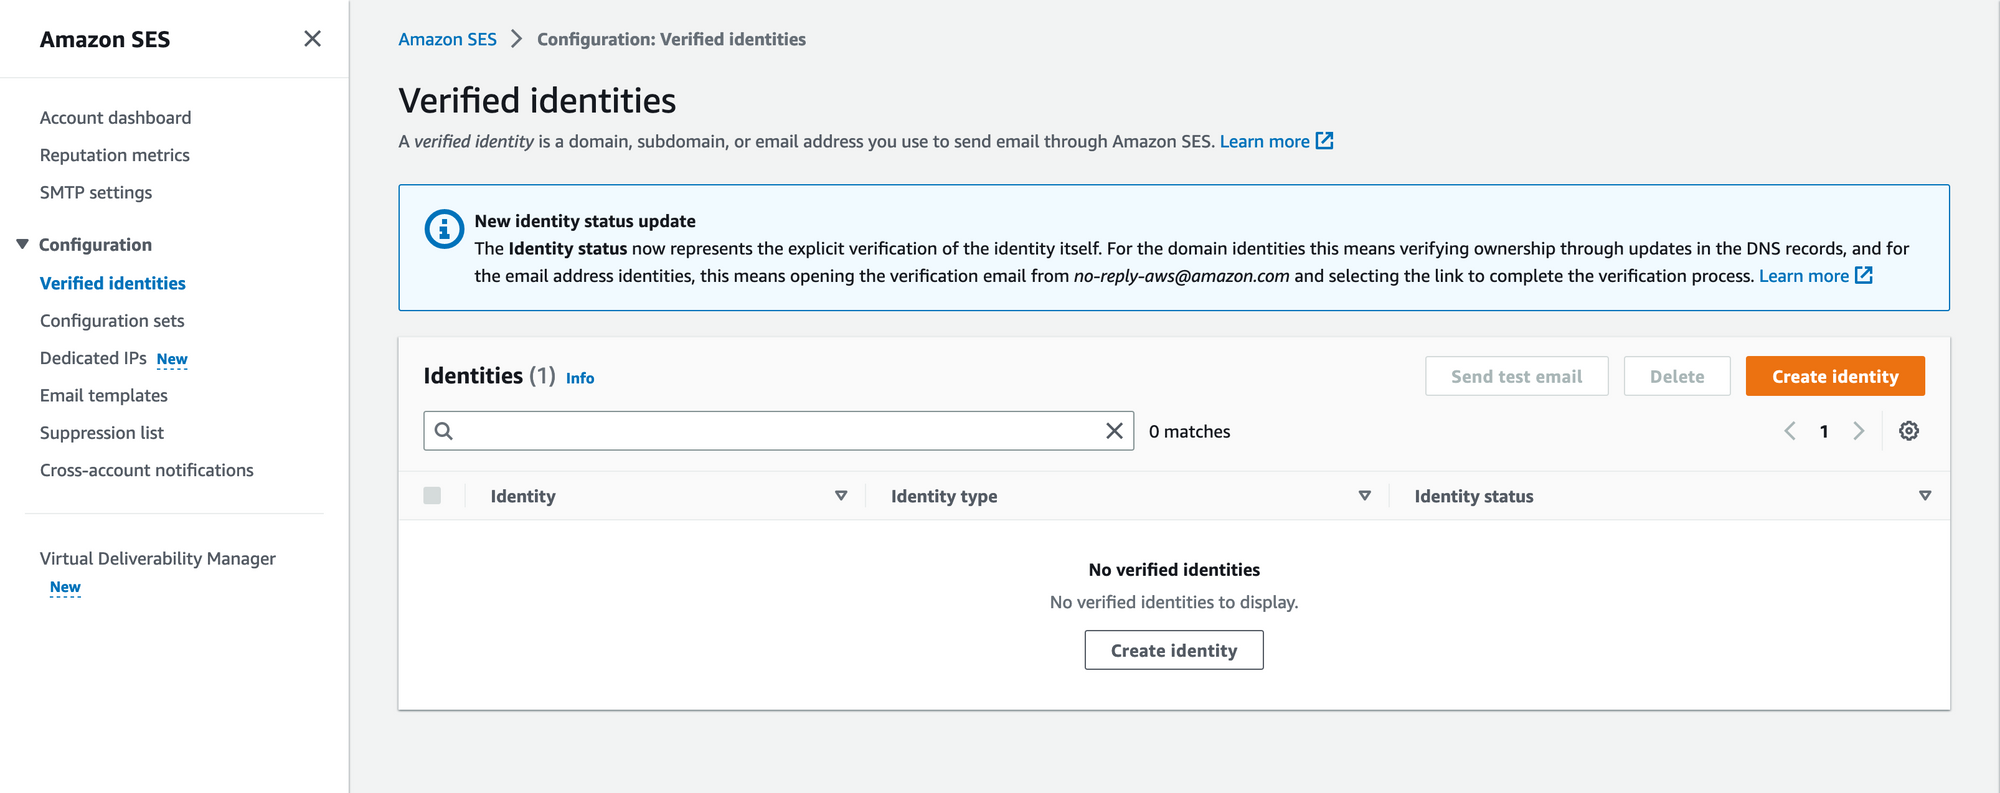
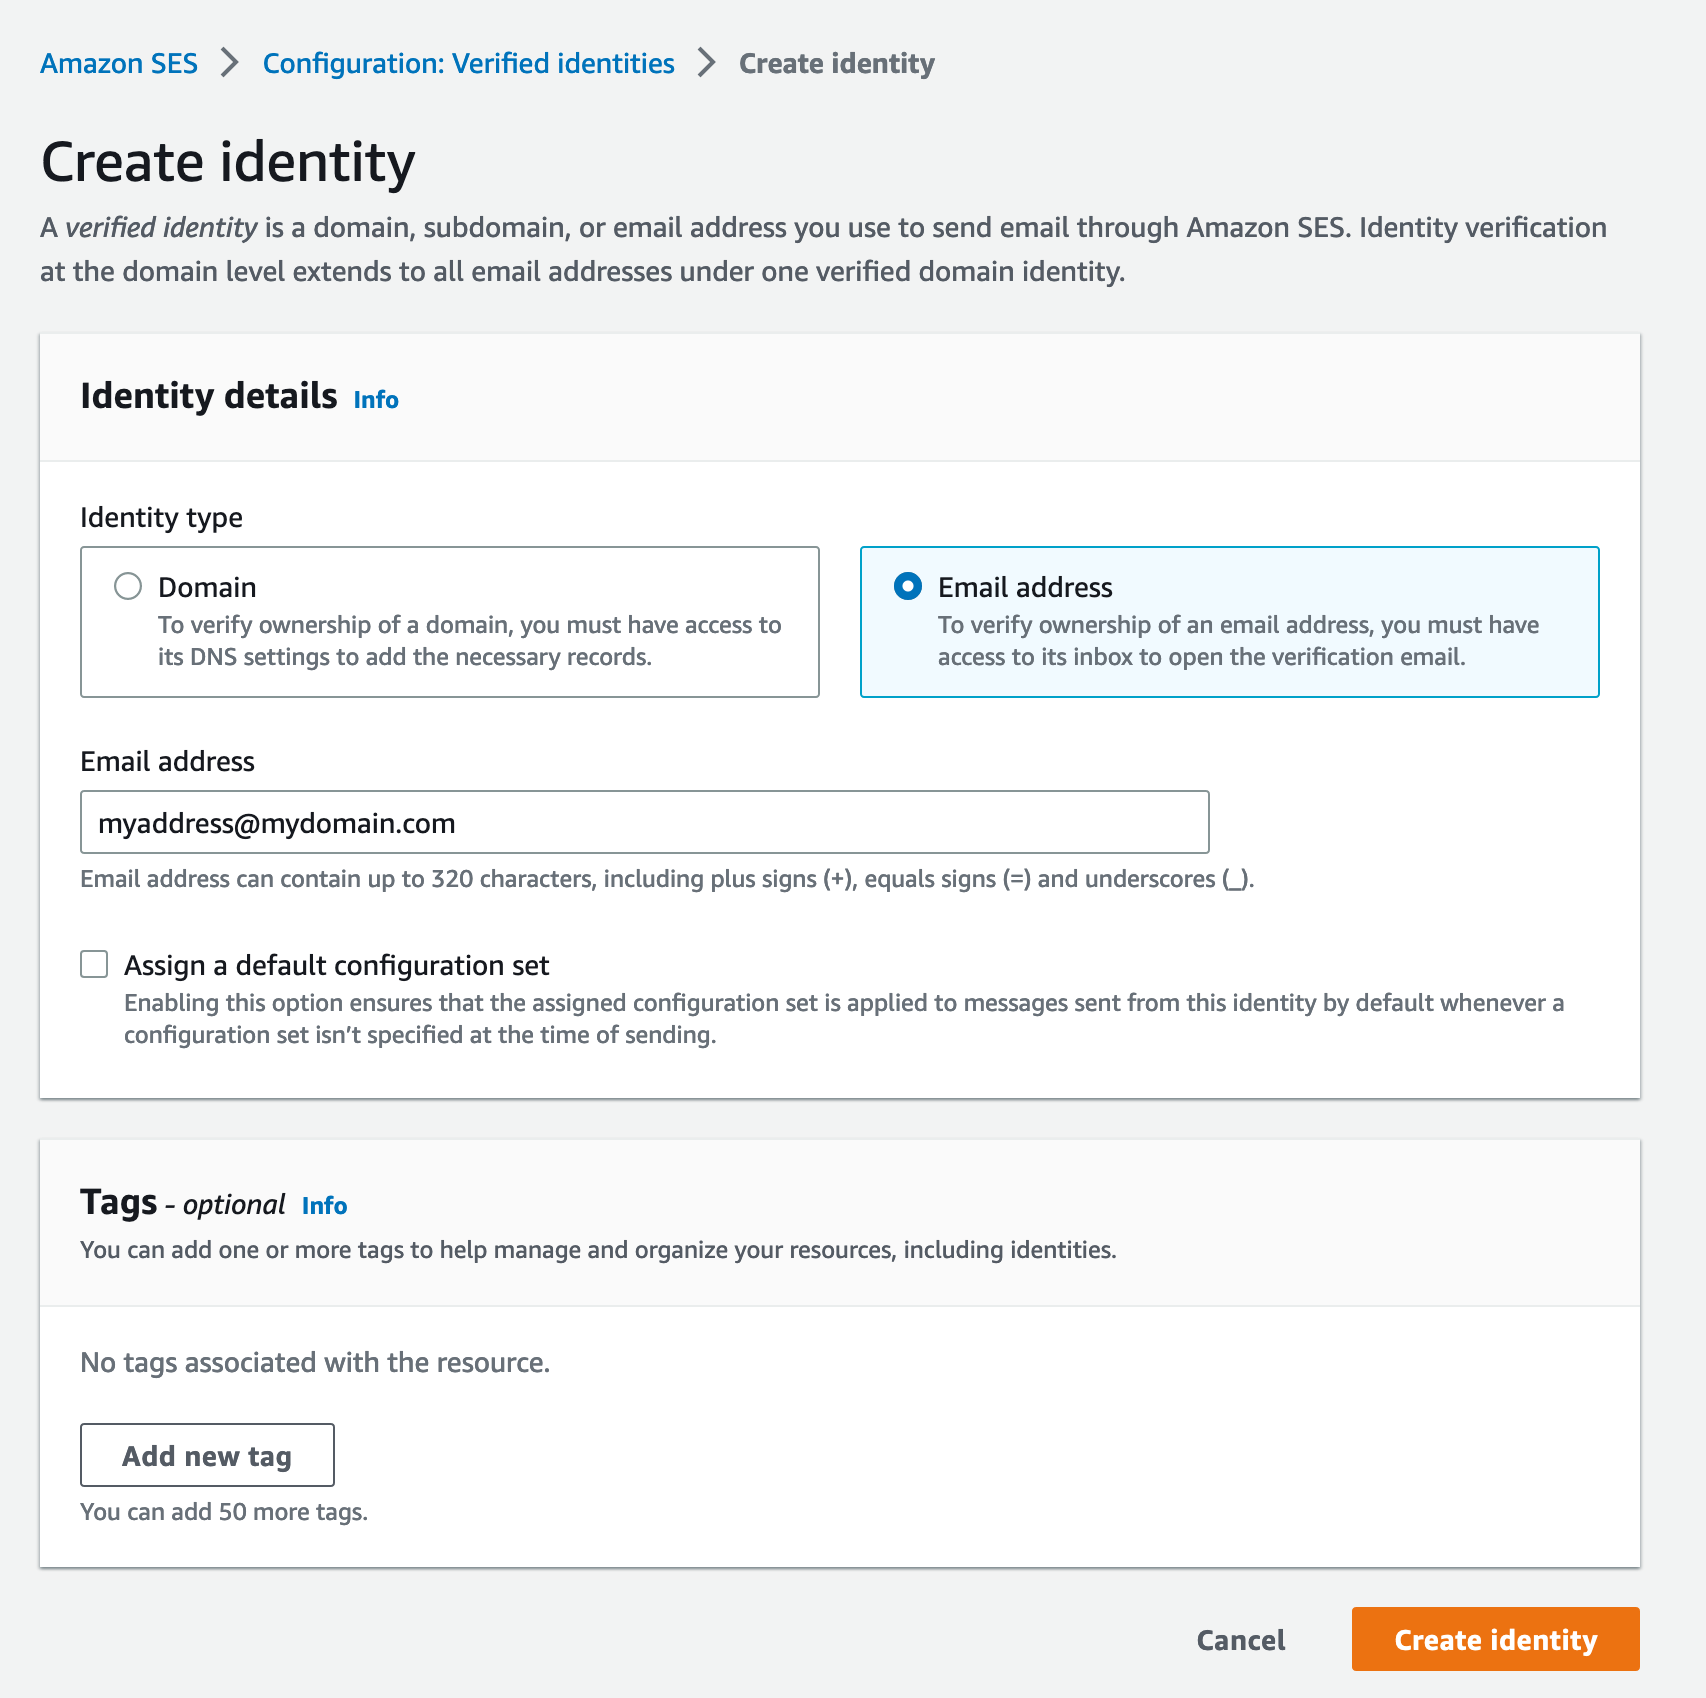
Pick E-Mail and use an address that you'd want to use for authentication-related stuff.
After you've created the identity you'll receive an e-mail from AWS to verify this address. Do it. Then you should see a nice and green checkmark. This means, you are good to go, using that address with Cognito.
Speaking of Cognito.
Setup Cognito
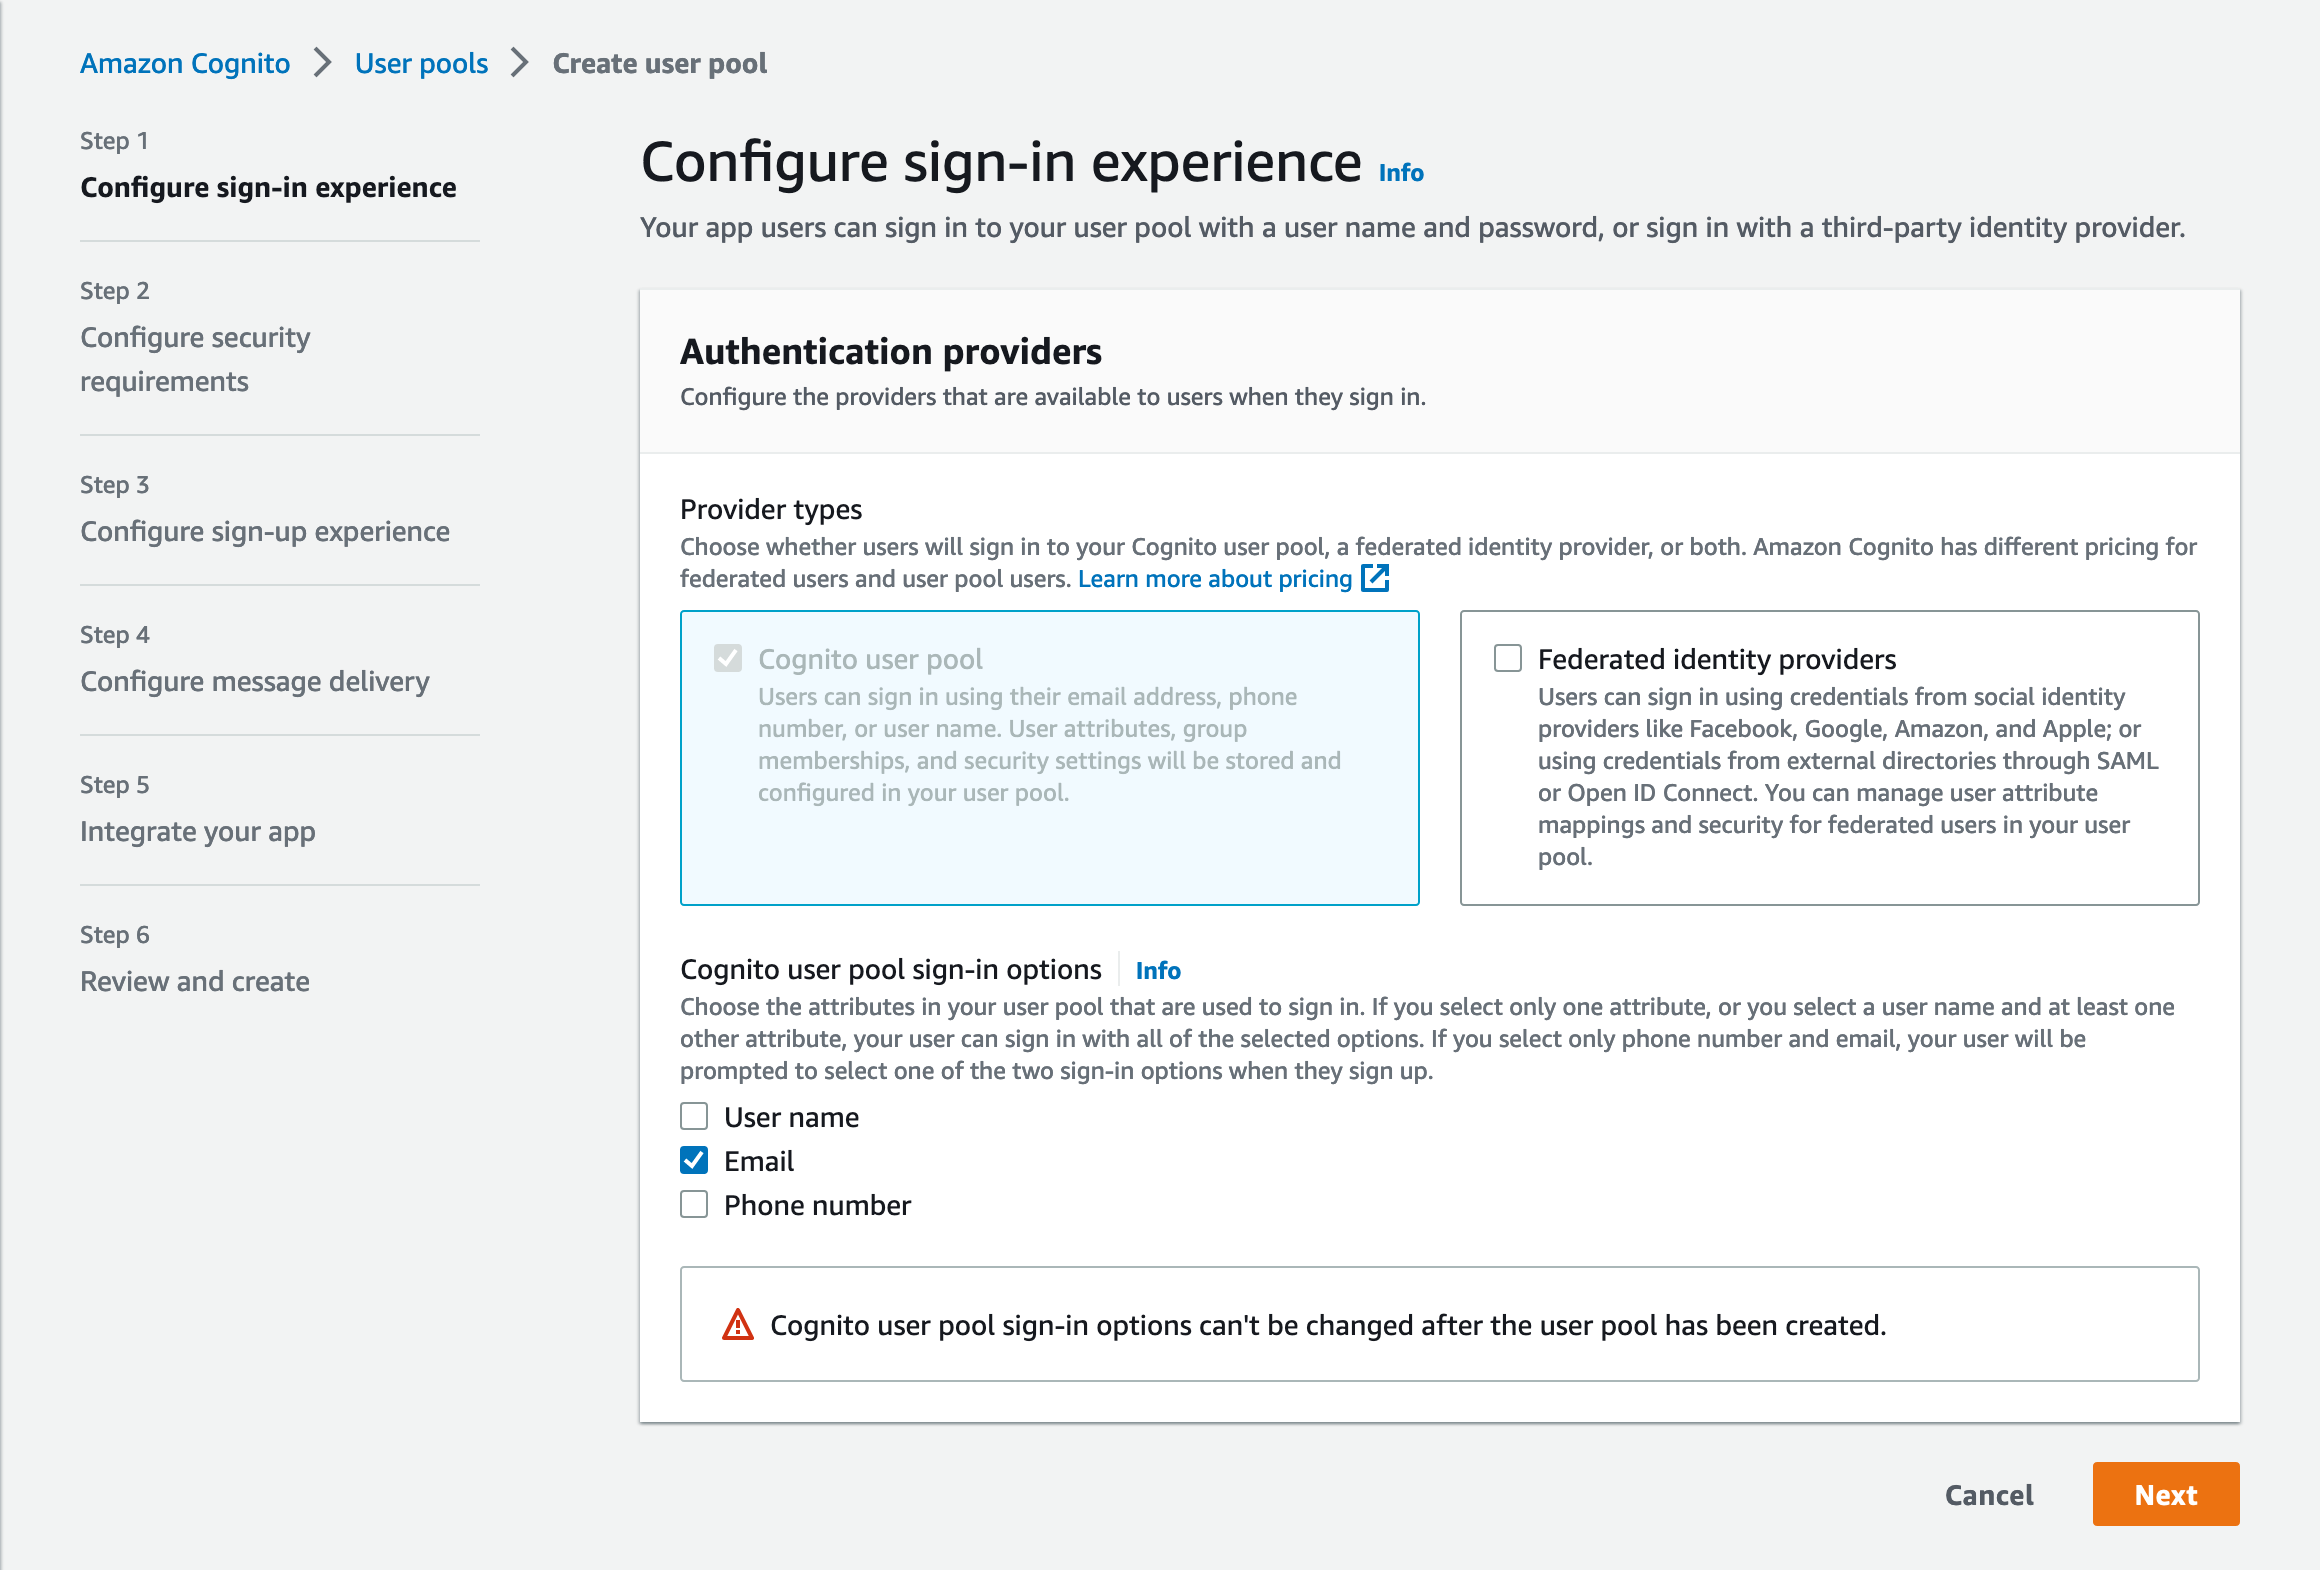
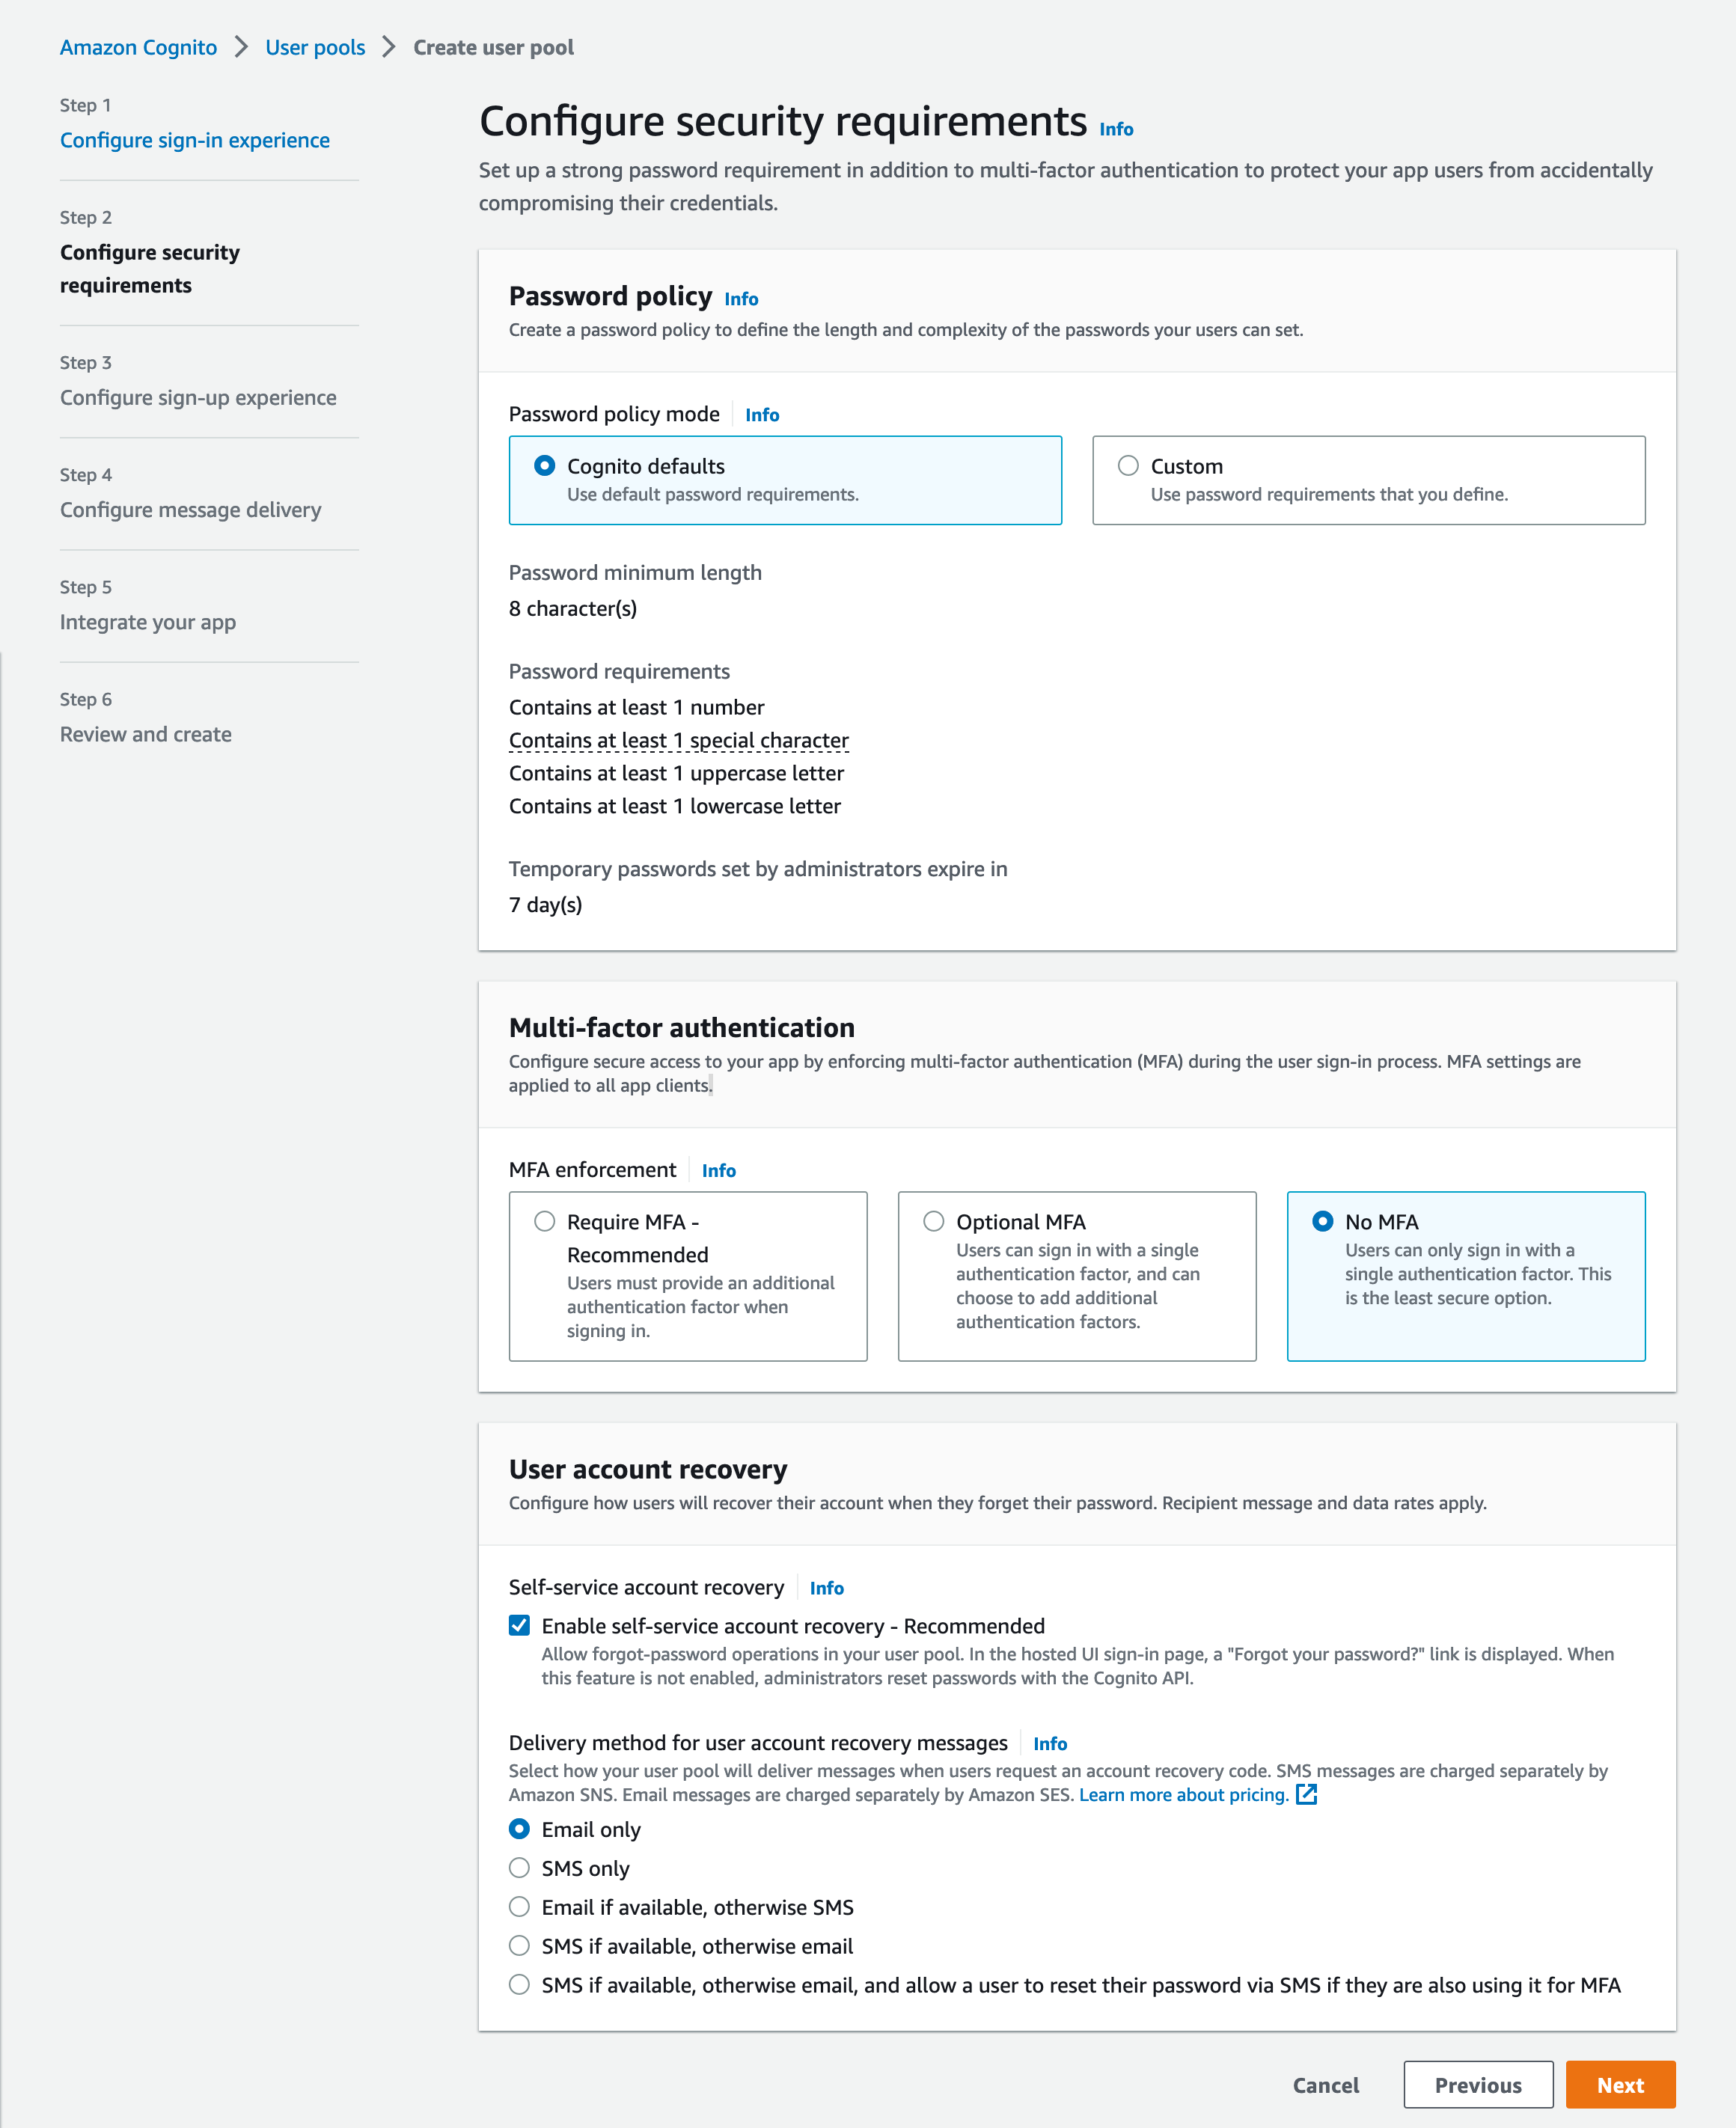
Now it is time to actually create the userpool. Head over to Cognito.
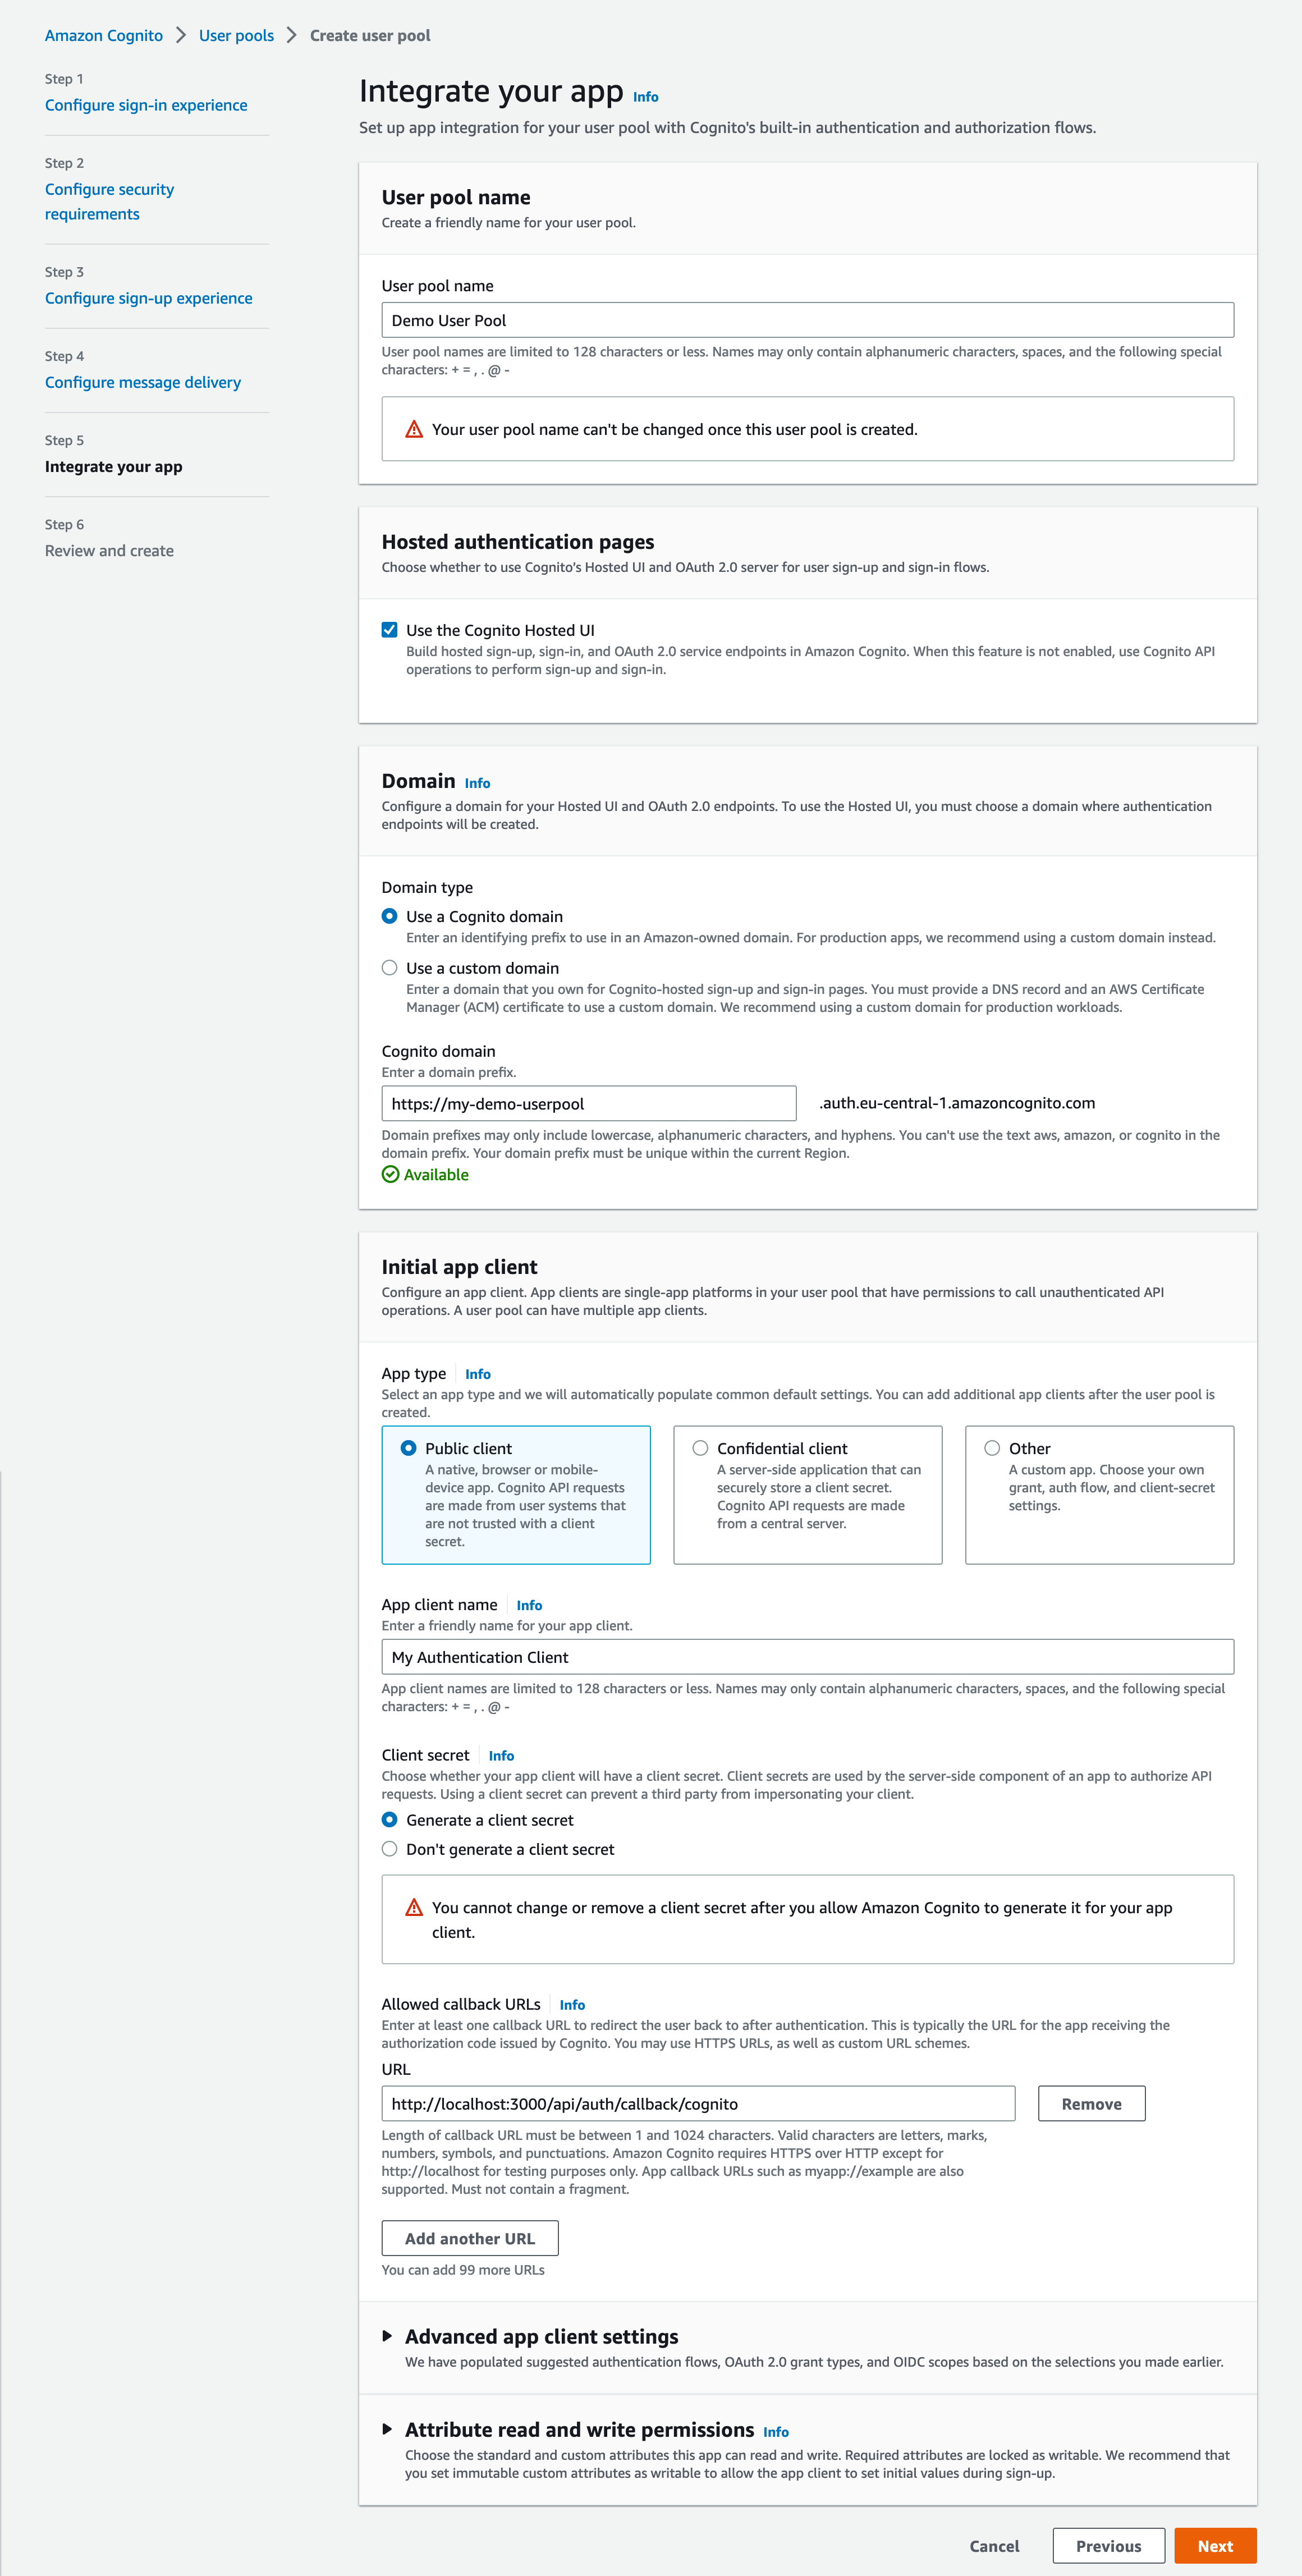
Click on Create user pool. Configure your user pool pretty much, how you need it. For the sake of simplicity, I'm going to use the bare minimum.
If you are using SES, watch out in step 4. Learn from my mistakes! Leave the
FROM sender namefield empty or use a validated e-mail address from SES. Otherwise, you'll run into issues, where Cognito won't be able to send out e-mails.

Perfect! A User pool is ready to receive users. Time to get into the fun part. The frontend. *sigh*
Integrating Next.js with NextAuth.js
Let's get this over with as quickly as possible so I can go back into my world and make queries 0.1ms faster.
If you already have a Next.js app running, skip this. I'm going to start from scratch here:
npx create-next-app@latest --experimental-app
$ npx create-next-app@latest --experimental-app
✔ What is your project named? … next-with-cognito
✔ Would you like to use TypeScript with this project? … No / Yes
✔ Would you like to use ESLint with this project? … No / Yes
✔ Would you like to use `src/` directory with this project? … No / Yes
✔ What import alias would you like configured? … @/*

...
The next step is to install all packages with npm install. As soon as this is done, start the app with npm run dev.
When visiting http://localhost:3000, we are greeted with a fancy startup page. Good, good. Now we can start working.
Setting up NextAuth.js
It's time to bring in the next player into this game: NextAuth.js. Just install it with npm install next-auth.
While this is being installed, go ahead and create a folder named /auth inside pages/api. Inside the auth folder, create a file with the following name: [...nextauth].ts (yes, square brackets!). Your path to that file should now look like this: pages/api/auth/[...nextauth].ts
Open that file and place the following content inside:
import NextAuth from "next-auth";
import CognitoProvider from "next-auth/providers/cognito";
import { NextAuthOptions } from "next-auth";

export const authOptions: NextAuthOptions = {
    // Configure one or more authentication providers
    secret: process.env.AUTH_SECRET,
    providers: [
        CognitoProvider({
            clientId: process.env.COGNITO_CLIENT_ID,
            clientSecret: process.env.COGNITO_CLIENT_SECRET,
            issuer: process.env.COGNITO_ISSUER,
        }),
    ],
};

export default NextAuth(authOptions);
Great, now TypeScript is complaining: Type 'undefined' is not assignable to type 'string'. for clientId and clientSecret. Let's fix that.
Create a file named process.d.ts in the root folder of this project. Paste this code inside:
declare namespace NodeJS {
  export interface ProcessEnv {
    COGNITO_CLIENT_ID: string
    COGNITO_CLIENT_SECRET: string
  }
}
This will tell TypeScript that our environment variables for COGNITO_CLIENT_ID and COGNITO_CLIENT_SECRET will never be undefined. Speaking of which, it's time to create them.
In the root folder, create a file named .env.local. Inside that file, you need to define the necessary variables:
AUTH_SECRET = salse_is_the_secret_ingredient
COGNITO_CLIENT_ID = YOUR_CLIENT_ID
COGNITO_CLIENT_SECRET = YOUR_CLIENT_SECRET
COGNITO_ISSUER = https://cognito-idp.<REGION>.amazonaws.com/<USER_POOL_ID>
Now, you might wonder, "Where the heck do I get these values?". Don't worry, I'll show you:
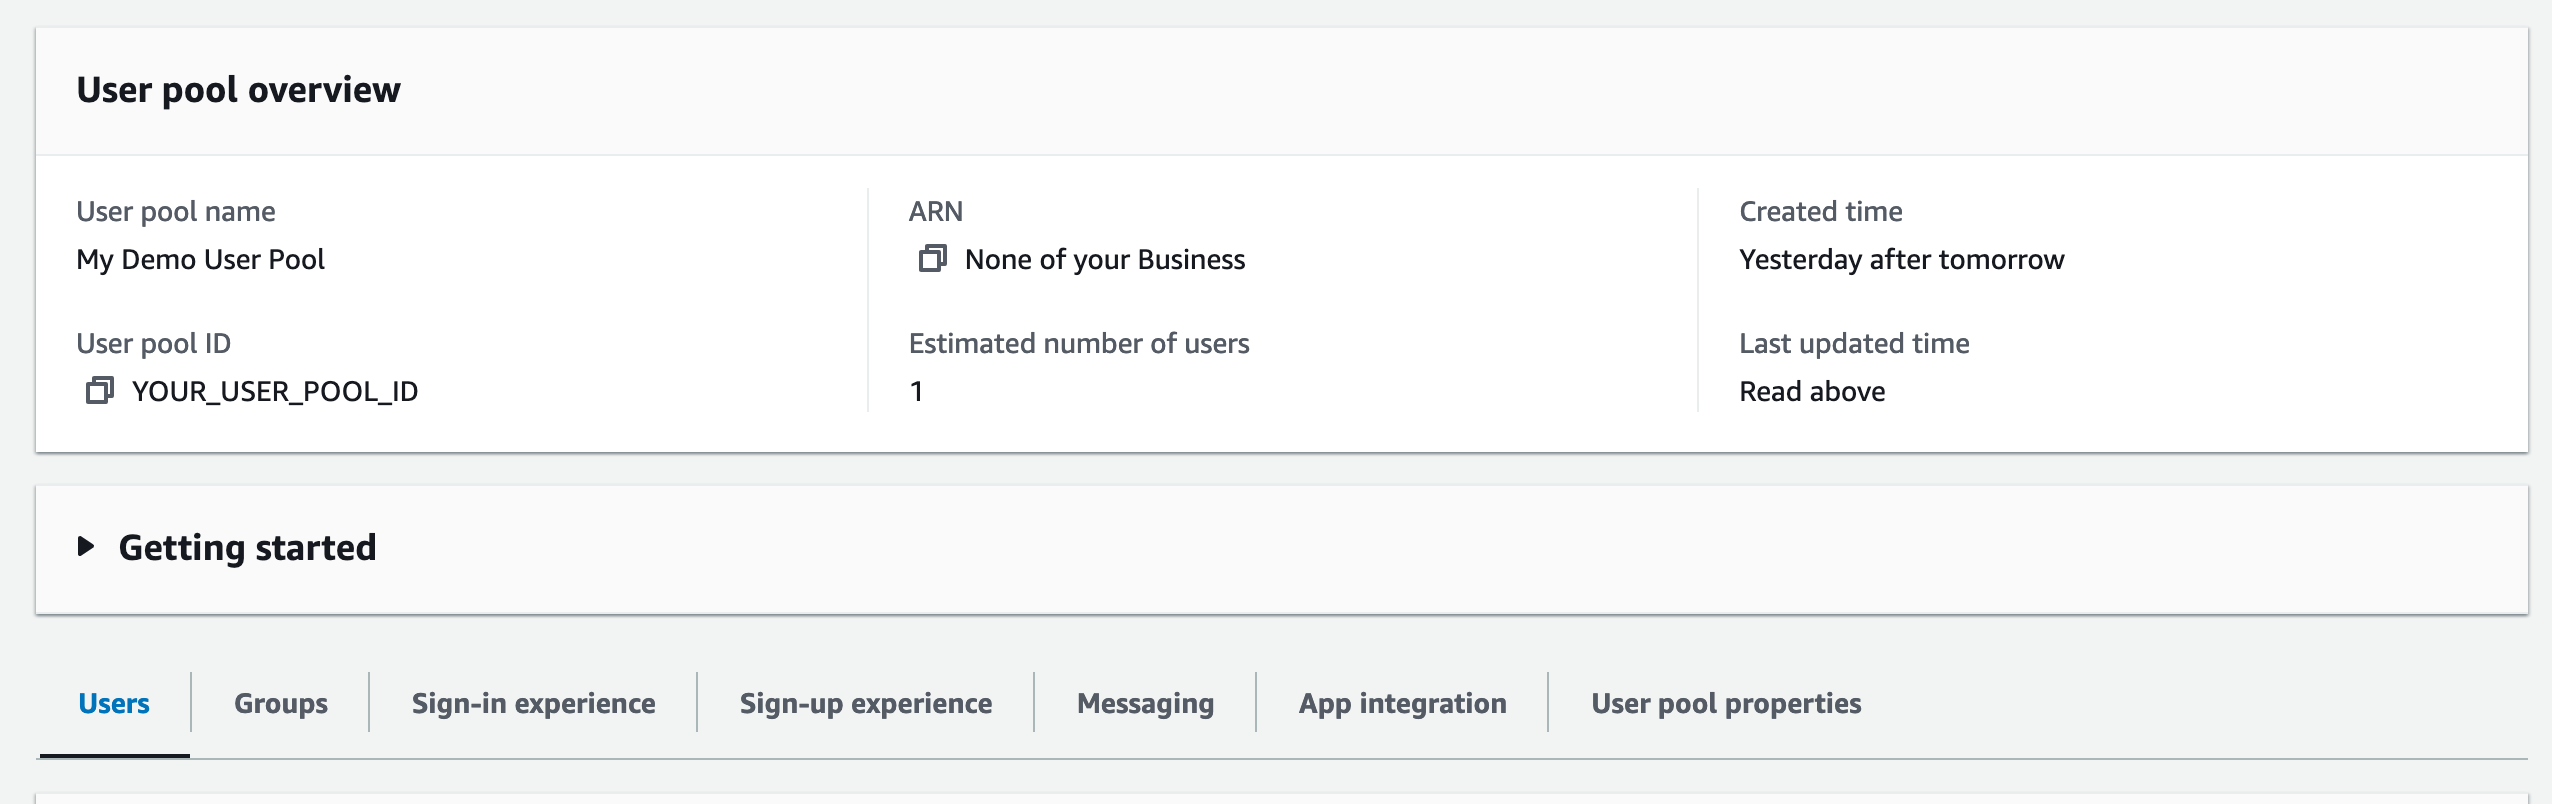
First, go back to AWS -> Cognito and select your user pool.
Here, you can directly find your User pool ID. Simply copy it and place it inside the URL. Do the same for the region where your user pool resides.
Example URL: https://cognito-idp.eu-central-1.amazonaws.com/eu-central-1_gLSJZ97lB
Next, let's go for the COGNITO_CLIENT_ID and COGNITO_CLIENT_SECRET.
Click on the App integration tab and scroll to the bottom. You will see the App client list. Great! Here, you should find your app client that was auto-created when you created the user pool.
Click on it. This is the place where you want to be:
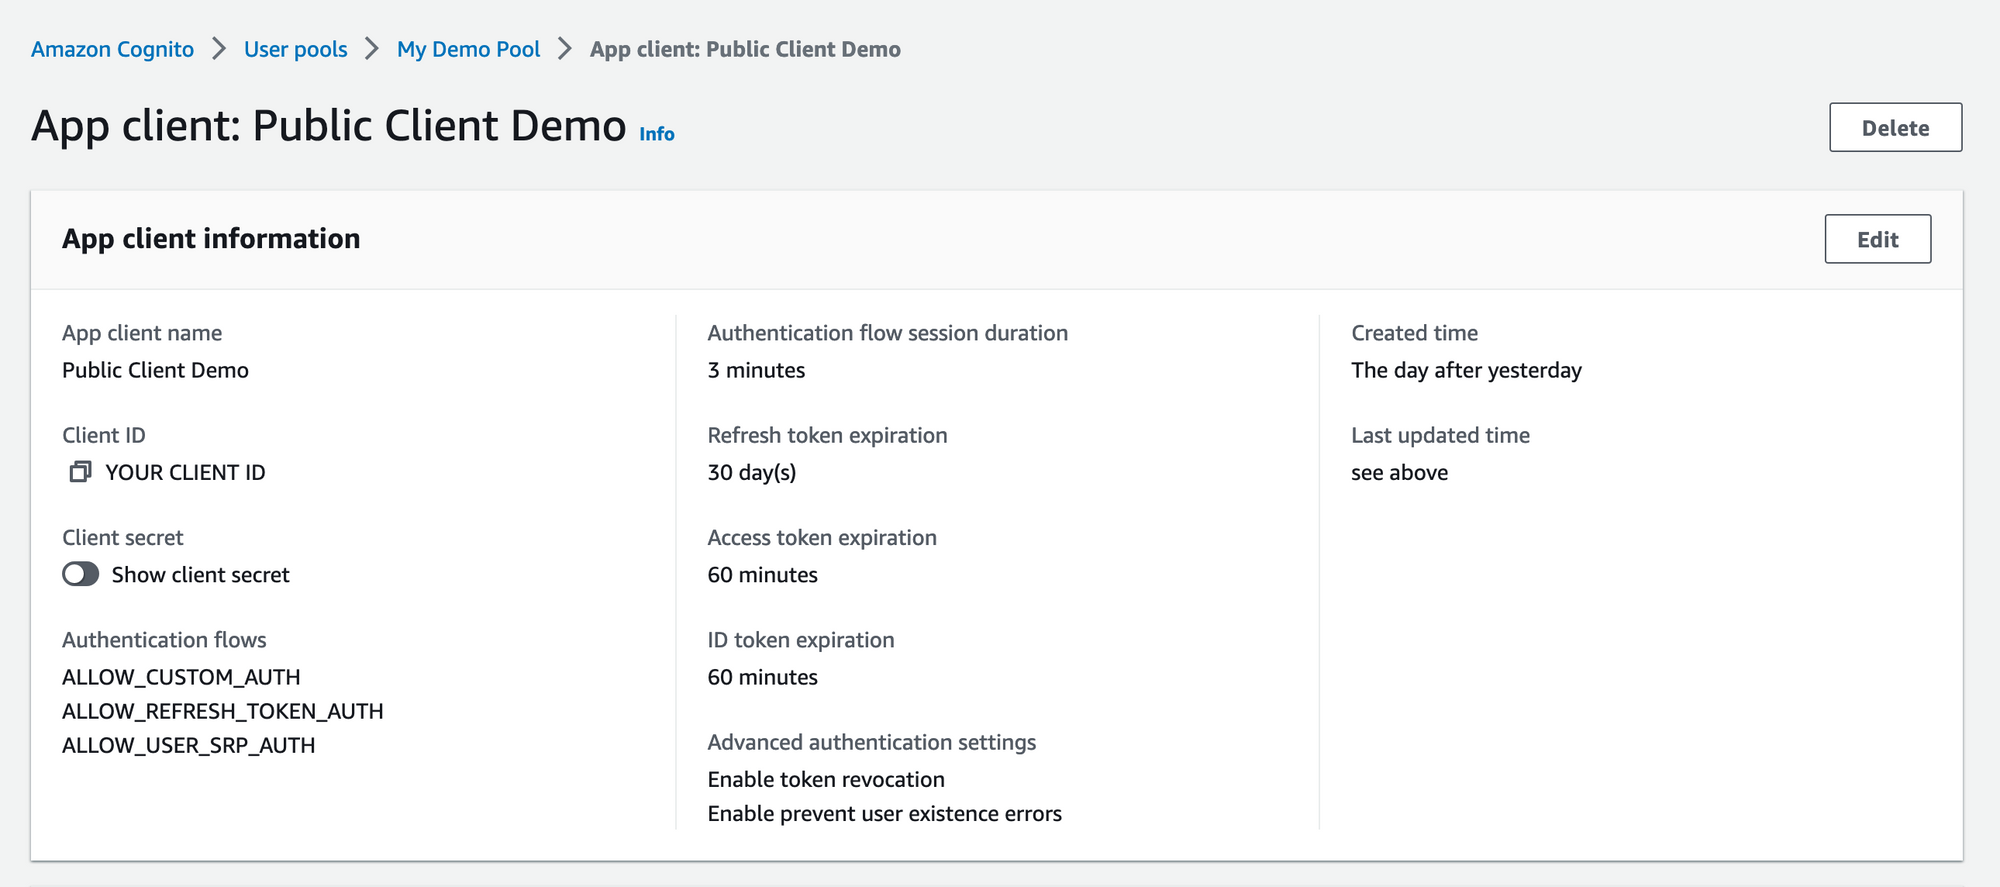
Now, simply copy your Client ID and Client Secret into your .env.local file.
That's it! You are all set and ready to go!

I guess I also need to show you how to do the rest, right? Okay, fine. Let's create a small demo with authentication and protect a view.
Implementing User Authentication
This section is extra, so enjoy it!
Create a new file components/LoginButton.tsx and paste the following code into it:
"use client";
import { Session } from "next-auth";
import { signIn, signOut } from "next-auth/react";

export default function LoginButton({ session }: { session: Session | null }) {
    if (session && session.user) {
        return (
            <>
                Signed in as {session.user.email} <br />
                <button onClick={() => signOut()}>Sign out</button>
            </>
        );
    }
    return (
        <>
            Not signed in <br />
            <button onClick={() => signIn()}>Sign in</button>
        </>
    );
}
This is a component I proudly stole from the NextAuth.js docs. The only thing I've added was the "use client"; line so it can use the onClick event here.
As you can see, this will use the session passed in and check if a valid session is provided. Cool! Now, let's prepare the rest.
Go over to app/page.tsx and add the following code:
...
import LoginButton from "@/components/LoginButton";

import { getServerSession } from "next-auth/next";
import { authOptions } from "pages/api/auth/[...nextauth]";

export default function Home() {
  const session = await getServerSession(authOptions);
    return (
        <main className={styles.main}>
            <div style={{ border: "2px solid red", padding: "10px" }}>
                <LoginButton session={session} />
            </div>

      ...
With that highly crafted code, you can see a button that will render a Sign in or Sign out, depending on whether the user is signed in or not.
Just click "sign in", "register", and see your email address showing up.
That's all. Use the getServerSession function in every layout you like and show the desired content accordingly. Your imagination is the limit!
Conclusion
As a backend developer, I was excited (🙃) to work on a frontend project using Next.js 13. Realizing that most of the tutorials were outdated and useless for my situation, I had to do it independently. I documented the process in this article, so you don't have to go through the same struggle as I did.
The next step is up to you now. If you want to have an extra task: Count every next in this article and let me know on Twitter, how many you counted. (Ctrl+F is cheating!)
UPDATE: Thanks to Balázs Orbán, I've updated the code to make use of getServerSession
Great post, small notes.
— Balázs Orbán (@balazsorban44) March 1, 2023
The App Router (app/) is opt-in in Next.js 13, meaning that any currently available reasonably up-to-date tutorial should work.
If you are testing the app dir, try `getServerSession` instead of `SessionProvider`/`useSession`: https://t.co/n5Rq4nlhfA
This post was originally created for evoila.